
If you don't know what a checkpoint is, check out our getting started article.
There are two types of checkpoints, a full checkpoint and a partial checkpoint (also known as a delta checkpoint). This article describes how to create a full checkpoint. As the name implies, a full checkpoint is a complete copy of the master configuration. To be a bit more precise, a full checkpoint is a copy of all of the master configuration XML files.
You must have the administrator or configurator role to be able to create a full checkpoint, because users with these roles have permission to make changes to the master repository.
Manually create full checkpoint
- In the WebSphere admin console, select System administration > Extended Repository Service.
- Select Repository Checkpoints.
- Select New.
- Give your checkpoint a name and description, and select OK.
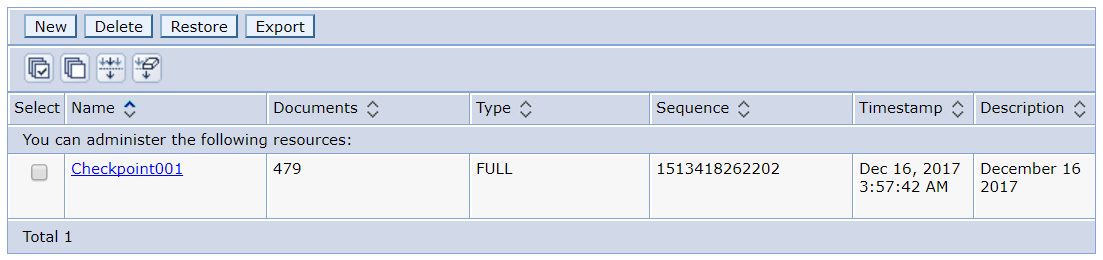
In this example, a Full Checkpoint named Checkpoint001 was created. Notice this created 479 documents. These are the files that make up the master configuration. Some of the more well known files would be serverindex.xml, security.xml, resources.xml, and so on. Full checkpoints also contain all of the applications in the cell, so a full checkpoint can be quite large if there are a large number of applications in the cell.
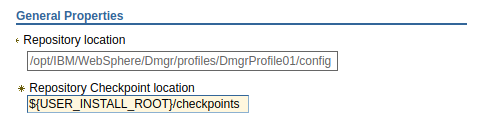
At System administration > Extended Repository Service, two directories are defined, Repository location and Repository Checkpoint location. Repository location is the directory where the checkpoint.xml file will reside. The checkpoint.xml file is also known as the metadata file. Repository Checkpoint location is where all of the files that were created by the checkpoint will reside. In this example, the 479 files would reside at ${USER_INSTALL_ROOT}/checkpoints.
Restore full checkpoint
A full checkpoint can be restored to return WebSphere to the state it was in when the checkpoint was created. In this example, selecting Checkpoint001 and then Restore will return WebSphere to the state it was in on December 16, 2017.
Once the restore has completed, you will need to sign out and then back into the web console.

Did you find this article helpful?
If so, consider buying me a coffee over at 