
Let's say you have the following files on your Terraform server.
├── required_providers.tf
├── virtual_private_clouds (directory)
│   ├── data.tf
│   ├── outputs.tf
│   ├── provider.tf
│   ├── resources.tf
required_providers.tf will almost always have this.
terraform {
  required_providers {
    aws = {
      source  = "hashicorp/aws"
    }
  }
}
Let's say provider.tf has the following. In this example, the "default" profile in /home/username/.aws/config and /home/username/.aws/credentials is being used. This assumes you have setup Terraform as described in Amazon Web Services (AWS) - Getting Started with Terraform.
provider "aws" {
  alias   = "default"
  profile = "default"
  region  = "default"
}
And resources.tf could have something like this.
resource "aws_vpc" "my-vpc" {
  cidr_block = "10.0.0.0/16"

  tags = {
    Name = "my-vpc"
  }
}
You may need to reissue the terraform init command.
~]# terraform init
Initializing the backend...
Initializing modules...
Initializing provider plugins...
Terraform has been successfully initialized!
The terraform plan command can be used to see what Terraform will try to do.
Terraform used the selected providers to generate the following execution plan. Resource actions are indicated with the following symbols:
  + create

Terraform will perform the following actions:

  # module.modules.aws_vpc.my-vpc will be created
  + resource "aws_vpc" "my-vpc" {
      + arn                                  = (known after apply)
      + cidr_block                           = "10.0.0.0/16"
      + default_network_acl_id               = (known after apply)
      + default_route_table_id               = (known after apply)
      + default_security_group_id            = (known after apply)
      + dhcp_options_id                      = (known after apply)
      + enable_classiclink                   = (known after apply)
      + enable_classiclink_dns_support       = (known after apply)
      + enable_dns_hostnames                 = (known after apply)
      + enable_dns_support                   = true
      + id                                   = (known after apply)
      + instance_tenancy                     = "default"
      + ipv6_association_id                  = (known after apply)
      + ipv6_cidr_block                      = (known after apply)
      + ipv6_cidr_block_network_border_group = (known after apply)
      + main_route_table_id                  = (known after apply)
      + owner_id                             = (known after apply)
      + tags_all                             = (known after apply)
    }

Plan: 1 to add, 0 to change, 0 to destroy.

────────────────────────────────────────────────────────────────────────────────────────────────────────────────────────────────────────────────────────────────────────────────────────────

Note: You didn't use the -out option to save this plan, so Terraform can't guarantee to take exactly these actions if you run "terraform apply" now.
By default, the terraform.tfstate file should be found in your root module directory (/usr/local/terraform/aws in this example).
- If the VPC does not exist and the terraform.tfstate file does not contain the VPC, Terraform will create the VPC.
- If the VPC exists and the terraform.tfstate file contains the VPC and a difference is found between the vpc.tf file and the terraform.tfstate file, Terraform will update the VPC.
- If the VPC exists and the terraform.tfstate file contains the VPC and the VPC is removed from the vpc.tf file, Terraform will destroy (delete) the VPC.
The terraform apply command can be used to create, update or delete the VPC.
~]# terraform apply

Terraform used the selected providers to generate the following execution plan. Resource actions are indicated with the following symbols:
  + create

Terraform will perform the following actions:

  # module.modules.aws_vpc.my-vpc will be created
  + resource "aws_vpc" "my-vpc" {
      + arn                                  = (known after apply)
      + cidr_block                           = "10.0.0.0/16"
      + default_network_acl_id               = (known after apply)
      + default_route_table_id               = (known after apply)
      + default_security_group_id            = (known after apply)
      + dhcp_options_id                      = (known after apply)
      + enable_classiclink                   = (known after apply)
      + enable_classiclink_dns_support       = (known after apply)
      + enable_dns_hostnames                 = (known after apply)
      + enable_dns_support                   = true
      + id                                   = (known after apply)
      + instance_tenancy                     = "default"
      + ipv6_association_id                  = (known after apply)
      + ipv6_cidr_block                      = (known after apply)
      + ipv6_cidr_block_network_border_group = (known after apply)
      + main_route_table_id                  = (known after apply)
      + owner_id                             = (known after apply)
      + tags_all                             = (known after apply)
    }

Plan: 1 to add, 0 to change, 0 to destroy.

Do you want to perform these actions?
  Terraform will perform the actions described above.
  Only 'yes' will be accepted to approve.

  Enter a value: yes

module.modules.aws_vpc.my-vpc: Creating...
module.modules.aws_vpc.my-vpc: Creation complete after 1s [id=vpc-03c28af7edb60f7bc]

Apply complete! Resources: 1 added, 0 changed, 0 destroyed.
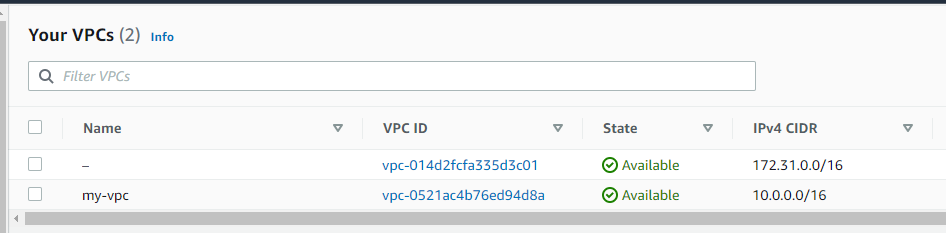
In this example, a Virtual Private Cloud (VPC) named my-vpc was created.
Did you find this article helpful?
If so, consider buying me a coffee over at 