IBM WebSphere - Update a deployment manager to use a certain version of Java

by
Jeremy Canfield |
Updated: August 18 2022
| IBM WebSphere articles
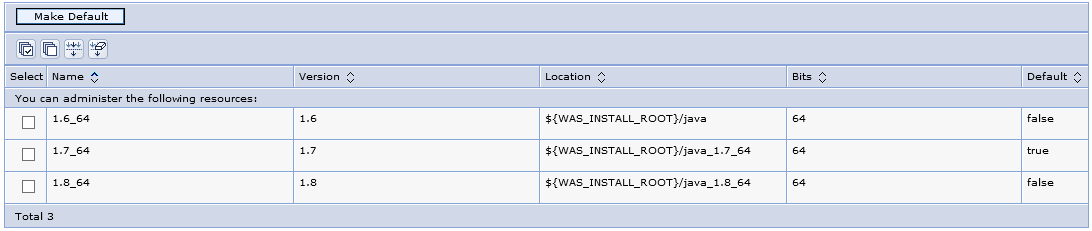
- In the WebSphere admin console, select System administration > Deployment manager.
- Select the Java SDKs.
- To update the dmgr, select one of the available Java SDKs and select Make Default.
- Select Save.
- Restart the deployment manager for this change to take effect.
In this example, the deployment manager is updated to use Java SDK version 1.7_64.
Or, the managesdk script could be used.
${WAS_INSTALL_ROOT}/bin/managesdk.sh -enableProfile -profileName Profile01 -sdkname 1.8_64 -enableServers
Or, the wsadmin.sh (Linux) or wsadmin.bat (Windows) command can be used list the version of Java being used by an application server or deployment manager. This example uses the Jython scripting language (-lang jython). In this example, getServerSDK shows that Server01 is using Java SDK 1.8_64.
~]# /opt/WebSphere/AppServer85/profiles/profile01/bin/wsadmin.sh -lang jython -c "print AdminTask.getServerSDK('[-nodeName Node01 -serverName Server01]')"
[[javahome ${JAVA_LOCATION_1.8_64}] [sdkname 1.8_64] ]
Then setServerSDK can be used to update the version of Java SDK being used by the deployment manager named dmgr01. This example uses the Jython scripting language (-lang jython).
/opt/WebSphere/AppServer85/profiles/profile01/bin/wsadmin.sh -lang jython -c "print AdminTask.setServerSDK('[-nodeName Node01 -serverName dmgr01 -sdkName 1.8_64_bundled]')"
Did you find this article helpful?
If so, consider buying me a coffee over at 