
Follow these directions to configure the IP address and subnet mask on a Cisco router or switch in IOS.
- In IOS, type enable and press enter
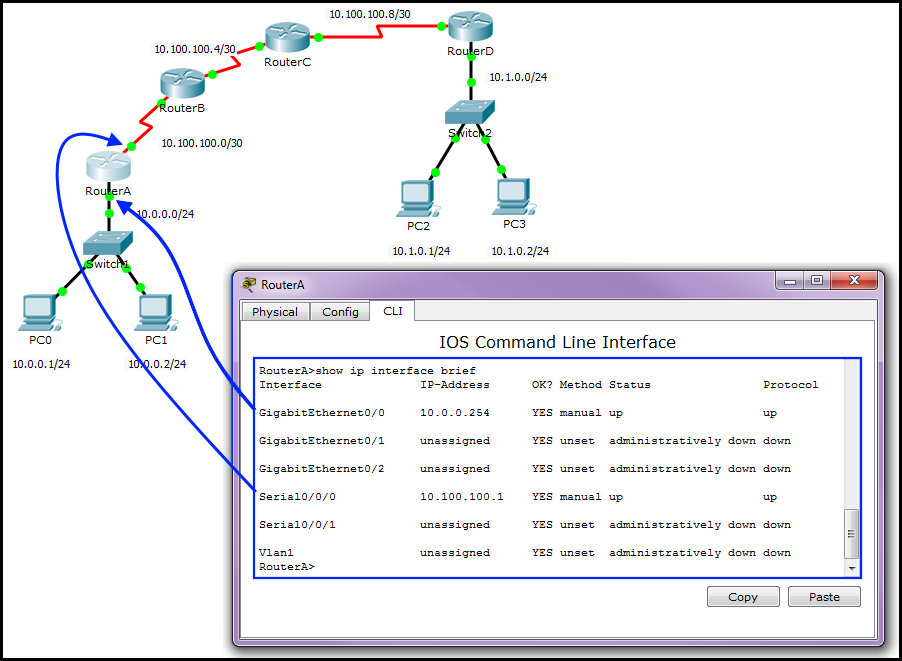
- Type show ip interface brief and press enter. Make note of the interface you wish to configure. Following are example interfaces:
- FastEtherner0/1
- GigabitEthernet0/1
- Serial0/0/0
- Vlan 1
- vty 0 4
Interface           IP-Address    OK?  Method  Status                 Protocol
------------------------------------------------------------------------------
GigabitEthernet0/0  192.168.0.1   YES  manual  up                     up
GigabitEthernet0/1  71.25.15.16   YES  manual  up                     up
Vlan1               unassigned    YES  unset   administratively down  down
Note: The VTY (virtual terminal lines) are used to connect to the router or switch remotely, via SSH or telnet. Because VTY is virtual, there is no physical interface on the router for the VTY interface. When making a VTY connection to the router or switch from a computer in the LAN, the connection flows through the Ethernet LAN interface, which is probably GigabitEthernet0/1. When making a VTY connection to the router or switch from a computer over the WAN, the connection flows throughthe Ethernet WAN interface, which is probably GigabitEthernet0/1.
It can be helpful to recognize that a router or switch will have at least two cables connected, one going to the LAN (probably GigabitEthernet) and the other going to the WAN (probably Serial).
- Type configure terminal and press enter
- Type interface followed by the interface you need to configure and press enter (example: interface GigabitEthernet0/1)
- Enter the IP address:
- For IPv4, type ip address x.x.x.x x.x.x.x and press enter (example: ip address 192.168.0.253 255.255.255.0). Notice both the IP address and subnet mask are entered
- For IPv6, type ipv6 address xxxx:xxxx:xxxx:xxxx:xxxx:xxxx:xxxx:xxxx/64 and press enter (example: ipv6 address 2001:DB8:1:1::1/64). Also type ipv6 address FE80::1 link-local and press enter.
- Type no shutdown and press enter. This changes the interface state from down to up.
- Type description cable connection on interface on device to interface on device (example: Ethernet connection on G0/1 on R1 to G0/1 on S1). In human speak, this is saying that an Ethernet cable is connected to the Gigabit interface 0/1 on Router 1 to the Gigabith interface 0/1 on Switch 1.
- Type exit and press enter
- Type ip default-gateway x.x.x.x and press enter (example: ip default-gateway 192.168.0.1)
- Type exit and press enter
R1> enable
R1# configure terminal
R1(config)# interface interface
R1(config-if)# ip address x.x.x.x x.x.x.x
R1(config-if)# no shutdown
R1(config-if)# description cable connection on interface on device to interface on device
R1(config)# exit
R1(config)# ip default-gateway x.x.x.x
R1# exit
Use the show running-config to verify that the IP address, subnet mask and default gateway have been added. Command show ip interface brief displays a brief summary of all of the IPv4 interfaces. Command show ipv6 interface brief displays a brief summary of all of the IPv6 interfaces. Following is example output of the show ip interface brief command:
Interface           IP-Address    OK?  Method  Status                 Protocol
------------------------------------------------------------------------------
GigabitEthernet0/0  192.168.0.1   YES  manual  up                     up
GigabitEthernet0/1  71.25.15.16   YES  manual  up                     up
Vlan1               unassigned    YES  unset   administratively down  down
Command show interface interface shows details information about an interface (example: show interface FastEthernet0/1)..
The reload command can be used to return the switch to the configuration it had before any changes were made.
To ensure these changes remain saved if the switch is restarted, save the changes to the startup-config. In IOS, type enable and press enter to enter priviledge mode. Type copy running-config startup-config and press enter. This saves to NVRAM. To ensure the startup-config contains the IP address and subnet mask, use the show startup-config command. It is also possible to save the changes to flash using the copy startup-config flash command. Then use the show flash command, and the startup-config file should be listed.
Did you find this article helpful?
If so, consider buying me a coffee over at 