
When creating a new project in Visual Studio, if you select New Project > ASP.NET Web Application > Empty, the project will not automatically include a login system. On the other hand, if you select File > New > Web Site, the website will automatically include a login system. This tutorial is meant to explain how to create a login system when buidling an ASP.NET Empty Web Application.
Follow these steps to create a username and password login page in Visual Studio.
- Press Ctrl + Shift + A (or right-click on the name of your new project and select Add > Add New Item).
- In the Add New Item dialog box, select Web Form, change the name to signin.aspx, and select Add.
- From Toolbox, expand Login, and drag a Login control onto the page
The authentication mode will need to be set to Forms:
- In Solution Explorer, select the Web.config file
- Ensure the system.web markup includes the following:
  <system.web>
   <authentication mode="Forms" />
  </system.web>
Press Ctrl F5 to preview the page in a browser. Enter a username and password and attempt to sign in.
A variety of errors may appear:
- WebForms UnobtrusiveValidationMode requires a ScriptResourceMapping for 'jquery'
- A network-related or instance-specific error occurred while establishing a connection to SQL Server. The server was not found or was not accessible. Verify that the instance name is correct and that SQL Server is configured to allow remote connections. (provider: SQL Network Interfaces, error: 26 - Error Locating Server/Instance Specified)
- Could not find stored procedure 'dbo.aspnet_CheckSchemaVersion'
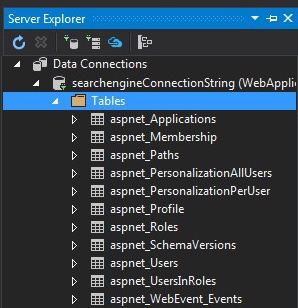
Because you have not yet created a username and password, error Your login attempt was not successful will appear. Behind the scene's, the SQL Server tables used with the login system should have automatically been created. In Visual Studio, in Server Explorer, expand the database being used, and the newly created tables will be listed.
Follow these steps to create a page that allows a visitor to create their username and password:
- Press Ctrl + Shift + A (or right-click on the name of your new project and select Add > Add New Item).
- In the Add New Item dialog box, select Web Form, change the name to signup.aspx, and select Add.
- From Toolbox, expand Login, and drag a CreateUserWizard control onto the page
Press Ctrl F5 to preview the page in a browser. Register a username and password. Viewing the records of the aspnet_Users table will show the newly created user account.

Return to the signin.aspx page, and attempt to sign in.
Did you find this article helpful?
If so, consider buying me a coffee over at 