
To change the heap size of an application server
- In the WebSphere admin console, expand Servers > Server Types, and select WebSphere application servers.
- Select the application server.
- Expand Java and Process Management and select Process definition.
- Select Java Virtual Machine.
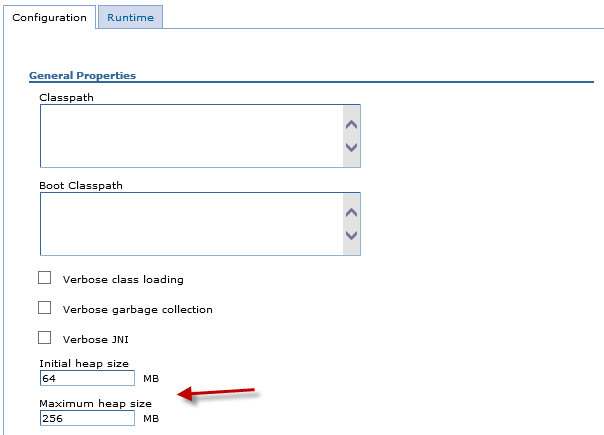
- Update the Initial heap size and/or Maximum heap size.
- Select Apply.
- Select Save.
- Restart the application server for the change to take effect.
To change the heap size of the deployment manager (dmgr)
- In the WebSphere admin console, expand System administration > Deployment manager.
- Expand Java and Process Management and select Process definition.
- Select Java Virtual Machine.
- Update the Initial heap size and/or Maximum heap size.
- Select Apply.
- Select Save.
- Restart the dmgr for the change to take effect.
To change the heap size of a node agent
- In the WebSphere admin console, expand System administration > Node agents.
- Expand Java and Process Management and select Process definition.
- Select Java Virtual Machine.
- Update the Initial heap size and/or Maximum heap size.
- Select Apply.
- Select Save.
- In the WebSphere admin console, at System administration > Node agents, restart the node agent for the change to take effect.
In this example, the initial heap size is 64 MB and the maximum heap size is 256 MB.
Or, wsadmin can be used. First list the Java Virtual Machines.
~]$ /opt/WebSphere/AppServer/profiles/your_profile/bin/wsadmin.sh -lang jython -c "print AdminConfig.list('JavaVirtualMachine')"
WASX7209I: Connected to process "dmgr" on node Node01 using SOAP connector;  The type of process is: DeploymentManager
(cells/Cell01/nodes/Node01/servers/dmgr|server.xml#JavaVirtualMachine_1)
(cells/Cell01/nodes/Node01/servers/AppSrv01|server.xml#JavaVirtualMachine_1699553133969)
(cells/Cell01/nodes/Node01/servers/nodeagent|server.xml#JavaVirtualMachine_1699546101364)
(cells/Cell01/nodes/Node01/servers/WebServer1|server.xml#JavaVirtualMachine_1699558926383)
Then AdminConfig.show can be used to display the current initialHeapSize and maximumHeapSize.
~]$ /opt/WebSphere/AppServer/profiles/your_profile/bin/wsadmin.sh -lang jython -c "print AdminConfig.show('(cells/Cell01/nodes/Node01/servers/nodeagent|server.xml#JavaVirtualMachine_1699546101364)')"

[bootClasspath []]
[classpath []]
[debugArgs "-Djava.compiler=NONE -Xdebug -Xnoagent -Xrunjdwp:transport=dt_socket,server=y,suspend=n,address=7777"]
[debugMode false]
[disableJIT false]
[executableJarFileName []]
[genericJvmArguments -Djava.awt.headless=true]
[hprofArguments []]
[initialHeapSize 256]
[internalClassAccessMode ALLOW]
[maximumHeapSize 512]
[runHProf false]
[systemProperties [com.ibm.security.jgss.debug(cells/Cell01/nodes/Node01/servers/nodeagent|server.xml#Property_1631299304823) com.ibm.security.krb5.Krb5Debug(cells/Cell01/nodes/Node01/servers/nodeagent|server.xml#Property_1631299304824)]]
[verboseModeClass false]
[verboseModeGarbageCollection false]
[verboseModeJNI false]
Or AdminConfig.showAttribute can be used to return just the initialHeapSize or maximumHeapSize.
~]$ /opt/WebSphere/AppServer/profiles/your_profile/bin/wsadmin.sh -lang jython -c "print AdminConfig.showAttribute('(cells/Cell01/nodes/Node01/servers/nodeagent|server.xml#JavaVirtualMachine_1699546101364)', 'maximumHeapSize')"

512
And then use AdminConfig.modify to update the heap size.
~]$ /opt/WebSphere/AppServer/profiles/your_profile/bin/wsadmin.sh -lang jython -c "print AdminConfig.modify('(cells/Cell01/nodes/Node01/servers/nodeagent|server.xml#JavaVirtualMachine_1699546101364)', '[[maximumHeapSize 1024]]')"
Likewise, the application server or deployment manager or node agent server.xml file should contain the initial heap size and maximum heap size, something like this.
~]$ grep maximumHeapSize /opt/WebSphere/AppServer/profiles/your_profile/config/cells/your_cell/nodes/your_node/servers/nodeagent/server.xml
    <jvmEntries xmi:id="JavaVirtualMachine_1699546101364" verboseModeClass="false" verboseModeGarbageCollection="false" verboseModeJNI="false" initialHeapSize="64" maximumHeapSize="512" runHProf="false" hprofArguments="" debugMode="false" debugArgs="-Djava.compiler=NONE -Xdebug -Xnoagent -Xrunjdwp:transport=dt_socket,server=y,suspend=n,address=7777" genericJvmArguments="-Djava.awt.headless=true" executableJarFileName="" disableJIT="false">
Sign onto the server and issue the following command to ensure the JVM has the appropriate initial heap value at runtime. In this example, the JVM has an initial heap value of 64 MB.
~]# ps -ef | grep jvm_name | sed "s| |\n|g" | grep Xms
-Xms64m
Issue this command to ensure the JVM has the appropriate maximum heap value at runtime. In this example, the JVM has an maximum heap value of 256 MB.
ps -ef | grep jvm_name | sed "s| |\n|g" | grep Xmx
-Xmx256m
Tivoli Performance Monitor can be used to monitor and visualize the heap utiliation.
Did you find this article helpful?
If so, consider buying me a coffee over at 