
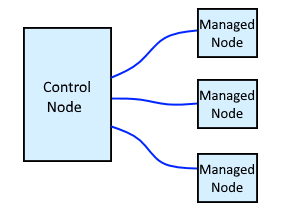
Tasks are run against target servers. Some Ansible documentation refers to the target servers as "hosts".
If you are not familiar dynamic inventory, check out Ansible - Getting Started with Dynamic Inventory.
Before using the nmap inventory plugin, you'll want to determine if nmap is able to resolve IP addresses to their appropriate DNS hostname.
nmap uses a custom stub DNS resolver, meaning that by default, nmap will not use your local DNS servers for IP address to hostname resolution. On a Linux system, regardless of whether the custom nmap stub DNS resolver or your local DNS resolver are being used, /etc/resolv.conf is used to define the target DNS servers.
The important difference between the custom nmap DNS resolve vs. your local DNS resolver is:
- The nmap custom DNS resolver uses all of the name servers in /etc/resolv.conf in parallel
- Your local DNS resolver would only use the primary DNS resolver in /etc/resolv.conf, and only use the secondary name server in /etc/resolv.conf if the primary name server is unavailable
The --system-dns flag option can be used to only use your primary DNS server in /etc/resolve.conf or to use the secondary DNS server if the primary is unavailable.
The --dns-servers option can be used to define a single target DNS server, or to define two or more target DNS servers, and to only use the first name server that is able to resolve the IP address to hostname.
The ansible-doc command can be used to display documentation on the nmap inventory plugin.
ansible-doc --type inventory --snippet nmap
Before you can use the nmap dynamic inventory plugin, you will need to have nmap installed on your control node (that's your Ansible server). You can use yum or apt-get to install nmap.
yum install nmap
This assumes you have nmap as one of the enabled_plugins in ansible.cfg, something like this.
[inventory]
enable_plugins = host_list, ini, yaml, nmap
Create a YAML file. The filename can be anything, but must have the .yml or .yaml extension.
touch nmap.yml
In the newly created file, add the following, replacing 192.168.0.0/24 with your appropriate IP address and subnet.
plugin: nmap
address: 192.168.0.0/24
The ansible command with the --list-hosts flag can be used to determine if things are working as expected.
ansible all -i nmap.yml --list-hosts
Or, the ansible-inventory command with the --list flag.
ansible-inventory -i nmap.yml --list
Something like this should be returned.
"all": {
    "children": [
        "ungrouped"
    ]
},
"ungrouped": {
    "hosts": [
        "server1.example.com",
        "server2.example.com",
        "server3.example.com"
    ]
}
Or the --graph option could be used as well.
ansible-inventory -i nmap.yml --graph
Something like this should be returned.
@all:
  |--@ungrouped:
  |  |--server1.example.com
  |  |--server2.example.com
  |  |--server3.example.com
Optional Options
- exclude: hosts to exclude
- ports: scan open ports on hosts. Setting this to false/no will greatly reduce the time it takes the nmap plugin to return hosts.
- strict: when set to true/yes, invalid entries will cause a fatal error
Example Optional Options
plugin: nmap
address: 192.168.0.0/24
exclude: 192.168.0.1, server2.example.com
ports: false
strict: false
Did you find this article helpful?
If so, consider buying me a coffee over at 