
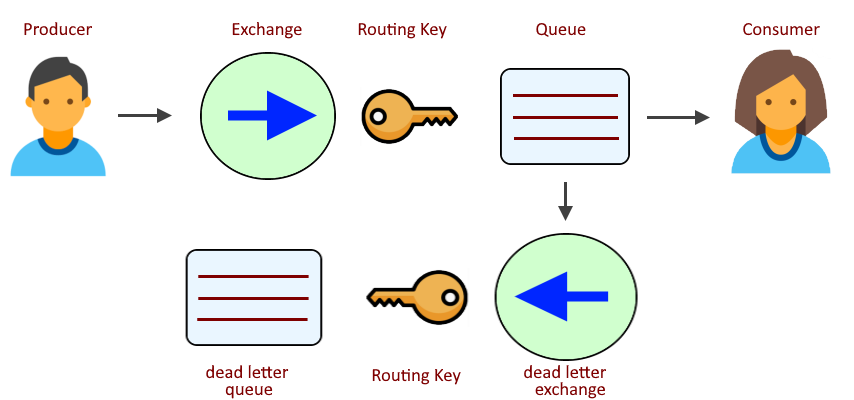
Before getting into dead letters, let's first look at how a message typically gets transmitted from a producer to a consumer. Typically, the producer puts the message onto an exchange with a routing key. The routing key is then used to determine what queue the message should be routed to, the messages gets onto the queue, and the consumer gets the message from the queue.

This is fine and dandy, but let's say the consumer is unable to get messages off the queue. This could result in a situation where messages accumulate in the queue. Fortunately, messages can be move to another queue when:
- A consumer negatively acknowledges (nack) a message
- The messages expires (Time to Live (TTL))
- The queue has reached max-length or max-length-bytes
Let's say foo.exchange is bound to foo.queue with routing key foo.key. In this scenario, if the dead letter exchange is a direct exchange, then the dead letter exchange must be bound to the dead letter queue with foo.key in the same virtual host as foo.queue. This is not a great approach, because you would need to know all of the possible routing keys that a producer might use, and then manually create bindings between the dead letter exchange and dead letter queue with the routing keys.
A much better approach is to have the dead letter exchange be a topic exchange, so that the dead letter exchange can be bound to the dead letter queue with a regular expression. Let's say deadletter.exchange is bound to deadletter.queue with routing key * (wildcard, match anything).
You may also want to set the dead letter queue as a lazy queue. Messages in a non-lazy queue are stored in memory. Messages in a lazy queue are not stored in memory, and are instead stored on disk.
The rabbitmqctl set_policy command can be used to create a dead letter policy, which is kind of like binding foo.queue to deadletter.exchange. In addition to the dead letter arguments, the policy should be configured with one or more of the following arguments. These arguments will move messages in foo.queue to the deadletter.exchange, and then onto the deadletter.queue, when:
- max-length - the number of messages in the normal queue matches max-length (such as 10 messages)
- max-length-bytes - the size of the message intended for the normal queue would cause the queue to exceed max-length-bytes
- message-ttl (time to live) - a new message has been in the normal queue for x seconds (such as 60 seconds)
In this example, a policy named deadletter is created in virtual host vhost001, the policy is applied to all of the queues in vhost001 except for the dead letter queue "^((?!deadletter.queue).).*". With drop-head, oldest message in each normal queue will be routed to the dead letter queue once the normal queue contains 10 messages. Or, reject-publish-dlx could be used to route the new message to the dead letter queue.
Notice also that dead-letter-routing-key is set to * (wildcard, match anything). Recall that deadletter.exchange is bound to deadletter.queue with routing key * (wildcard, match anything). It is important that wildcard is used in the deadletter policy and binding, so that all messages that land in the deadletter.exchange get routed to the deadletter.queue, regardless of what routing key was originally used when the producer published the message.
rabbitmqctl set_policy
--vhost vhost001
--priority 0
--apply-to queues
deadletter
"^((?!deadletter.queue).).*"
'{
  "max-length": 10,
  "overflow": "drop-head",
  "dead-letter-exchange": "deadletter.exchange",
  "dead-letter-routing-key": "*"
}'
The rabbitmqctl list_policies command can be used to display the policies.
rabbitmqctl list_policies -p vhost001
Which should return something like this.
Listing policies for vhost "vhost001" ...
vhost     name        pattern                     apply-to   definition                                       priority
vhost001  deadletter  ^((?!deadletter.queue).).*  queues     {"max-length":10, "overflow":"reject-publish", "dead-letter-exchange": "deadletter.exchange" }   0
curl can be used to view the messages in the dead letter queue.
curl
--insecure
--request POST
--user john.doe:itsasecret
--data '{"count":10,"ackmode":"ack_requeue_true","encoding":"auto","truncate":50000}'
--url https://server001:15671/api/queues/vhost001/deadletter.queue/get
Something like this should be returned. Notice in this example that the reason the message was placed in the dead letter queue was maxlen meaning the queue reached its max length.
[
 {
  "payload_bytes":22,
  "redelivered":false,
  "exchange":"deadletter.exchange",
  "routing_key":"*",
  "message_count":4,
  "properties":{
    "timestamp":1624363433,
    "delivery_mode":1,
    "headers":{
      "timestamp_in_ms":1624363433414,
      "x-death":[
                 {
        "count":1,
        "exchange":",
        "queue":"foo.queue",
        "reason":"maxlen",
        "routing-keys":["foo.queue"],
        "time":1624438300}
      ],
      "x-first-death-exchange":"",
      "x-first-death-queue":"foo.queue",
      "x-first-death-reason":"maxlen"
    }
  },
  "payload":"Hello World",
  "payload_encoding":"string"
 }
]
Did you find this article helpful?
If so, consider buying me a coffee over at 