
If you are not familiar with the oc command, refer to OpenShift - Getting Started with the oc command.
- Quotas can be used to:
- set the maximum amount of CPU and memory that can be used in a namespace
- set the maximum number of running resources (e.g. persistent volume claims, pods, replication controllers, routes, secrets, services, et cetera) in a namespace
- Cluster Resource Quotas is the same as Quotas except the minimum and maximum are associated with:
- A user
- One or more namespaces
The oc create quota command can be used to create a quota for the currently selected project.
oc create quota my-quota --hard=cpu=1,memory=1G,pods=10,routes=5,secrets=1
The oc get quota command can be used to see that the prior command will set REQUESTS but does not set CPU and Memory LIMITS.
~]$ oc get quota
NAME       AGE   REQUEST                                           LIMIT
my-quota   21s   cpu: 0/1, memory: 0/1G, pods: 5/2, secrets: 9/1
When creating the quota using a YAML file, you can set both CPU and Memory Requests and Limits.
apiVersion: v1
kind: ResourceQuota
metadata:
  name: test-quota
spec:
  hard:
    cpu: "2"
    memory: "2G"
    replicationcontrollers: "2"
    requests.cpu: "1"
    requests.memory: "1G"
    requests.ephemeral-storage: "2Gi"
    limits.cpu: "2"
    limits.memory: "2G"
    limits.ephemeral-storage: "4Gi"
    configmaps: "10"
    pods: "10"
    persistentvolumeclaims: "4"
    replicationcontrollers: "20"
    secrets: "10"
    services: "10"
    services.loadbalancers: "2"
The oc apply or oc create command with the -f or --filename option can be used to create the quota using the template JSON or YAML file.
The oc replace command can be used to replace a quota using a new or updated template JSON or YAML file.
The oc edit command can be used to update a quota template YAML file
~]$ oc create --filename quota.yml
resourcequota/my-quota created
The oc get quota command can be used to see that both REQUESTS and LIMITS have been set.
~]$ oc get quota
NAME         AGE     REQUEST                                                        LIMIT
test-quota   16h     pods: 10/10, requests.cpu: 50m/1, requests.memory: 544Mi/1Gi   limits.cpu: 2500m/10, limits.memory: 1408Mi/2Gi
The oc describe quota command can be used to display a bit of an easier to read output.
AVOID TROUBLE
Notice 9 used secrets with a hard limit of 2 pods but there are 5 used pods. This happens when the quota is created after the resources have already been created.
~]$ oc describe quota test-quota
Name:       test-quota
Namespace:  my-project
Resource         Used  Hard
--------         ----  ----
limits.cpu       2500m   10
limits.memory    1408Mi  2Gi
pods             5       2
requests.cpu     50m     1
requests.memory  544Mi   1Gi
secrets          20      20
If your quota has set CPU or Memory Requests/Limits, you'll want to either update the deployment or deployment config with CPU and Memory Requests/Limits or create a Limit Range that applies to the Pods/Containers in the project. For example, here is a snipped of a Deployment YAML with CPU and Memory Requests/Limits.
spec:
  template:
    spec:
      containers:
        resources:
          requests:
            cpu: 10m
            memory: 128Mi
          limits:
            cpu: 500m
            memory: 512Mi
Or if you are using limits to set the min and max CPU and Memory for pods and containers in the project, the limits YAML could look something like this.
apiVersion: v1
kind: LimitRange
metadata:
  name: my-limits
spec:
  limits:
    - type: Pod
      max:
        cpu: 20m
        memory: 1Gi
      min:
        cpu: 200m
        memory: 6Mi
    - type: Container
      max:
        cpu: 2
        memory: 1Gi
      min:
        cpu: 100m
        memory: 4Mi
If you do something that exceeds the quota, something like this should be returned.
~]$ oc create --filename pod.yml
Error from server (Forbidden): pods "my-pod" is forbidden: exceeded quota: test-quota, requested: pods=1, used: pods=5, limited: pods=2
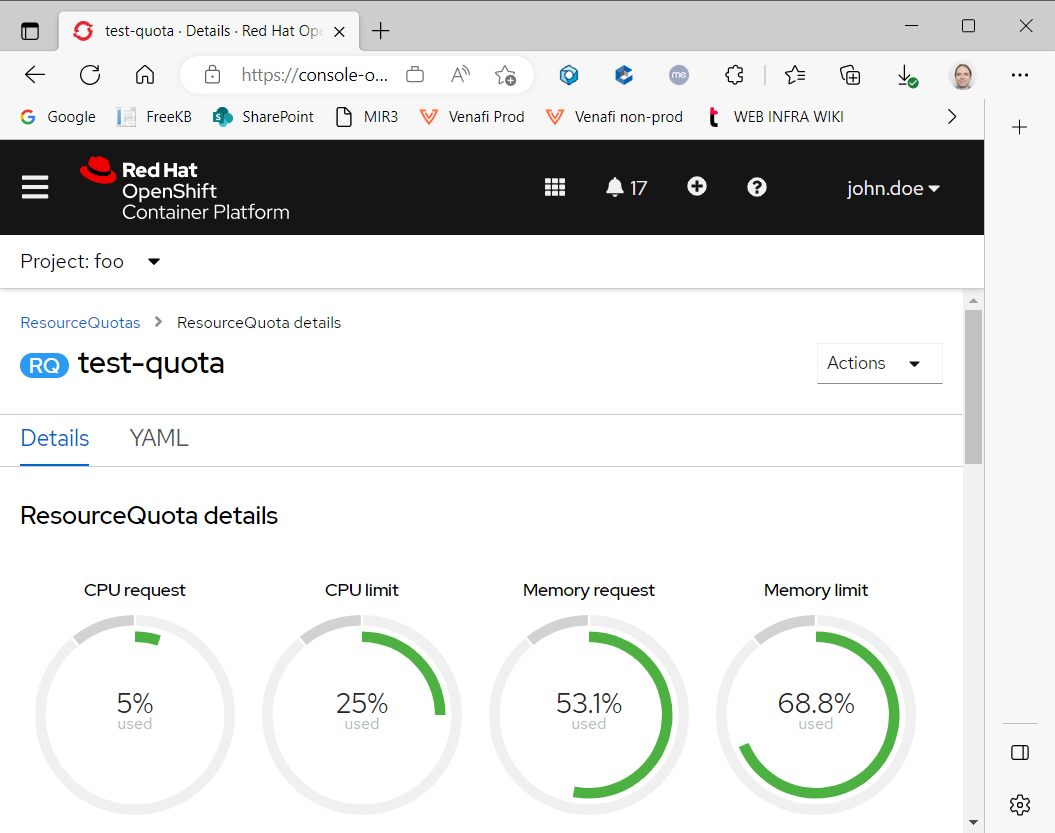
The web console makes is real easy to visualize how close the project is to reaching a quota limit.
Did you find this article helpful?
If so, consider buying me a coffee over at 