
At a high level, there are two types of subnets, public and private.
- A public subnet has access to the internet
- A private subnet does NOT have access to the internet
At a high level, there are two ways to create a public subnet:
- Using an Internet Gateway (this article) - An Internet Gateway allows EC2 instances that have a public IP address to access the internet.
- Using a Network Address Translation (NAT) Gateway - A Network Address Translation (NAT) Gateway allows EC2 instances that do NOT have a public IP address to access the internet.
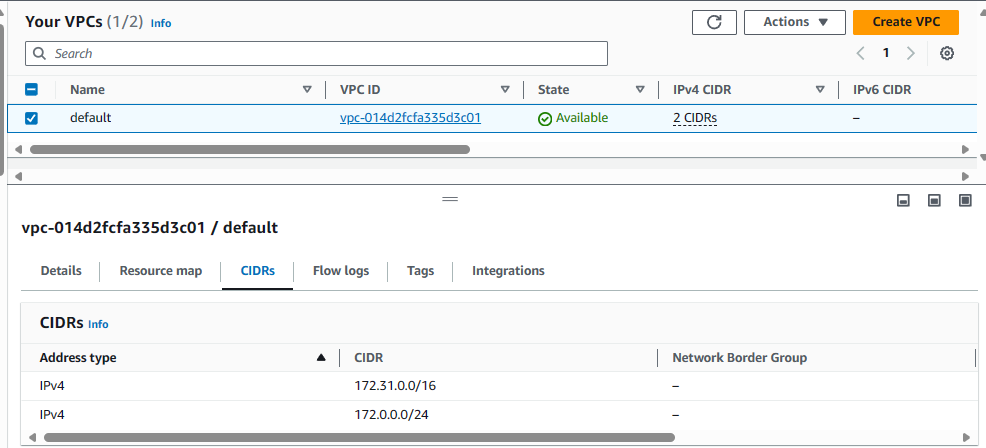
Virtual Private Cloud (VPC) CIDRs
In this walkthrough, we are going to have two subnets in the same Virtual Private Cloud (VPC), one will be public, the other will be private, each in their own CIDRs.
- the public subnet will be in the 172.31.0.0/16 subnet
- the private subnet will be in the 172.0.0.0/24 subnet
The Virtual Private Cloud is going to need to be configured with both the 172.31.0.0/16 and 172.0.0.0/24 subnet. I go with this approach for clear separation between the public and private subnets.
PUBLIC SUBNET - (Route Table has Internet Access via an Internet Gateway)
Let's start with an EC2 instance that has a public IP address and is using a Subnet with a Route Table that has an Internet Gateway Route, just for proof of concept to ensure the EC2 instance is able to connect to the Internet.

The aws ec2 create-subnet command can be used to create a subnet. Let's create a subnet.
aws ec2 create-subnet --vpc-id vpc-0a9d4cb29e2748444 --cidr-block 172.31.0.0/16 --availability-zone us-east-1a
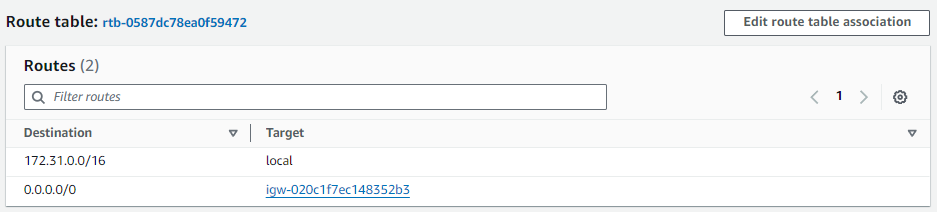
By default, the subnet will have target local which allows communication between systems in the Virtual Private Cloud (VPC) and will NOT have a route to one of your Internet Gateways or Network Address Translation (NAT) Gateways. At this point, this is a private subnet that will not allow connections to the internet. Let's update the Route Table in the Subnet to have destination 0.0.0.0/0 and target one of your Internet Gateways in your Virtual Private Cloud (VPC). Now the Subnet is a public subnet.
For proof of concept, let's create an EC2 instance using the aws ec2 run-instances command, and attach the EC2 instance to the public subnet.
aws ec2 run-instances \
--image-id ami-0cf10cdf9fcd62d37 \
--count 1 \
--key-name default \
--instance-type t2.micro \
--subnet-id <subnet ID public subnet> \
--associate-public-ip-address \
--security-group-ids sg-11122233344455566677 \
--tag-specifications 'ResourceType=instance,Tags=[{Key=Name,Value=public-instance}]'
SSH onto the EC2 instance and the ip address command should show that the instance has an IP address in the subnet (in this example, the EC2 instance has IP address 172.31.45.86 which is in the 172.31.0.0/16 subnet).
~]$ ip address
2: ens5: <BROADCAST,MULTICAST,UP,LOWER_UP> mtu 9001 qdisc mq state UP group default qlen 1000
    link/ether 0e:d1:fa:42:5f:37 brd ff:ff:ff:ff:ff:ff
    altname enp0s5
    altname eni-0d39a7ba2fef60763
    altname device-number-0
    inet 172.31.45.86/20 metric 512 brd 172.31.47.255 scope global dynamic ens5
       valid_lft 2645sec preferred_lft 2645sec
    inet6 fe80::cd1:faff:fe42:5f37/64 scope link
       valid_lft forever preferred_lft forever
The route --numeric command should contain a route that has destination 0.0.0.0. This is the Internet Gateway route.
~]$ route --numeric
Kernel IP routing table
Destination     Gateway         Genmask         Flags Metric Ref    Use Iface
0.0.0.0         172.31.32.1     0.0.0.0         UG    512    0        0 ens5 <- internet gateway (flag UG stands for Up Gateway, the Gateway Route is Up)
172.31.0.2      172.31.32.1     255.255.255.255 UGH   512    0        0 ens5 <- local (flag UGH stands for Up Gateway Host, the Gateway Host Route is Up)
172.31.32.0     0.0.0.0         255.255.240.0   U     512    0        0 ens5 <- ? (flag U stands for Up, the route is Up)
You should be able to ping remote URLs, such as www.example.com. Hooray - so far, so good!
[ec2-user@ip-172-31-45-86 ~]$ ping -c4 www.example.com
PING www.example.com (93.184.216.34) 56(84) bytes of data.
64 bytes from 93.184.216.34 (93.184.216.34): icmp_seq=1 ttl=54 time=23.4 ms
64 bytes from 93.184.216.34 (93.184.216.34): icmp_seq=2 ttl=54 time=23.4 ms
64 bytes from 93.184.216.34 (93.184.216.34): icmp_seq=3 ttl=54 time=23.4 ms
64 bytes from 93.184.216.34 (93.184.216.34): icmp_seq=4 ttl=54 time=23.4 ms

--- www.example.com ping statistics ---
4 packets transmitted, 4 received, 0% packet loss, time 3005ms
rtt min/avg/max/mdev = 23.444/23.453/23.472/0.187 ms
PRIVATE SUBNET - (no internet access)
Now let's create a second EC2 instance that will be in a Subnet with a Route Table that does not have an Internet Gateway or a Network Address Translation (NAT) Gateway. The second EC2 instance will not be able to access the internet.

The aws ec2 create-subnet command can be used to create a subnet. Let's create a second subnet.
aws ec2 create-subnet --vpc-id vpc-0a9d4cb29e2748444 --cidr-block 172.0.0.0/24 --availability-zone us-east-1a
The aws ec2 create-route-table command can be used to create another Route Table in your Virtual Private Cloud (VPC). Let's create a new Route Table.
aws ec2 create-route-table --vpc-id vpc-0a9d4cb29e2748444
By default, the new Route Table should have target local which allows communication between systems in the Virtual Private Cloud (VPC) and does NOT have a route to one of your Internet Gateways or Network Address Translation (NAT) Gateways. This Route Table is private (no internet access).

The aws ec2 associate-route-table command can be used to update the Route Table associated with a Subnet. Let's update the second Subnet to be associated to the Route Table that only has the target local route. Now the subnet is private with no internet access.
aws ec2 associate-route-table --route-table-id rtb-0e96e9343c4086863 --subnet-id subnet-0f015da3a1e164304
For proof of concept, let's create an EC2 instance using the aws ec2 run-instances command, and attach the EC2 instance to the public subnet.
Both EC2 instance will need to use subnets that are in the same availability zone in the same Virtual Private Cloud (VPC). For example, both would need to be in Availability Zone us-east-1. It's perfectly OK for the EC2 instance to be in different sub-availability zones, such as us-east-1a and us-east-1b.
aws ec2 run-instances \
--image-id ami-0cf10cdf9fcd62d37 \
--count 1 \
--key-name default \
--instance-type t2.micro \
--subnet-id <subnet ID private subnet> \
--security-group-ids sg-11122233344455566677 \
--tag-specifications 'ResourceType=instance,Tags=[{Key=Name,Value=private-instance}]'
SSH onto the EC2 instance in the public subnet and you should still be able to ping remote URLs, such as www.example.com. Hooray - still all good!
[ec2-user@ip-172-31-45-86 ~] ping -c4 www.example.com
PING www.example.com (93.184.216.34) 56(84) bytes of data.
64 bytes from 93.184.216.34 (93.184.216.34): icmp_seq=1 ttl=54 time=23.4 ms
64 bytes from 93.184.216.34 (93.184.216.34): icmp_seq=2 ttl=54 time=23.4 ms
64 bytes from 93.184.216.34 (93.184.216.34): icmp_seq=3 ttl=54 time=23.4 ms
64 bytes from 93.184.216.34 (93.184.216.34): icmp_seq=4 ttl=54 time=23.4 ms

--- www.example.com ping statistics ---
4 packets transmitted, 4 received, 0% packet loss, time 3005ms
rtt min/avg/max/mdev = 23.444/23.453/23.472/0.187 ms
From the EC2 instance in the public subnet SSH onto the EC2 instance in the private subnet.
The Security Group attached to the EC2 instance in the private subnet will need to allow SSH connections from the EC2 instance in the public subnet. This can either be done by allowing connections from the IP address of the EC2 instance in the public subnet or allowing connections from the Security Group associated with the EC2 instance in the public subnet.
Let's say you have a file named aws.ppk that is being used to connect to your EC2 instance in your public subnet using PuTTY. Assuming both EC2 instances are Linux system, you will need to convert the aws.ppk file to an OpenSSH private key file such as aws.key. This can be done using PuTTYgen. Check out my article PuTTYgen - Extract public certificate and private key from PPK file.
[ec2-user@ip-172-31-45-86 ~] ssh -i /home/ec2-user/.ssh/aws.key ec2-user@10.0.0.8
   ,     #_
   ~\_  ####_        Amazon Linux 2
  ~~  \_#####\
  ~~     \###|       AL2 End of Life is 2025-06-30.
  ~~       \#/ ___
   ~~       V~' '->
    ~~~         /    A newer version of Amazon Linux is available!
      ~~._.   _/
         _/ _/       Amazon Linux 2023, GA and supported until 2028-03-15.
       _/m/'           https://aws.amazon.com/linux/amazon-linux-2023/

[ec2-user@ip-172-0-0-5 ~]$
On the EC2 instance in the private subnet, you should NOT be able to ping www.example.com since the EC2 instance in the private subnet does not have a route that allows connections out of the private subnet, and www.example.com is outside of the private subnet.
[ec2-user@ip-172-0-0-5 ~]$ ping -c4 www.example.com
PING www.example.com (93.184.216.34) 56(84) bytes of data.

--- www.example.com ping statistics ---
4 packets transmitted, 0 received, 100% packet loss, time 3072ms
Did you find this article helpful?
If so, consider buying me a coffee over at 