
If you are not familiar with the oc command, refer to OpenShift - Getting Started with the oc command.
A Persistent Volume (PV) is the "physical" volume (such as a hard disk drive or solid state drive) on the host machine (node) that stores your persistent data, whereas a Persistent Volume Claim (PVC) is a reference to a persistent volume, used by a pod.

First and foremost, you'll want to ensure that the deployment/pod is running with a Security Context Constraint that allows Persistent Volumes to be mounted in the container.
By default, if a pod is not associated with a specific Service Account that has been bound to a certain Security Context Constraint, the pod should have the restricted Security Context Constraint, which can be seen using the oc describe pod command.
~]$ oc describe pod my-app-kf7hf
Annotations:  openshift.io/scc: restricted
The oc get securitycontextconstraints command can be used to see that the restricted Security Context Constraint has persistentVolumeClaim for VOLUMES. In other words, the pod is running with a Security Context Constraint that allows Persistent Volumes to be mounted in the container.
If the pod is running with a Security Context Constraint that does not have persistentVolumeClaim for VOLUMES, check out my article FreeKB - OpenShift - Run a deployment with a Service Account and Security Context Constraint.
~]$ oc get securitycontextconstraints restricted
NAME         PRIV    CAPS         SELINUX     RUNASUSER        FSGROUP     SUPGROUP   PRIORITY     READONLYROOTFS   VOLUMES
restricted   false   <no value>   MustRunAs   MustRunAsRange   MustRunAs   RunAsAny   <no value>   false            ["configMap","downwardAPI","emptyDir","persistentVolumeClaim","projected","secret"]
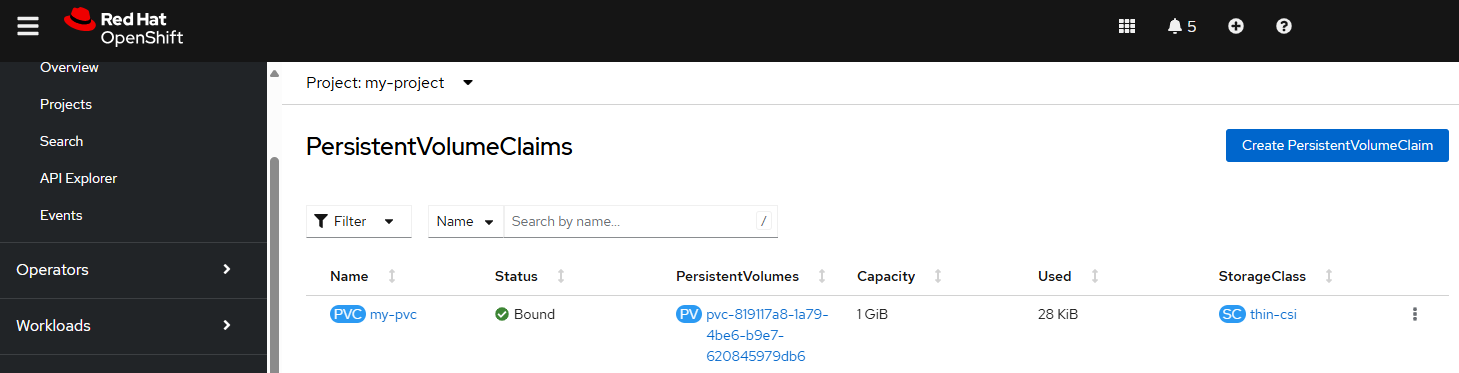
The oc get pvc command can be used to list the Persistent Volume Claims in the currently selected project / namespace.
~]$ oc get pvc
NAME                           STATUS   VOLUME                    CAPACITY   ACCESS MODES   STORAGECLASS   AGE
my-persistent-volume-claim     Bound    my-persistent-volume      1Gi        RWO            file-storage   256d
You can also see this in the OpenShift console at Storage > PersistentVolumeClaims.
The oc describe pvc command can be used to display the details of a Persistent Volume Claim. Notice this Persistent Volume Claim has two access modes, ROX and RWX. More on this in a moment.
- ReadOnlyMany (ROX) - The volume may be mounted on different nodes, read only
- ReadWriteMany (RWX) - The volume may be mounted on different nodes, read and write
~]$ oc describe pvc my-persistent-volume-claim
Name:          my-persistent-volume-claim
Namespace:     my_project
StorageClass:  file-storage
Status:        Bound
Volume:        my-persistent-volume
Labels:        <none>
Annotations:   pv.kubernetes.io/bind-completed: yes
               pv.kubernetes.io/bound-by-controller: yes
               volume.beta.kubernetes.io/storage-provisioner: csi.trident.netapp.io
Finalizers:    [kubernetes.io/pvc-protection]
Capacity:      1Gi
Access Modes:  ROX,RWX
VolumeMode:    Filesystem
Used By:       my-app-2mp2k
The volume and volumeMounts options can be used to mount a Persistent Volume Claim in a container.
apiVersion: apps/v1
kind: Deployment
metadata:
  name: my-deployment
spec:
  template:
    spec:
      containers:
      - name: my-container
        volumeMounts:
        - mountPath: /var/data
          name: my-volume <- must match the volumes name
      volumes:
      - name: my-volume <- something unique
        persistentVolumeClaim:
          claimName: my-persistent-volume-claim <- must match the name of the persistent volume claim
If the Persistent Volume Claim only has a single access mode, such as Read Write Many (RWX), the volume will use the access mode. On the other hand, if the Persistent Volume Claim has both Read Only Many (ROX) and Read Write Many (RWX), the volume will default to use Read Write Many (RWX). In this scenario, readOnly: true must be used to mount the volume as read only.
spec:
  template:
    spec:
      containers:
      - name: my-container
        volumeMounts:
          mountPath: /var/data
          name: my-volume <- must match the volumes name
          readOnly: true
      volumes:
      - name: my-volume <- something unique
        persistentVolumeClaim:
          claimName: my-persistent-volume-claim <- must match the name of the persistent volume claim
fsGroup can be used to set the group that owns mounted volume. In this example, the /var/data directory should be owned by group 1000. fsGroup is used for controlling access to block storage.
spec:
  template:
    spec:
      securityContext:
        fsGroup: 1000
      containers:
      - name: my-container
        volumeMounts:
          mountPath: /var/data
          name: my-volume
      volumes:
      - name: my-volume
        persistentVolumeClaim:
          claimName: my-persistent-volume-claim
supplementalGroups can be used to set the groups that own a mounted volume when the Persistent Volume points to shared storage, such as an NFS share and GlusterFS.
spec:
  template:
    spec:
      securityContext:
        supplementalGroups: [1000]
      containers:
      - name: my-container
        volumeMounts:
          mountPath: /var/data
          name: my-volume
      volumes:
      - name: my-volume
        persistentVolumeClaim:
          claimName: my-persistent-volume-claim
Assuming the volume was successfully mounted, the oc exec command can be used to validate that the volume has been mounted in the pod. Notice in this example that the /var/data directory that was mounted is owned by 99 instead of root, as an indication that /var/data is a mounted volume.
~]$ oc exec pod/my-pod-hp5w4 -- ls -l /var
total 4
drwxr-xr-x. 2 root root    6 Apr 23  2020 adm
drwxr-xr-x. 1 root root   33 Apr 15  2021 cache
drwxrwxrwx. 2   99   99 4096 Aug  2 10:24 data
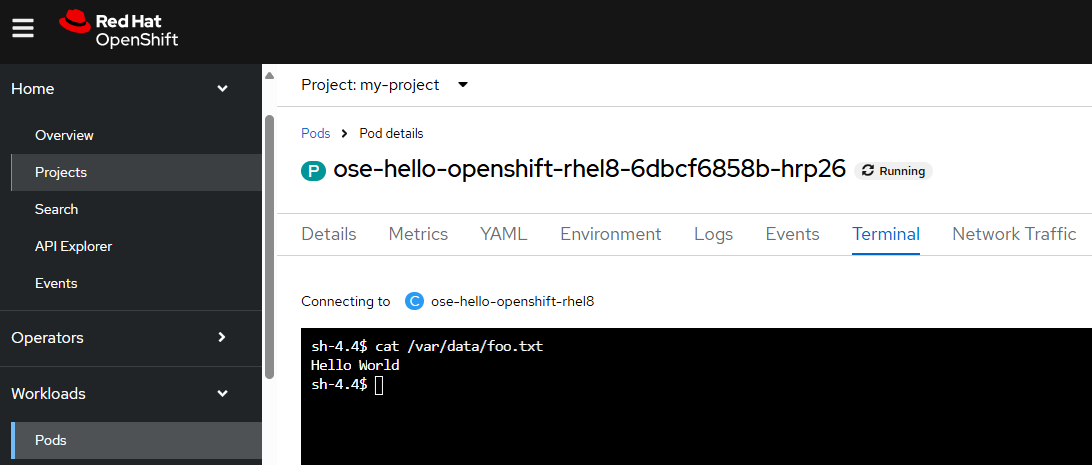
You can also see this in the OpenShift console at Workloads > Pods > your pod.

And let's say there is a file named foo.txt at /var/data that contains Hello World.
~]$ oc exec pod/ose-hello-openshift-rhel8-69f4d74fbc-k5r4p --namespace my-project -- ls -l /var/data

-rw-r--r--. 1 1001060000 1001060000    12 Apr 29 01:30 foo.txt

~]$ oc exec pod/ose-hello-openshift-rhel8-69f4d74fbc-k5r4p --namespace my-project -- cat /var/data/foo.txt
Hello World
You can also see this in the OpenShift console at Workloads > Pods > your pod > Terminal.
Did you find this article helpful?
If so, consider buying me a coffee over at 