
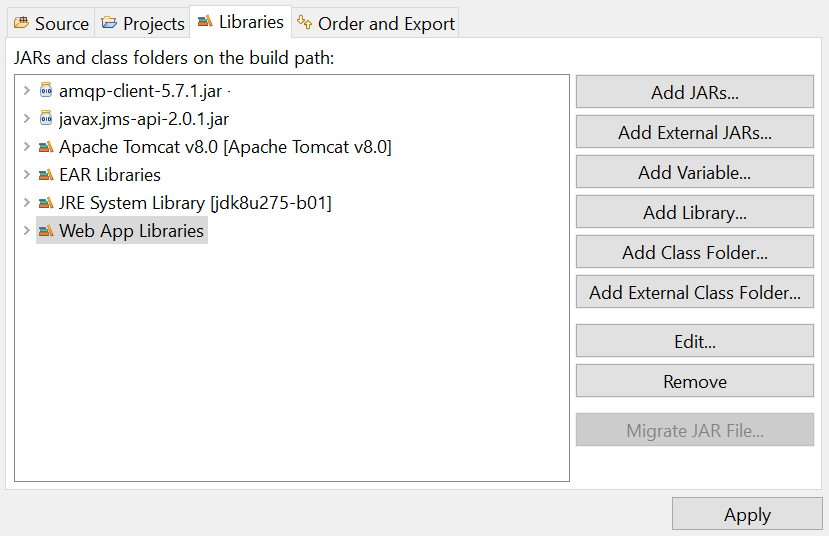
Create a Dynamic Web Project in Eclipse. Let's say the name of the project is rabbitmq. Download amqp-client-<version>.jar and javax.jms-api-<version>.jar and add the JAR files to your build path in Eclipse.
In the left panel of Eclipse, at the name of your project (rabbitmq in this example) > Java Resources > src, create a new package. For the sake of this tutorial, let's name the package com.rabbitmq.demo.
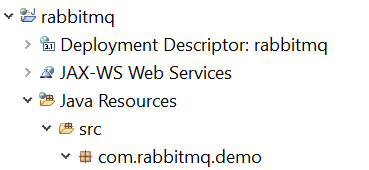
In the package, create a class called declare.

In declare.java, add the following markup. In this example, foo.exchange will be created.
package com.rabbitmq.demo;

import com.rabbitmq.client.Channel;
import com.rabbitmq.client.Connection;
import com.rabbitmq.client.ConnectionFactory;
import java.net.URISyntaxException;
import java.security.KeyManagementException;
import java.security.NoSuchAlgorithmException;
import java.util.Date;
import java.text.*;

public class declare {
  public void amqDeclare() throws KeyManagementException, NoSuchAlgorithmException, URISyntaxException {
    ConnectionFactory cf = new ConnectionFactory();

    // use amqp if the server is not using SSL (e.g. http)
    cf.setUri("amqp://john.doe:itsasecret@server1.example.com:5671/foo");

    // use amqps if the server is using SSL (e.g. https)
    cf.setUri("amqps://john.doe:itsasecret@server1.example.com:5671/foo");

    Connection conn = null;
    try {
      System.out.println("Trying to connect to " + conn);

      conn = cf.newConnection();

      if (conn != null) {
        System.out.println("Successfully connected to " + conn);
      }
	  else {
	    System.out.println("Failed to connect to " + conn);
	  }

      Channel channel = conn.createChannel();
      channel.exchangeDeclare("foo.exchange", "topic", true);

    }
    catch (Exception e) {
      e.printStackTrace();
    }
		    finally {
		        try {
		          conn.close();
		        }
		        catch (Exception e) {
		            e.printStackTrace();
		        }
		        finally {
		          System.out.println("Successfully closed the connection to " + conn);
		        }

		    }
  }
}
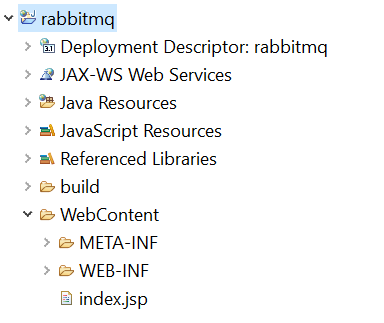
In the left panel of Eclipse, right click on the name of your project (rabbitmq in this example) and select New > JSP File. Select the WebContent folder, give the file a name such as index.jsp, and select Finish.
Add the following to line 1 of the JSP file. This is the combination of the package (com.rabbitmq.main) and the class (declare.java).
<%@page import="com.rabbitmq.main.declare"%>
Add the following inside the <body> tags.
- In this example, "declare" must be used because the name of the class in declare.java is consumer.
- In this example, "amqDeclare" must be used because the name of the method in declare.java is amqDeclare.
<body>
<%
  declare jms = new declare();
  jms.amqDeclare();
%>
</body>
Select the green play button in Eclipse and foo.exchange should be created.
Likewise, the main RabbitMQ log file should have something like this.
accepting AMQP connection <0.7993.1338> (10.17.115.16:54343 -> 10.122.15.2:5672)

connection <0.7993.1338> (10.17.115.16:54343 -> 10.122.15.2:5672): user 'john.doe' authenticated and granted access to vhost 'foo'

closing AMQP connection <0.21250.1339> (10.17.115.16:54343 -> 10.122.15.2:5672, vhost: 'foo', user: 'john.doe')
Did you find this article helpful?
If so, consider buying me a coffee over at 