
Adding a JAR to the Java Build Path in Eclipse will allow you to use the JAR in Eclipse (eg. the app will be able to use the classes in the JAR).
- Right-click on your project and select Properties.
- Select Java Build Paths.
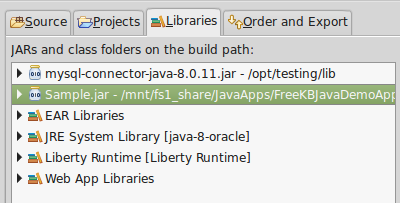
- Select the Libraries tab.
- Select Add External JARs.
- Select the JAR and select Apply.
In this example. Sample.jar has been added to the Java Build Path.
If you want the JAR to be placed in your apps /WEB-INF/lib folder when the WAR is compiled, you'll want to add a Java Build Path Entry. In this way, when the WAR is deployed to your application server, such as JBoss, Tomcat, or WebSphere, the JAR will be in the /WEB-INF/lib directory of your app, and you app will be able to use the JAR.
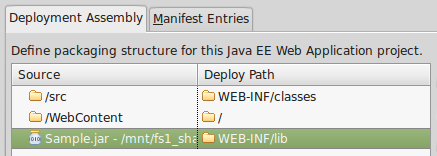
- Select Deployment Assembly.
- Select Add, then select Java Build Path Entries and click Next.
- Select the JAR and select Finish.
- Select Apply.
Now, the JAR will contain "Publish/export dependency: /WEB-INF/lib.
Adding the JAR to the /WEB-INF/lib folder usually only makes sense when no other apps will be using the JAR. When two or more apps need to use the JAR, then you'll usually want to take a different approach.
- If the applicatoin that contains the JAR is being deployed to Tomcat, you can include the JAR in the setenv.sh file.
- If the applicatoin that contains the JAR is being deployed to WebSphere, you can use the WebSphere admin console to verify that the applications classpath was able to load the JAR.
- If the JAR provides a database connecton, if using WebSphere, setup the JDBC, data source, and J2C alias.
Did you find this article helpful?
If so, consider buying me a coffee over at 