
If you are not familiar with the oc command, refer to OpenShift - Getting Started with the oc command.
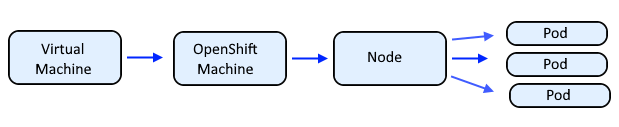
I like to think of a machine as OpenShift representation of a Virtual Machine, such as an Amazon Web Services (AWS) EC2 Instance, or a VMWare Virtual Machine, and then a Node, and then the pods running on the node. Machine Configs can be used to configure the Virtual Machine Operating System, such as configuring a Linux systemd service such as sshd or chronyd or Network Manager.
The oc get nodes command will return the list of nodes, something like this.
~]# oc get nodes
NAME              STATUS   ROLES            AGE    VERSION
my-edge-lm6wz     Ready    infra,worker     667d   v1.24.12+8f6c8a6
my-edge-pmlls     Ready    infra,worker     667d   v1.24.12+8f6c8a6
my-infra-c4v5h    Ready    infra,worker     667d   v1.24.12+8f6c8a6
my-infra-mc8rc    Ready    infra,worker     667d   v1.24.12+8f6c8a6
my-infra-p9cjv    Ready    infra,worker     667d   v1.24.12+8f6c8a6
my-master-0       Ready    master           670d   v1.24.12+8f6c8a6
my-master-1       Ready    master           670d   v1.24.12+8f6c8a6
my-master-2       Ready    master           670d   v1.24.12+8f6c8a6
my-worker-lk5vm   Ready    compute,worker   209d   v1.24.12+8f6c8a6
my-worker-pj4r4   Ready    compute,worker   209d   v1.24.12+8f6c8a6
The oc debug command can be used to create a temporary (ephemeral) pod that mounts a nodes filesystem.
oc debug node/my-node-5n4fj
If something like "Pod Predicate NodeAffinity failed" is returned . . .
error: debug pod could not be scheduled: Pod Predicate NodeAffinity failed. To fix this you may want to create a new namespace with empty node selector and run the debug there. For example: oc adm new-project --node-selector="" debug
. . . you can do as the error output suggests and use the oc adm new-project command to create a "debug" project with an empty node selector annotation.
oc adm new-project --node-selector="" my-debug-project
And then use the oc project command to switch over to the "debug" project.
oc project my-debug-project
The oc debug command can then be used to create a temporary (ephemeral) pod that mounts a nodes filesystem. This will provide you with a command line prompt in a debug.
~]# oc debug node/my-node-5n4fj
Starting pod/my-node-5n4fj-debug ...
sh-4.4#
Typically you will first issue the chroot /host command is used to set /host as the root directory because the root file system of the node is mounted to /host in the debug pod.
sh-4.4# chroot /host
If you know the exact commands you need to issue in the debug pod, you can include the commands on the command line like this.
oc debug node/<node name> -- chroot /host <your commands here>
For example.
oc debug node/ip-10-11-12-13.us-east-1.compute.internal -- chroot /host /usr/bin/systemctl status kubelet
Did you find this article helpful?
If so, consider buying me a coffee over at 