
TestDisk is a software program which attempts to find and fix filesystem issues with a faulty drive.
If using Linux, use the apt-get or yum command to install TestDisk.
apt-get install testdisk
yum install testdisk
If you have more than one disk, and you are able to boot into windows, you can download test disk from http://www.cgsecurity.org/wiki/TestDisk_Download. If you are unable to boot into Windows, you will need to make a bootable flash drive.
- Download the grml iso from http://grml.org/download/
- Click here to create a bootable USB ISO using Universal USB Installer (UUI)
Steps to repair a faulty disk in Windows
- In the first prompt, highlight Create and press enter.
- Highlight the faulty drive and press enter.
Note: If the faulty drive is not listed, boot into BIOS, and ensure the motherboard detects the faulty drive.
- The next prompt in TeskDisk lists the partition types. By default, the partition type for the faulty disk will be highlighted. Press enter.
- Highlight Analyse and press enter
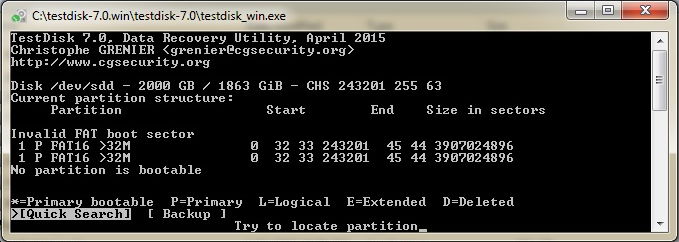
- Typically, the partition 1 will be listed twice. This this screen shot, the FAT16 P (primary) partition is listed twice. This implies a corrupted filesystem. Highlight Quick Search and press enter. This can take hours to complete.
- After quick search has completed, if message No partition found or selected for recovery is displayed, hightlight Deeper Search and press enter.
- After Quick Search or Deeper Search, at least one partition should be listed highlighted green.
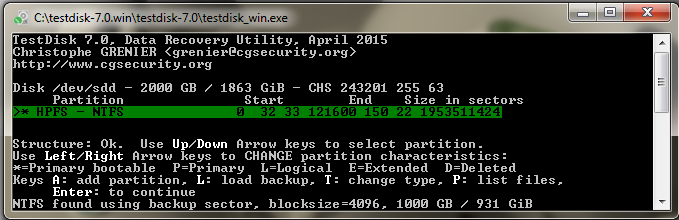
- We want find the partition which has our data, and we want to ensure no data has been lost. Highlight each partition and press p (print). Use the left/right arrow keys to navigate. If your only did a Quick Search, and some of your data is missing, do a Deeper Search. After finding the partition which has the data, press q (quit).
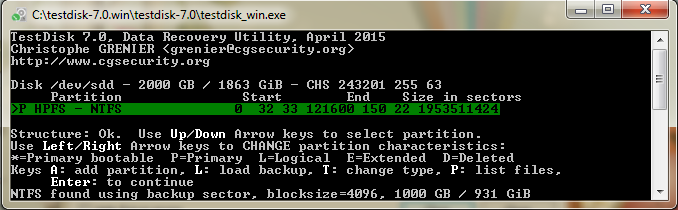
- At the begining of each parition, just after the > will be a character. If the drive is not being used to boot an Operating System, press the left/right arrow keys to toggle the partition type to P (Primary).
- * = Boot Partition
- P = Primary Partitions
- L = Logical Partition
- E = Extended Partition
- Highlight Write and press enter.
- Hightlight each partition and press p (print). Review your data to ensure none of your data has been lost. Uses the left/right arrow keys to navigate. If no data is missing, press q (quit).
- Typically, Boot Sector will be Bad, and Backup Boot Sector will be OK. We need to remedy this, so that both are OK. Highlight Backup BS and press y (yes).
Steps to repair a faulty disk in Linux
- Use the lsscsi command to determine where the faulty drive is mounted (/dev/sda in this example)
root@linux ~ # lsscsi
[0:0:0:0]  disk  ATA      ST500LM000-1EJ16  DEMH  /dev/sda
[6:0:0:0]  disk  SanDisk  SandDisk Cruzer   8.02  /dev/sdb
- Type testdisk and press enter.
- In the first prompt, highlight Create and press enter.
- Highlight the faulty drive and press enter.
Note: If the faulty drive is not listed, boot into BIOS, and ensure the motherboard detects the faulty drive.
- The next prompt in TeskDisk lists the partition types. By default, the partition type for the faulty disk will be highlighted. Press enter.
- Highlight Analyse and press enter
- Typically, the partition 1 will be listed twice. This this screen shot, the FAT16 P (primary) partition is listed twice. This implies a corrupted filesystem. Highlight Quick Search and press enter. This can take hours to complete.
- After quick search has completed, if message No partition found or selected for recovery is displayed, hightlight Deeper Search and press enter.
- After Quick Search or Deeper Search, at least one partition should be listed highlighted green.
- We want find the partition which has our data, and we want to ensure no data has been lost. Highlight each partition and press p (print). Use the left/right arrow keys to navigate. If your only did a Quick Search, and some of your data is missing, do a Deeper Search. After finding the partition which has the data, press q (quit).
- At the begining of each parition, just after the > will be a character. If the drive is not being used to boot an Operating System, press the left/right arrow keys to toggle the partition type to P (Primary).
- * = Boot Partition
- P = Primary Partitions
- L = Logical Partition
- E = Extended Partition
- Highlight Write and press enter.
- Hightlight each partition and press p (print). Review your data to ensure none of your data has been lost. Uses the left/right arrow keys to navigate. If no data is missing, press q (quit).
- Typically, Boot Sector will be Bad, and Backup Boot Sector will be OK. We need to remedy this, so that both are OK. Highlight Backup BS and press y (yes).
This page has additional information: http://www.cgsecurity.org/wiki/TestDisk_Step_By_Step.
Did you find this article helpful?
If so, consider buying me a coffee over at 