
Ports when creating a new profile
When creating a new WebSphere application server profile, the profile will contain one application server, named server1 by default. If using the manageprofiles.sh (Linux) or manageprofiles.bat (Windows) scripts to create the profile and you do not use the -portsFile or -startingPort or -defaultPorts options, the application server will be assigned a predefined collection of port values, such as 9080 for HTTP and 9443 for HTTPS.
The -portsFile option can be used to use a file to define the port values. The portdef.props file can be used. Following are the locations of the portdef.props files.
${WAS_INSTALL_ROOT}/profileTemplates/default/actions/portsUpdate/portdef.props

${WAS_INSTALL_ROOT}/profileTemplates/management/actions/portsUpdate/portdef.props
Typically, the portdef.props file is used. Or, the -startingPort option can be used to define the starting port number, such as 12345.
Ports when creating a new application server
After federating a node into a WebSphere network deployment manager (dmgr), you can then use the WebSphere admin console to create a new WebSphere application server. This could either be a stand alone application server that is not part of a static cluster or dynamic cluster. Or, you could create a new application server that is part of a static cluster or dynamic cluster. Regardless of whether the application server is stand alone or part of a cluster, the creation of the application server will cause the application server to have a certain collection of unique port values.
Viewing ports on the command line
The serverindex.xml file (e.g. /opt/WebSphere/AppServer/profiles/your_profile/config/cells/your_cell/nodes/your_node/serverindex.xml) will list the ports being used, something like this.
<specialEndpoints xmi:id="NamedEndPoint_10" endPointName="WC_adminhost_secure">
  <endPoint xmi:id="EndPoint_10" host="*" port="9443"/>
</specialEndpoints>
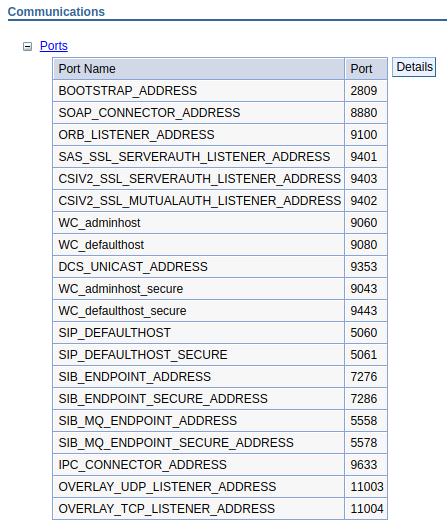
Viewing ports using the WebSphere admin console
- In the WebSphere admin console, expand Servers > Server Types.
- Select WebSphere application servers.
- Select the application server.
- Expand Ports.
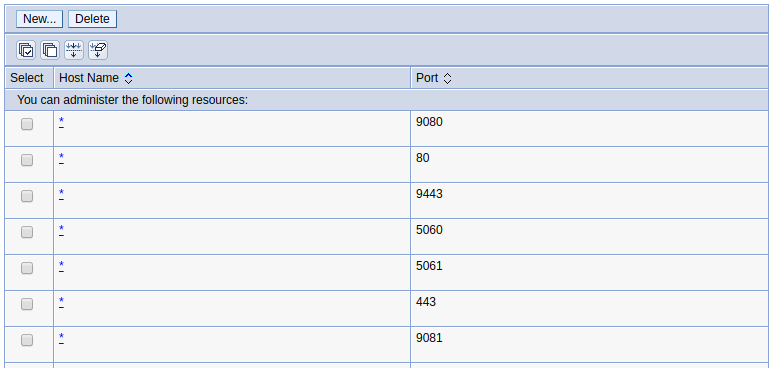
Additionally, there will be a virtual host aliases for each port.
- Select Environment > Virtual Hosts.
- Select the virtual host that contains the port (usually default_host).
- Select Host Aliases.
Additionally, some of the application server ports will also be defined in the web container transport chains. Changes made to the application server ports will also update the web container transport chain port.
- Select Servers > Server Types > WebSphere application servers.
- Select the application server.
- Select Web Container Settings > Web container transport chains.
![]()
Changing ports
Refer to our article on how to change WebSphere application server ports.
Did you find this article helpful?
If so, consider buying me a coffee over at 