
If you are not sure what a cell, profile, node, application server, dmgr are, check out my article WebSphere terms (cell, profile, node, application server, dmgr).
The manageprofiles.sh (Linux) or manageprofiles.bat (Windows) script can be used to create a profle. In fact, the manageprofiles script can be used to do a number of different things.
- Backup a profile (-backupProfile)
- Create a new profile (-create) (this article)
- Delete a profile (-delete)
- Determine if a profile is valid in the registry (-validateRegistry)
- Determine if a profile is valid in the registry and updae (-validateAndUpdateRegistry)
- List profiles (-listProfiles)
- List default profile (-getDefaultName)
- List profile path (-getPath)
- Restore a profile (-restoreProfile)
When possible, it is usually best to create a profile as root (Linux) or administrator (Windows). If you must create a profile as a non-root or non-administrator, then you may need to perform additional file permission and ownership changes, such as making the non-root or non-administrator user the owner of files that make up the profile.
Before you can create a profile, you must install the websphere package such as com.ibm.websphere.BASE.v90_9.0.6.20171205_1311.
At a minimum, the only options that are required to create a profile are -create and -profileName. If you are going to have two or more profiles on the same application server, each profile name must be unique.
${WAS_INSTALL_ROOT}/bin/manageprofiles.sh -create -profileName AppSrv01
When creating a profile, there will be different types of profiles that can be created, such as an application server profile, a management profile, et cetera. The -templatePath option is used to choose the type of profile. If you do not include the -templatePath option, the default template will be used. In this example, a management profile will be created. In other words, which will create a deployment manager (dmgr) profile.
${WAS_INSTALL_ROOT}/bin/manageprofiles.sh -create -profileName Dmgr01 -templatePath ${WAS_INSTALL_ROOT}/profileTemplates/management
If you don't include the -profilePath option, the profile will be created in the ${WAS_INSTALL_ROOT}/profiles directory.
If you don't include the -cellName option, the cell name will be the hostname of your server followed by Node01Cell1. For example, if the hostname of your server is wasServer1, then the cell name will be wasServer1Node01Cell1.
If you don't include the -nodeName option, the node name will be the hostname of your server followed by Node01. For example, if the hostname of your server is wasServer1, then the node name will be wasServer1Node01.
If you don't include the -serverName option, the server name will be server1.
If you do not include the -hostName option, the hostname will be hostname of the Linux or Windows Operating System.
If you don't include the -isDefault option, the profile will not be identified as the default profile. Certain scripts will do a change to the default profile when the -profileName option is not used in the script.
If you don't include the -enableAdminSecurity, -adminUserName, and -adminPassword options, administrative security will be disabled. Administrative security can be configured after the profile has been created. If these options are used, administrative security will be enabled with a federated repository.
${WAS_INSTALL_ROOT}/bin/manageprofiles.sh
-create
-profileName AppSrv01
-enableAdminSecurity true
-adminUserName john.doe
-adminPassword itsasecret
Optionally, the -portsFile or -startingPort option can be used. You may also want to include the -validatePorts option. You wouldn't want to use the -defaultPorts option, as this would configure the profile to use the default ports, such as port 9060 for the web console. You would never use a combination of -portsFile, -startingPort, or -defaultPorts. Instead, you would use only one of these options. If using the -startingPort option, you would specify a value, such as 20000.
For example, let's say /tmp/portdev.props contains the following.
SOAP_CONNECTOR_ADDRESS=8888
SIP_DEFAULTHOST_SECURE=5076
SIP_DEFAULTHOST=5077
SIB_ENDPOINT_ADDRESS=7295
WC_defaulthost_secure=9447
DCS_UNICAST_ADDRESS=9362
SIB_MQ_ENDPOINT_SECURE_ADDRESS=5586
WC_adminhost_secure=9052
CSIV2_SSL_MUTUALAUTH_LISTENER_ADDRESS=9431
ORB_LISTENER_ADDRESS=9109
BOOTSTRAP_ADDRESS=2811
CSIV2_SSL_SERVERAUTH_LISTENER_ADDRESS=9432
IPC_CONNECTOR_ADDRESS=9641
SIB_ENDPOINT_SECURE_ADDRESS=7296
WC_defaulthost=9084
SIB_MQ_ENDPOINT_ADDRESS=5566
SAS_SSL_SERVERAUTH_LISTENER_ADDRESS=9433
OVERLAY_UDP_LISTENER_ADDRESS=11023
OVERLAY_TCP_LISTENER_ADDRESS=11024
WC_adminhost=9069
You could include the -portsFile option when creating the profile.
${WAS_INSTALL_ROOT}/bin/manageprofiles.sh
-create
-profileName Dmgr01
-templatePath ${WAS_INSTALL_ROOT}/profileTemplates/management
-enableAdminSecurity true
-adminUserName john.doe
-adminPassword itsasecret
-portsFile /tmp/portdef.props
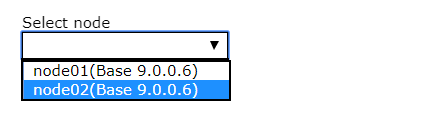
If creating two profiles on two different servers that will be part of a cluster, give the first profile a node name such as node01 and give the second profile a node name such as node02. This is necessary so that when you are creating the cluster, you can select node01 and node02. The server name will typically be the same on both nodes.
If the profile was successfully created, the following output should be displayed.
INSTCONFSUCCESS: Success: Profile your_profile_name now exists.
The profile will now exist at /opt/IBM/WebSphere/AppServer/profiles. You could also list the profile with the -listProfiles option.
~]# ls ${WAS_INSTALL_ROOT}/profiles
AppSrv01
And the manageprofiles.sh -listProfiles command should list the profile.
~]# ${WAS_INSTALL_ROOT}/bin/manageprofiles.sh -listProfiles
[AppSrv01]
You can now start the application server or start the deployment manager and then access the web browser console.
Did you find this article helpful?
If so, consider buying me a coffee over at 