
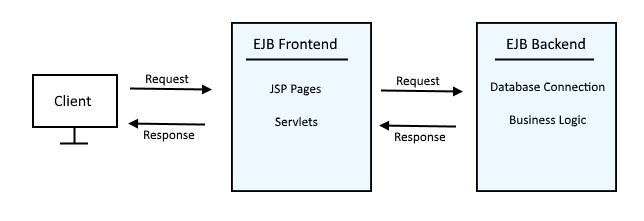
An EJB (Enterprise Java Bean) is a model that allows you to create separation between the frontend of an app, such as the JSP pages and servlets used to produce the app, and the backend, such as the database connection and business logic working behind the scenes. As an example, let's say you have an identical class being used by numerous applications that connects to a database. Instead of each application containing the database connection class, a backend EJB can be created, which contains the database connection class, and then individual frontend applications can use the database connection class by calling the backend EJB.
As an alternative, this could also be accomplished by creating a Java Archive (JAR) that contains the backend logic, and then use the JAR in the frontend app.
Create a new EJB Project
In Eclipse, select File > New > EJB Project. Give your project a name, such as "EJB Backend", select WebSphere or Liberty as the server runtime, and select Finish. I also like to remove the check mark from "add to EAR", just to reduce the cluter when learning something now. The EJB Backend folder should be added to the left panel of Eclipse.
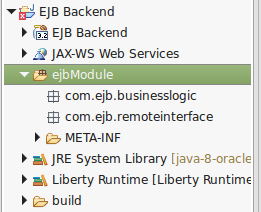
Create Packages
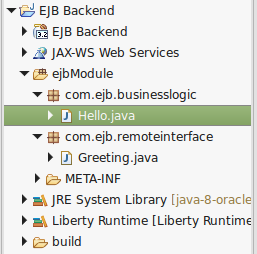
Expand EJB Backend, right click on the ejbModule folder, and select New > Package. Create the follow two packages:
- com.ejb.businesslogic
- com.ejb.remoteinterface
The new packages should now be displayed under the ejbModule folder.
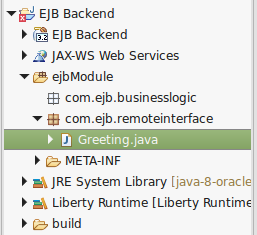
Create Interface
Right click on the com.ejb.remoteinterface package, and select New > Interface. Give the interface a name, such as "Greeting", and select Finish. The new interface should now be displayed under the com.ejb.remoteinterface package.
Add the following markup to the Greeting.java interface.
package com.ejb.remoteinterface;

import javax.ejb.Remote;

@Remote
public interface Greeting {
	public String sayHello();
}
Create Class
Right click on the com.ejb.businesslogic package, and select New > Class. Give the class a name, such as "Hello", and select Finish. The new class should now be displayed under the com.ejb.businesslogic package.
Add the following markup to the Hello.java class.
package com.ejb.businesslogic;

import javax.ejb.Stateless;
import com.ejb.remoteinterface.Greeting;

@Stateless
public class Hello implements Greeting {

	public Hello() {

	}

	public String sayHello() {
		return "Hello World";
	}
}
Deploy EJB to WebSphere
Right click on your EJB project and select Export. This will create a JAR file. You can then deploy the JAR file to your WebSphere application server.
Create Stub class
Once deployed, you will then want to add the Stub to the JAR, by running this script.
~]# was_home/bin/createEJBStubs.sh was_home/profiles/your_profile/installedApps/your_ear/yourEJB.jar
In this example, the following Stub would be added to the JAR.
com/ejb/remoteinterface/_Greeting_Stub.classPK
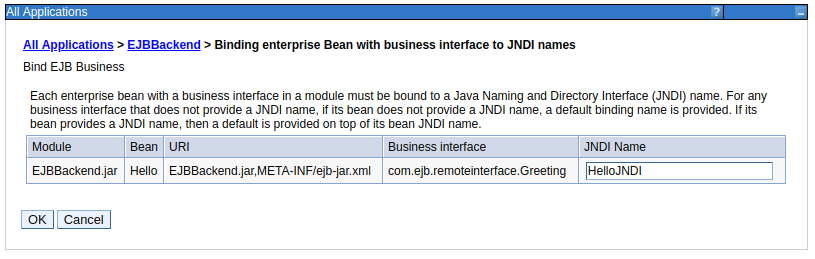
Create JNDI
You will want to create a JNDI name that will be used by the clients to call the class in the EJB. In WebSphere, go to Applications > All applications > your EJB > Bind EJB Business, and give the EJB an JNDI name (HelloJNDI in this example). Restart the JVM.
The application server logs should provide you with the binding details, which the clients will need. For example, these are the logs of the EJB deployed to WebSphere.
[mm/dd/yy hh:mm:ss] 000006a WASNameSpaceB I CNTR0167I:
The server is binding the com.ejb.remoteinterface.Greeting interface of the Hello enterprise bean in the EJBBackend.jar module of the EJBBackend application.
The binding location is: HelloJNDI

[mm/dd/yy hh:mm:ss] 000006a WASNameSpaceB I CNTR0167I:
The server is binding the com.ejb.remoteinterface.Greeting interface of the Hello enterprise bean in the EJBBackend.jar module of the EJBBackend application.
The binding location is: java:global/EJBBackend/Hello!com.ejb.remoteinterface.Greeting
Validate classes are being loaded
Using the class loader viewer, you can see that the jar file (EJBBackend.jar) was loaded.
And you can see the classes that are available in EJBBackend.jar.

Create frontend application
You can now follow this tutorial to configure a client application to use the Hello class from the EJB.
Did you find this article helpful?
If so, consider buying me a coffee over at 