
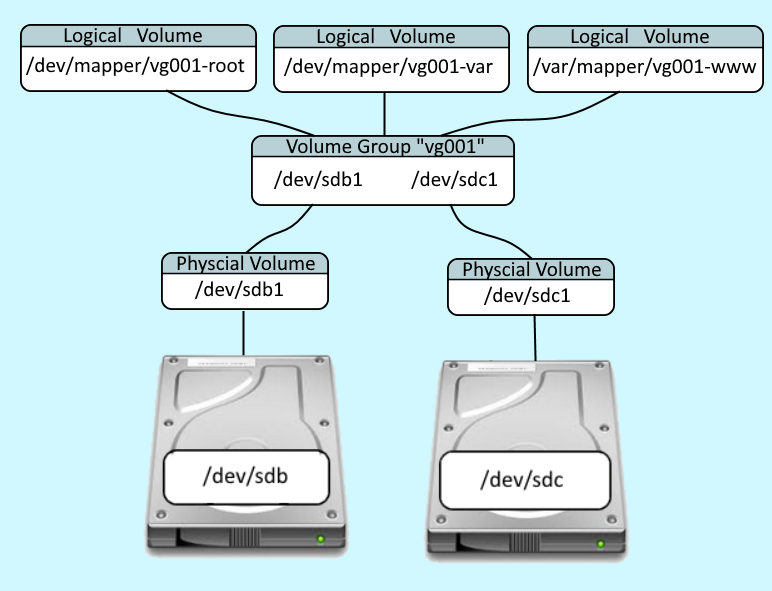
LVM (Logical Volume Manager) is a system that lets you create logical volumes from physical storage devices. For example, in this illustration, using 2 physical storage devices, 3 logical volumes are created:
- /dev/mapper/vg001-root
- /dev/mapper/vg001-var
- /dev/mapper/vg001-www
The first step in setting up an LVM system is to create a partition on each physical storage device to use the Linux LVM system. This can be accomplished with fdisk, gdisk, or parted. Here are the steps on how to set /dev/sda3 to type Linux LVM using parted.
parted -s /dev/sdb set 1 lvm on
parted -s /dev/sdc set 1 lvm on
The pvdisplay command should now show both physical volumes. Or, the pvcreate command can be used to create the physical volumes.
--- NEW Physical volume ---
PV Name               /dev/sdb1
VG Name
PV Size               <100.00 GiB
Allocatable           NO
PE Size               0
Total PE              0
Free PE               0
Allocated PE          0
PV UUID               qIJr3I-uokW-qIRJ-Mi9a-SmIp-2DYN-XwxUDf

--- NEW Physical volume ---
PV Name               /dev/sdc1
VG Name
PV Size               <100.00 GiB
Allocatable           NO
PE Size               0
Total PE              0
Free PE               0
Allocated PE          0
PV UUID               bW0moV-MWxi-4PvP-RWXR-NUFe-GfJD-2fe83A
Next you would use the vgcreate command to add the physical volumes to a volume group. In this example, the name of the volume group is "vg001".
vgcreate vg001 /dev/sdb1 /dev/sdc1
Or, if the volume group already exists, the vgextend extend command would be used.
vgextend vg001 /dev/sdb1
The vgdisplay command can then be used to display the volume group.
--- Volume group ---
VG Name               vg001
System ID
Format                lvm2
Metadata Areas        1
Metadata Sequence No  3
VG Access             read/write
VG Status             resizable
MAX LV                0
Cur LV                2
Open LV               2
Max PV                0
Cur PV                1
Act PV                1
VG Size               <15.51 GiB
PE Size               4.00 MiB
Total PE              3970
Alloc PE / Size       3960 / <15.47 GiB
Free  PE / Size       10 / 40.00 MiB
VG UUID               lgHh9m-9iMP-8ltU-2cxz-Y4wL-uwG0-EHiGFr
Then the lvcreate command is used create logical volumes from available space in the volume group.
lvcreate --size 1G --name root vg001
lvcreate --size 1G --name var  vg001
lvcreate --size 1G --name www  vg001
The lvdisplay command can then be used to display each logical volume.
---Logical volume---
LV Path               /dev/vg001/root
LV Name               root
VG Name               vg001
LV UUID               EuBJ3c-Q8EU0M5ef-Qvip-KeyH-m2Sc-MGelKe
LV Creation host,time localhost.localdomain, 2013-10-11 15:40:12 -0500
LV Status             available
# open                1
LV Size               99.94 GiB
Current LE            3198
Segments              3
Allocation            inherit
Read ahead sectors    auto
- currently set to    256
Block device          253:9

---Logical volume---
LV Path               /dev/vg001/var
LV Name               var
VG Name               vg001
LV UUID               EuBJ3c-Q8EU0M5ef-Qvip-KeyH-m2Sc-MGelKe
LV Creation host,time localhost.localdomain, 2013-10-11 15:40:12 -0500
LV Status             available
# open                1
LV Size               99.94 GiB
Current LE            3198
Segments              3
Allocation            inherit
Read ahead sectors    auto
- currently set to    256
Block device          253:9

---Logical volume---
LV Path               /dev/vg001/www
LV Name               www
VG Name               vg001
LV UUID               EuBJ3c-Q8EU0M5ef-Qvip-KeyH-m2Sc-MGelKe
LV Creation host,time localhost.localdomain, 2013-10-11 15:40:12 -0500
LV Status             available
# open                1
LV Size               99.94 GiB
Current LE            3198
Segments              3
Allocation            inherit
Read ahead sectors    auto
- currently set to    256
Block device          253:9
The mkfs command would then be used to configure each logical volume with a file system type.
mkfs --type xfs /dev/vg001/root
mkfs --type xfs /dev/vg001/var
mkfs --type xfs /dev/vg001/www
The file command with the --special-files and --dereference flags can then be used to validate each logical volume has the expected file system type.
~]# file /dev/vg001/root --special-files --dereference
/dev/vg001/root: SGI XFS filesystem data (blksz 4096, inosz 256, v2 dirs)
Finally, you would update the /etc/fstab so that the logical volumes are mounted at boot. In this example, the /etc/fstab would probably have something like this.
/dev/mapper/vg001-root  /     xfs  defaults  0  0
/dev/mapper/vg001-var   /var  xfs  defaults  0  0
/dev/mapper/vg001-www   /www  xfs  defaults  0  0
Did you find this article helpful?
If so, consider buying me a coffee over at 