
There are multiple different types of Identity Providers (IdP) that OpenShift can use for authentication.
- htpasswd
- kubeadmin
- LDAP sync (Active Directory)
- Red Hat build of the Keycloak Operator
- Red Hat Single Sign-On (SSO)
Both the Red Hat build of the Keycloak Operator and Red Hat Single Sign-On (SSO) (this article) use keycloak as the backend Identity Provider (IdP) system. Red Hat Single Sign-On (SSO) is much easier to install and configure but may limit you from being able to use or configure certain features. For example, Red Hat Single Sign-On (SSO) installs and configures a Postgres SQL database for you, whereas with Red Hat build of the Keycloak Operator you install and configure the Postgres SQL database.
I find it much easier to use the OpenShift console to add an OpenID Connect Identity Provider over the command line, and since this is typically just a one time task, it probably make sense to use the console for this.
You probably are going to want to sign into the OpenShift console as a user that has the cluster-admin permission.
If you are not familiar with the oc command, refer to OpenShift - Getting Started with the oc command.
In this example I will be adding a Red Hat Single Sign On (SSO) OpenID Connect Identity Provider. Check out my article create a Red Hat Single Sign On (SSO) OpenID Connect Identity Provider.
In the upper left hand corner of your Red Hat Single Sign On (SSO) console, select your realm. In the left panel select Clients and select your OpenID Connect client.
On the Configuration tab, you should have the following.

On your OpenShift system, this command can be used to return the default hostname for your OpenShift oAuth server.
~]$ oc get ingress.config.openshift.io cluster --output jsonpath="{.status.componentRoutes[*].defaultHostname}"
oauth-openshift.apps.openshift.example.com
On a Linux system, curl can be used to return the issuer, authorization endpoint and token endpoint URLs by submitting a GET request to https://<the API URL of your OpenShift system>:6443/.well-known/oauth-authorization-server.
~]$ curl --request GET --url https://api.openshift.example.com:6443/.well-known/oauth-authorization-server
{
  "issuer": "https://oauth-openshift.apps.openshift.example.com",
  "authorization_endpoint": "https://oauth-openshift.apps.openshift.example.com/oauth/authorize",
  "token_endpoint": "https://oauth-openshift.apps.openshift.example.com/oauth/token",
  "scopes_supported": [
    "user:check-access",
    "user:full",
    "user:info",
    "user:list-projects",
    "user:list-scoped-projects"
  ],
  "response_types_supported": [
    "code",
    "token"
  ],
  "grant_types_supported": [
    "authorization_code",
    "implicit"
  ],
  "code_challenge_methods_supported": [
    "plain",
    "S256"
  ]
}
Or the oc exec command from a pod running on your OpenShift cluster should be able to return the OpenShift oAuth server URLs.
~]$ oc exec pod/ose-hello-openshift-rhel8-5959c4fb77-9tdzw -n hello-openshift -- curl --insecure --request GET --url https://openshift.default.svc/.well-known/oauth-authorization-server
{
  "issuer": "https://oauth-openshift.apps.openshift.example.com",
  "authorization_endpoint": "https://oauth-openshift.apps.openshift.example.com/oauth/authorize",
  "token_endpoint": "https://oauth-openshift.apps.openshift.example.com/oauth/token",
  "scopes_supported": [
    "user:check-access",
    "user:full",
    "user:info",
    "user:list-projects",
    "user:list-scoped-projects"
  ],
  "response_types_supported": [
    "code",
    "token"
  ],
  "grant_types_supported": [
    "authorization_code",
    "implicit"
  ],
  "code_challenge_methods_supported": [
    "plain",
    "S256"
  ]
}
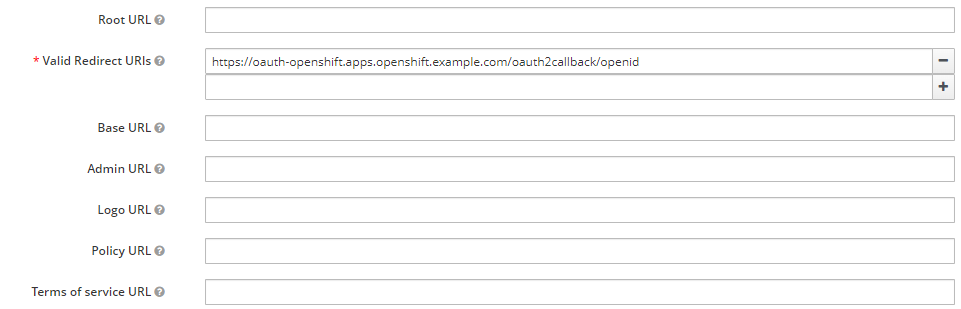
The Valid Redirect URIs should have https://<hostname of your OpenShift oAuth server>/oauth2callback/<the name of your Red Hat SSO Identity Provider> such as https://oauth-openshift.apps.openshift.example.com/oauth2callback/openid.
In the left panel, select Administration > Cluster Settings
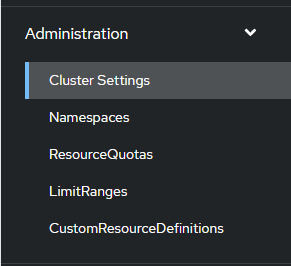
Select the Configuration tab and then select OAuth.

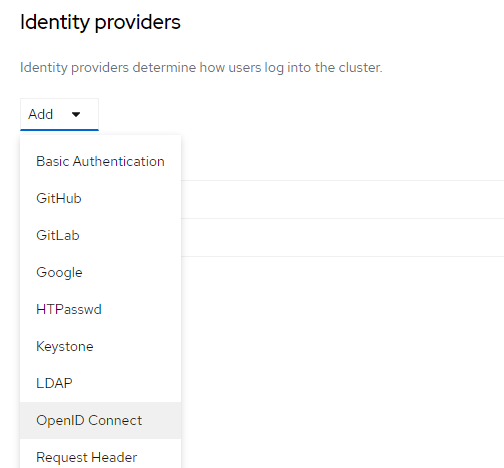
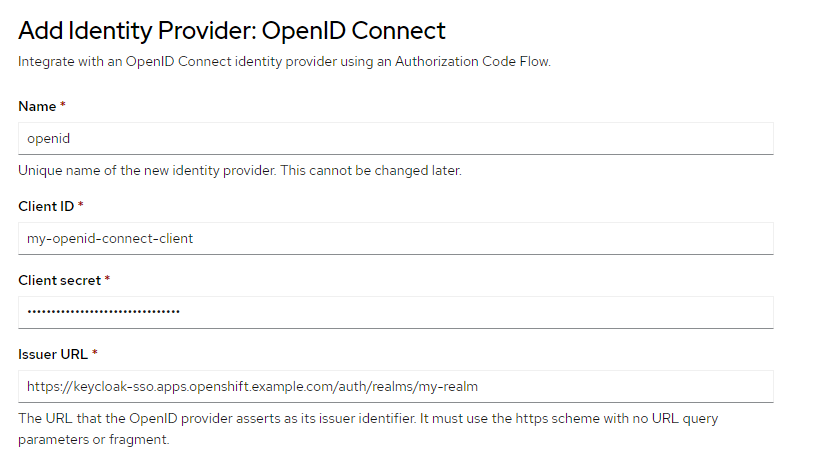
Select Add > OpenID Connect.
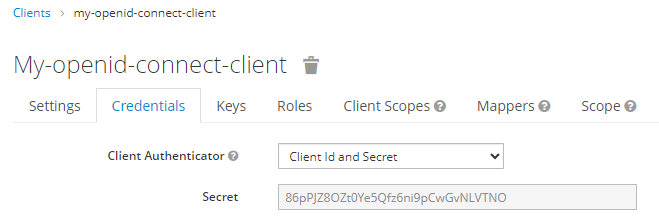
In this example, you can get your OpenID Connect client ID in the Red Hat Single Sign On (SSO) console at clients > your OpenID Connect client.
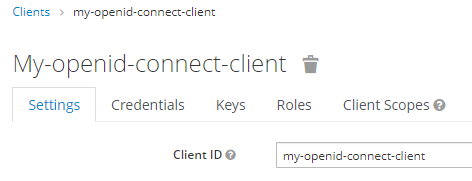
And you can get the value of the OpenID Connect Secret in the Red Hat Single Sign On (SSO) console at clients > your OpenID Connect client > Credentials.
Let's create the OpenID Connect Identity Provider.
- Name should be the last value from your oAuth Valid Redirect URI. For example, if your oAuth Valid Redirect URI is https://oauth-openshift.apps.openshift.example.com/oauth2callback/openid then name should be openid
- Client ID is your OpenID Connect client ID in the Red Hat Single Sign On (SSO) console at clients > your OpenID Connect client
- Client Secret is your OpenID Connect Secret in the Red Hat Single Sign On (SSO) console at clients > your OpenID Connect client > Credentials.
- The Issuer URL is https://<base URL of your Red Hat Single Sign On (SSO) console>/auth/realms/<your realm> such as https://keycloak-sso.apps.openshift.example.com/auth/realms/my-realm.
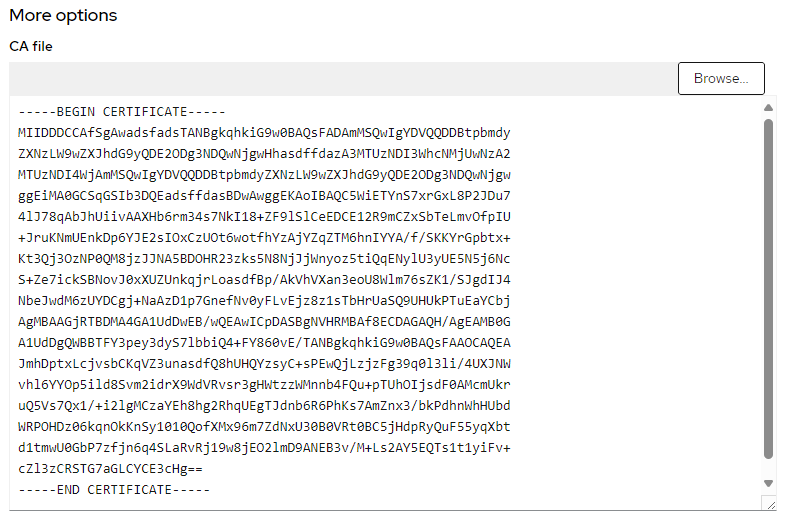
The oc get secret command can be used to get the public certificate in the router-ca secret in the openshift-ingress-operator namespace.
~]$ oc get secret router-ca --namespace openshift-ingress-operator --output jsonpath="{.data.tls\.crt}" | base64 --decode | openssl x509 -text -noout
-----BEGIN CERTIFICATE-----
MIIDDDCCAfSgAwadsfadsTANBgkqhkiG9w0BAQsFADAmMSQwIgYDVQQDDBtpbmdy
ZXNzLW9wZXJhdG9yQDE2ODg3NDQwNjgwHhasdffdazA3MTUzNDI3WhcNMjUwNzA2
MTUzNDI4WjAmMSQwIgYDVQQDDBtpbmdyZXNzLW9wZXJhdG9yQDE2ODg3NDQwNjgw
ggEiMA0GCSqGSIb3DQEadsadsfadsfdfasadsfasfas5WiETYnS7xrGxL8P2JDu7
4lJ78qAbJhUiivAAXHb6rm34s7NkI18+ZF9lSlCeEDCE12R9mCZxSbTeLmvOfpIU
+JruKNmUEnkDp6YJE2sIOasdfadsfdasfasdfdasfTM6hnIYYA/f/SKKYrGpbtx+
Kt3Qj3OzNP0QM8jzJJNA5BDOHR23zks5N8NjJjWnyoz5tiQqENylU3yUE5N5j6Nc
S+Ze7ickSBNovJ0xXUZUnkadsfadsfdasfasfhVXan3eoU8Wlm76sZK1/SJgdIJ4
NbeJwdM6zUYDCgj+NaAzD1p7GnefNv0yFLvEjz8z1sTbHrUaSQ9UHUkPTuEaYCbj
AgMBAAGjRTBDMA4GA1UdDwEB/wQEAwICpDASBgNVHRMBAf8ECDAGAQH/AgEAMB0G
A1UdDgQWBBTFY3pey3dyS7lbbiQ4+FY860vE/TANBgkqhkiG9w0BAQsFAAOCAQEA
JmhDptxLcjvsbCKqVZ3unasasdfadsfadsfC+sPEwQjLzjzFg39q0l3li/4UXJNW
vhl6YYOp5ild8Svm2idrX9WdVRvsr3gHWtzzWMnnb4FQu+pTUhOIjsdF0AMcmUkr
uQ5Vs7Qx1/+i2lgMCzaYEh8hg2RhqUEgTJdnb6R6PhKs7AmZnx3/bkPdhnWhHUbd
WRPOHDz06kqnOkKnSy1010QofXMx96m7ZdNxU30B0VRt0BC5jHdpRyQuF55yqXbt
d1tmwU0GbP7zfjn6q4SLaRvRj19w8jEO2lmD9ANEB3v/M+Ls2AY5EQTs1t1yiFv+
cZl3zCRSTG7aGLCYCE3cHg==
-----END CERTIFICATE-----
Let's provide the public certificate when creating the Identity Provider.
And the oauth YAML should have something like this.
~]$ oc get oauth cluster --output yaml
apiVersion: config.openshift.io/v1
kind: OAuth
metadata:
  generation: 2
  name: cluster
  ownerReferences:
  - apiVersion: config.openshift.io/v1
    kind: ClusterVersion
    name: version
spec:
  identityProviders:
  - mappingMethod: claim
    name: openid
    openID:
      ca:
        name: openid-ca-dgqwd
      claims:
        email:
        - email
        name:
        - name
        preferredUsername:
        - preferred_username
      clientID: my-openid-connect-client
      clientSecret:
        name: openid-client-secret-kqflt
      extraScopes: []
      issuer: 'https://keycloak-sso.apps.openshift.example.com/auth/realms/my-realm'
    type: OpenID
And there should be a secret named openid-client-secret-<random string> in the openshift-config namespace.
~]$ oc get secrets --namespace openshift-config
NAME                                      TYPE                                  DATA   AGE
openid-client-secret-kqflt                Opaque                                1      4d
And the secret should contain whatever value you created for the client ID secret and must be an exact match of the value of the secret in the Red Hat Single Sign On (SSO) console.
~]$ oc get secret openid-client-secret-kqflt --namespace openshift-config --output jsonpath="{.data.clientSecret}" | base64 --decode
86pPJZ8OZt0Ye5Qfz6ni9pCwGvNLVTNO
This should also create a config map named openid-ca-<random string> in the openshift-config namespace.
~]$ oc get configmaps --namespace openshift-config
NAME                               DATA   AGE
openid-ca-dgqwd                    1      2m2s
The config map should contain the public certificate.
~]$ oc get configmap openid-ca-dgqwd --namespace openshift-config --output jsonpath="{.data.ca\.crt}"
-----BEGIN CERTIFICATE-----
MIIDDDCCAfSgAwadsfadsTANBgkqhkiG9w0BAQsFADAmMSQwIgYDVQQDDBtpbmdy
ZXNzLW9wZXJhdG9yQDE2ODg3NDQwNjgwHhasdffdazA3MTUzNDI3WhcNMjUwNzA2
MTUzNDI4WjAmMSQwIgYDVQQDDBtpbmdyZXNzLW9wZXJhdG9yQDE2ODg3NDQwNjgw
ggEiMA0GCSqGSIb3DQEadsadsfadsfdfasadsfasfas5WiETYnS7xrGxL8P2JDu7
4lJ78qAbJhUiivAAXHb6rm34s7NkI18+ZF9lSlCeEDCE12R9mCZxSbTeLmvOfpIU
+JruKNmUEnkDp6YJE2sIOasdfadsfdasfasdfdasfTM6hnIYYA/f/SKKYrGpbtx+
Kt3Qj3OzNP0QM8jzJJNA5BDOHR23zks5N8NjJjWnyoz5tiQqENylU3yUE5N5j6Nc
S+Ze7ickSBNovJ0xXUZUnkadsfadsfdasfasfhVXan3eoU8Wlm76sZK1/SJgdIJ4
NbeJwdM6zUYDCgj+NaAzD1p7GnefNv0yFLvEjz8z1sTbHrUaSQ9UHUkPTuEaYCbj
AgMBAAGjRTBDMA4GA1UdDwEB/wQEAwICpDASBgNVHRMBAf8ECDAGAQH/AgEAMB0G
A1UdDgQWBBTFY3pey3dyS7lbbiQ4+FY860vE/TANBgkqhkiG9w0BAQsFAAOCAQEA
JmhDptxLcjvsbCKqVZ3unasasdfadsfadsfC+sPEwQjLzjzFg39q0l3li/4UXJNW
vhl6YYOp5ild8Svm2idrX9WdVRvsr3gHWtzzWMnnb4FQu+pTUhOIjsdF0AMcmUkr
uQ5Vs7Qx1/+i2lgMCzaYEh8hg2RhqUEgTJdnb6R6PhKs7AmZnx3/bkPdhnWhHUbd
WRPOHDz06kqnOkKnSy1010QofXMx96m7ZdNxU30B0VRt0BC5jHdpRyQuF55yqXbt
d1tmwU0GbP7zfjn6q4SLaRvRj19w8jEO2lmD9ANEB3v/M+Ls2AY5EQTs1t1yiFv+
cZl3zCRSTG7aGLCYCE3cHg==
-----END CERTIFICATE-----
Now in the OpenShift console let's go to Administration > Cluster Settings > Cluster Operators. If the authentication Cluster Operator is not Available this means you have some issue you'll need to look into.
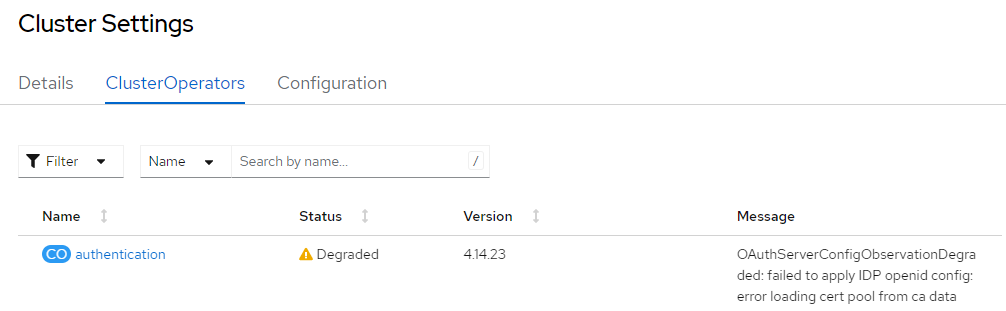
One thing that wasn't totally clear to me is if the config map should contain the base64 encoded public certificate, or the public certificate that starts with -----BEGIN CERTIFICATE----- and ends with -----END CERTIFICATE----- or if it should contain the private key that starts with -----BEGIN RSA PRIVATE KEY----- and ends with -----END RSA PRIVATE KEY-----, so I did some experimentation. When my oauth cluster YAML had the config map that contains the private key that starts with -----BEGIN RSA PRIVATE KEY----- and ends with -----END RSA PRIVATE KEY----- the status of the authentication Operator had this.
OAuthServerConfigObservationDegraded: failed to apply IDP my-openid-connect-client config: error loading cert pool from ca data
I then updated my oauth cluster YAML to have the config map that contains the public certificate that starts with -----BEGIN CERTIFICATE----- and ends with -----END CERTIFICATE----- and the status of the authentication Operator had this.
OAuthServerConfigObservationDegraded: failed to apply IDP my-openid-connect-client config: tls: failed to verify certificate: x509: cannot validate certificate for 10.11.12.13 because it doesn't contain any IP SANs
And indeed I used this command to verified that the public certificate did not contain any Subject Alternative Names (SANs).
oc get configmap openid-ca-abc123 --namespace openshift-config --output jsonpath="{.data.ca\.crt}" | openssl x509 -text -noout
Did you find this article helpful?
If so, consider buying me a coffee over at 