
What is OpenShift API for Data Protection (OADP)?
OpenShift API for Data Protection (OADP) is an OpenShift Operator that can be used to backup and restore resources. For example, OADP can be used to backup all of the resources in a namespace, such as the deployments, replica sets, pods, services, routes, config maps, secrets, volumes, images, logs, events, and so on. Basically, everything in the namespace. Then, for whatever reason, if some or all of the resources need to be restored, the resources can be restored from the backups.
Install the OpenShift API for Data Protection (OADP) Operator
First and foremost, let's install the OpenShift API for Data Protection (OADP) Operator.
Let's use the oc adm new-project command to create the openshift-adp namespace.
oc adm new-project openshift-adp
Let's say you have the following in a file named operator-group.yml.
apiVersion: operators.coreos.com/v1
kind: OperatorGroup
metadata:
  annotations:
    olm.providedAPIs: Backup.v1.velero.io,BackupRepository.v1.velero.io,BackupStorageLocation.v1.velero.io,CloudStorage.v1alpha1.oadp.openshift.io,DataDownload.v2alpha1.velero.io,DataProtectionApplication.v1alpha1.oadp.openshift.io,DataUpload.v2alpha1.velero.io,DeleteBackupRequest.v1.velero.io,DownloadRequest.v1.velero.io,PodVolumeBackup.v1.velero.io,PodVolumeRestore.v1.velero.io,Restore.v1.velero.io,Schedule.v1.velero.io,ServerStatusRequest.v1.velero.io,VolumeSnapshotLocation.v1.velero.io
  generateName: openshift-adp-
  name: openshift-adp-s52m4
  namespace: openshift-adp
spec:
  targetNamespaces:
  - openshift-adp
  upgradeStrategy: Default
Let's use the oc apply command to create the Operator Group.
~]$ oc apply --filename operator-group.yml
operatorgroup.operators.coreos.com/openshift-adp-s52m4 created
Let's say you have the following in a file named subscription.yml.
apiVersion: operators.coreos.com/v1alpha1
kind: Subscription
metadata:
  labels:
    operators.coreos.com/redhat-oadp-operator.openshift-adp: ""
  name: redhat-oadp-operator
  namespace: openshift-adp
spec:
  channel: stable-1.4
  installPlanApproval: Automatic
  name: redhat-oadp-operator
  source: my-redhat-operators
  sourceNamespace: openshift-marketplace
  startingCSV: oadp-operator.v1.4.4
Let's use the oc apply command to create the Subscription.
~]$ oc apply --filename subscription.yml
subscription.operators.coreos.com/redhat-oadp-operator created
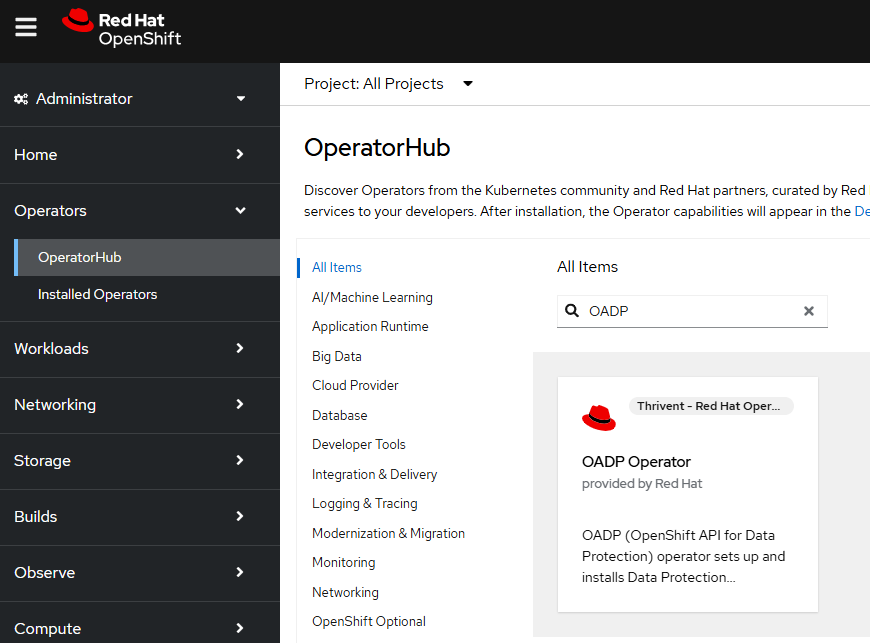
Or, in the OpenShift console, navigate to Operators > OperatorHub. Enter OADP in search and select the OADP Operator.
Select Install.
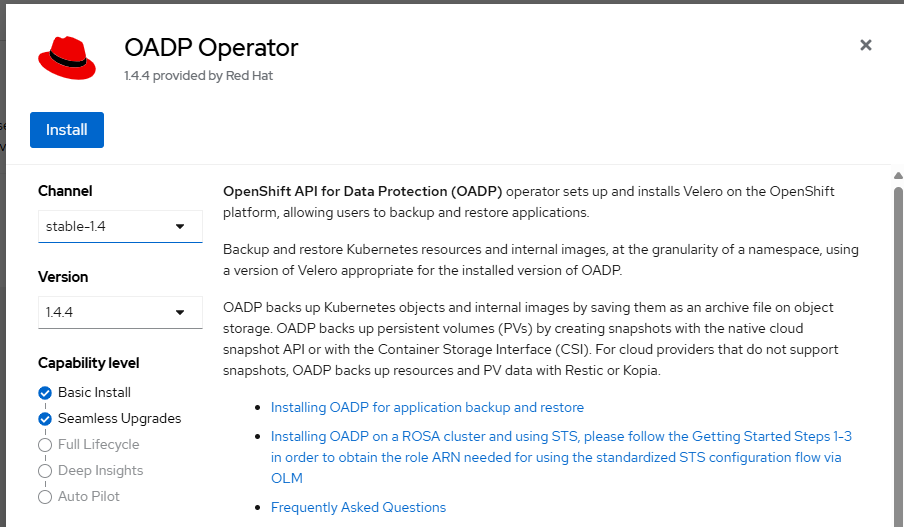
It's usually totally OK to just keep the defaults and select Install.

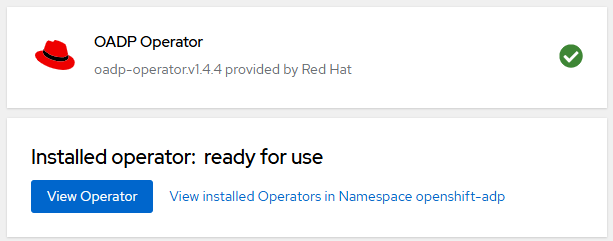
Assuming the operator is successfully installed, something like this should be displayed.
If you are not familiar with the oc command, refer to OpenShift - Getting Started with the oc command.
The oc get operator command should return the OADP operator.
~]$ oc get operators
NAME                                                              AGE
redhat-oadp-operator.openshift-adp                                119s
There should also be a Subscription in the openshift-adp namespace.
~]$ oc get subscriptions --namespace openshift-adp
NAME                   PACKAGE                SOURCE                CHANNEL
redhat-oadp-operator   redhat-oadp-operator   my-redhat-operators   stable-1.4
Assuming you installed the operator using the default option, there should be resources in the openshift-adp namespace.
~]$ oc get all --namespace openshift-adp
NAME                                                   READY   STATUS    RESTARTS   AGE
pod/openshift-adp-controller-manager-7589f7647-5l47r   1/1     Running   0          3m5s

NAME                                                       TYPE        CLUSTER-IP     EXTERNAL-IP   PORT(S)    AGE
service/openshift-adp-controller-manager-metrics-service   ClusterIP   172.30.97.95   <none>        8443/TCP   3m10s

NAME                                               READY   UP-TO-DATE   AVAILABLE   AGE
deployment.apps/openshift-adp-controller-manager   1/1     1            1           3m5s

NAME                                                         DESIRED   CURRENT   READY   AGE
replicaset.apps/openshift-adp-controller-manager-7589f7647   1         1         1       3m5s
Amazon Web Services (AWS) S3 Bucket
Let's say we want to store OADP backups in an Amazon Web Services S3 Bucket. Let's use the aws s3api create-bucket command to create an S3 Bucket for OpenShift API for Data Protection (OADP). Notice this is done using an account named "admin". Check out my article Amazon Web Services (AWS) - List Profile Config using the AWS CLI for more details on Amazon Web Services (AWS) profiles.
aws s3api create-bucket --bucket my-bucket-asdfadkjsfasfljdf --region us-east-1 --profile admin
Next let's create an Identity and Access Management (IAM) user named velero using the aws iam create-user command.
aws iam create-user --user-name velero --profile admin
Then create an access key and secret key for the velero user using the aws iam create-access-key command. Notice that the output will include both the value for both the access key and secret key. Make note of the value of the secret key! This is your one and only chance to view the access key. But don't worry, you can always create a new access key if you forgot to make note of the access key.
~]$ aws iam create-access-key --user-name velero --profile admin
{
    "AccessKey": {
        "UserName": "velero",
        "AccessKeyId": "AKIA2MITL76GFDLORQU6",
        "Status": "Active",
        "SecretAccessKey": "Nzy7dzWcr4hU6sYUg0PCquMCiCv04ae2aXmFIsGE",
        "CreateDate": "2025-04-09T01:26:08+00:00"
    }
}
Let's say you add the access key and secret key to your $HOME/.aws/credentials file (on a Linux system).
~]$ cat ~/.aws/credentials
[velero]
aws_secret_access_key = Nzy7dzWcr4hU6sYUg0PCquMCiCv04ae2aXmFIsGE
aws_access_key_id = AKIA2MITL76GFDLORQU6
And to the $HOME/.aws/config file too.
~]$ cat ~/.aws/config
[profile velero]
region = us-east-1
output = json
You can now try to list the location of your S3 Buckets using the velero user account but you'll get Access Denied because you've not yet granted velero any permissions.
~]$ aws s3api get-bucket-location --bucket my-bucket-asdfadkjsfasfljdf --profile velero
An error occurred (AccessDenied) when calling the GetBucketLocation operation: User: arn:aws:iam::123456789012:user/velero is not authorized to perform: s3:GetBucketLocation because no identity-based policy allows the s3:GetBucketLocation action
Let's create a file named velero-s3-policy.json that contains the following JSON, replacing my-bucket-asdfadkjsfasfljdf with the name of your S3 Bucket.
{
    "Version": "2012-10-17",
    "Statement": [
        {
            "Effect": "Allow",
            "Action": [
                "s3:GetObject",
                "s3:DeleteObject",
                "s3:PutObject",
                "s3:AbortMultipartUpload",
                "s3:ListMultipartUploadParts"
            ],
            "Resource": [
                "arn:aws:s3:::my-bucket-asdfadkjsfasfljdf/*"
            ]
        },
        {
            "Effect": "Allow",
            "Action": [
                "s3:ListBucket",
                "s3:GetBucketLocation",
                "s3:ListBucketMultipartUploads"
            ],
            "Resource": [
                "arn:aws:s3:::my-bucket-asdfadkjsfasfljdf"
            ]
        }
    ]
}
Let's use the aws iam put-user-policy command to attach the policy to the velero user account.
aws iam put-user-policy --user-name velero --policy-name velero-s3 --policy-document file://velero-s3-policy.json --profile admin
Now velero should be able to list the location of the S3 bucket. Don't worry if LocationContraint is null. We just want to make sure that we get a response instead of Access Denied. So far, so good.
~]$ aws s3api get-bucket-location --bucket my-bucket-asdfadkjsfasfljdf --profile velero
{
    "LocationConstraint": null
}
Let's create a file named credentials-velero that contains your AWS Access Key and Secret Key.
[velero]
aws_access_key_id=<your access key>
aws_secret_access_key=<your secret key>
Cloud Credentials Secret
Let's create a secret named cloud-credentials using the credentials-velero file.
oc create secret generic cloud-credentials --namespace openshift-adp --from-file cloud=credentials-velero
Backup Storage Locations
Let's create a YAML file that contains the following, replacing my-bucket-asdfadkjsfasfljdf with the name of your S3 Bucket.
apiVersion: velero.io/v1
kind: BackupStorageLocation
metadata:
  name: my-backup-storage-location
  namespace: openshift-adp
spec:
  config:
    region: us-east-1
    profile: velero
  credential:
    key: cloud
    name: cloud-credentials
  objectStorage:
    bucket: my-bucket-asdfadkjsfasfljdf
  provider: aws
  default: true
Let's use the oc apply command to create my-backup-storage-location.
~]$ oc apply --filename my-backup-storage-location.yaml
backupstoragelocation.velero.io/my-backup-storage-location created
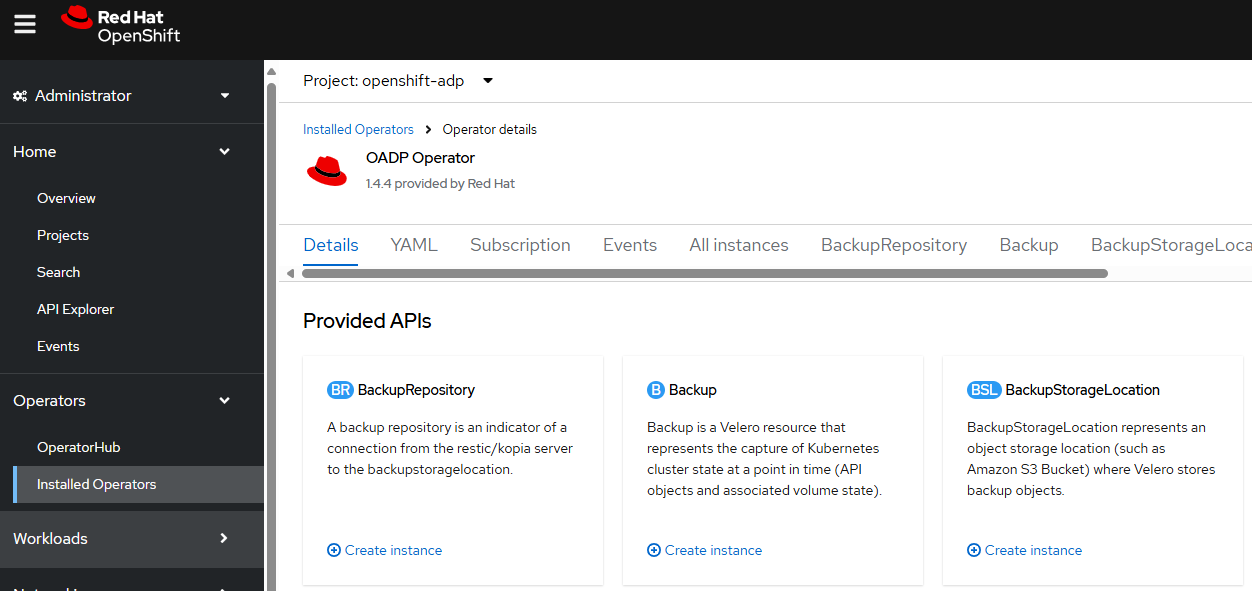
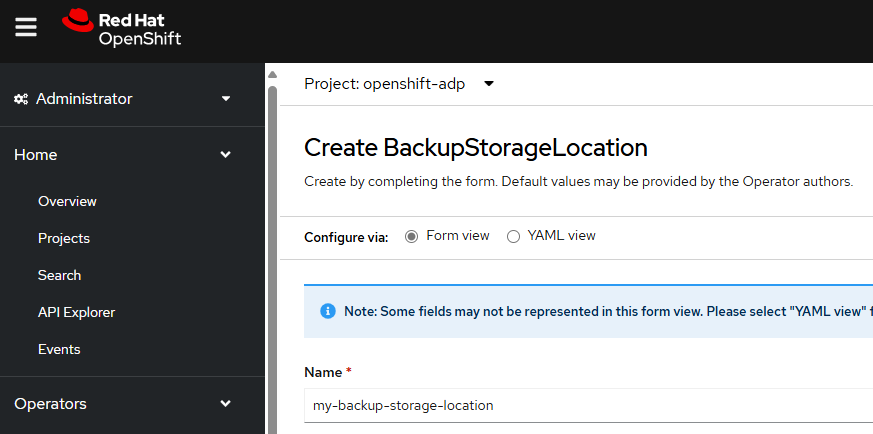
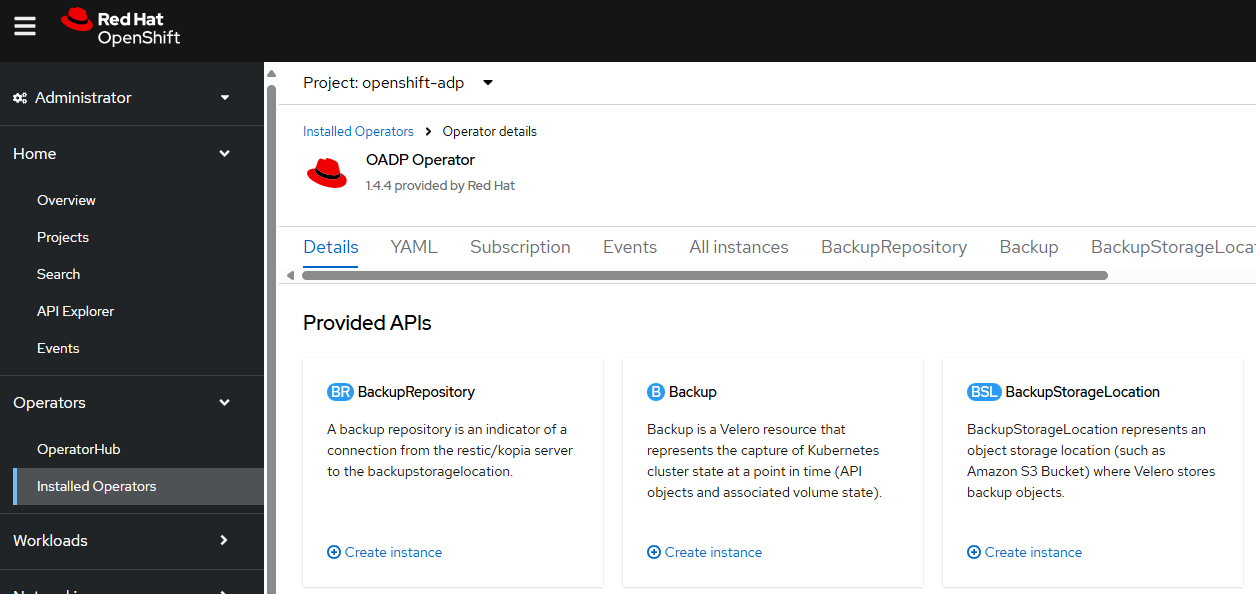
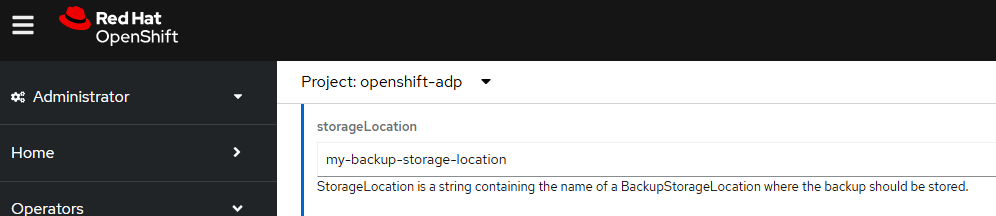
Or in the OpenShift console, at Operators > Installed Operators > OADP select BackupStorageLocation > Create instance.
Let's give the Backup Storage Location a meaningful name.
In this example, since the backup are being storage an Amazon Web Services (AWS) S3 Bucket let's enter aws as the provider and also provide the name of the S3 bucket.
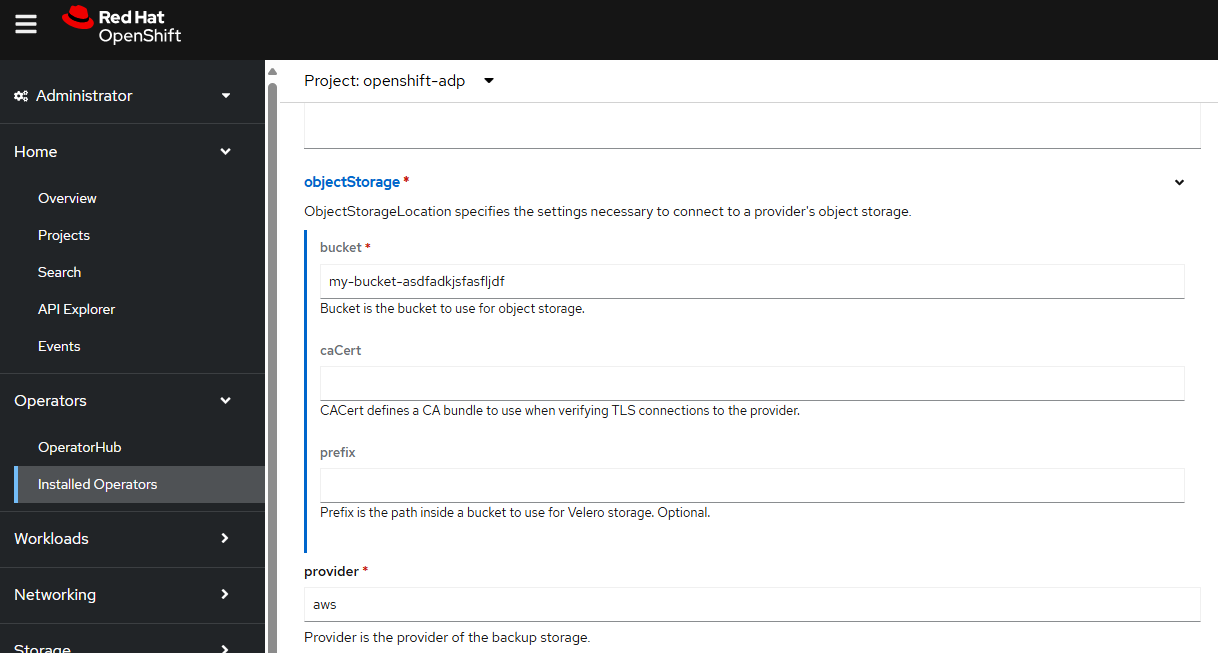
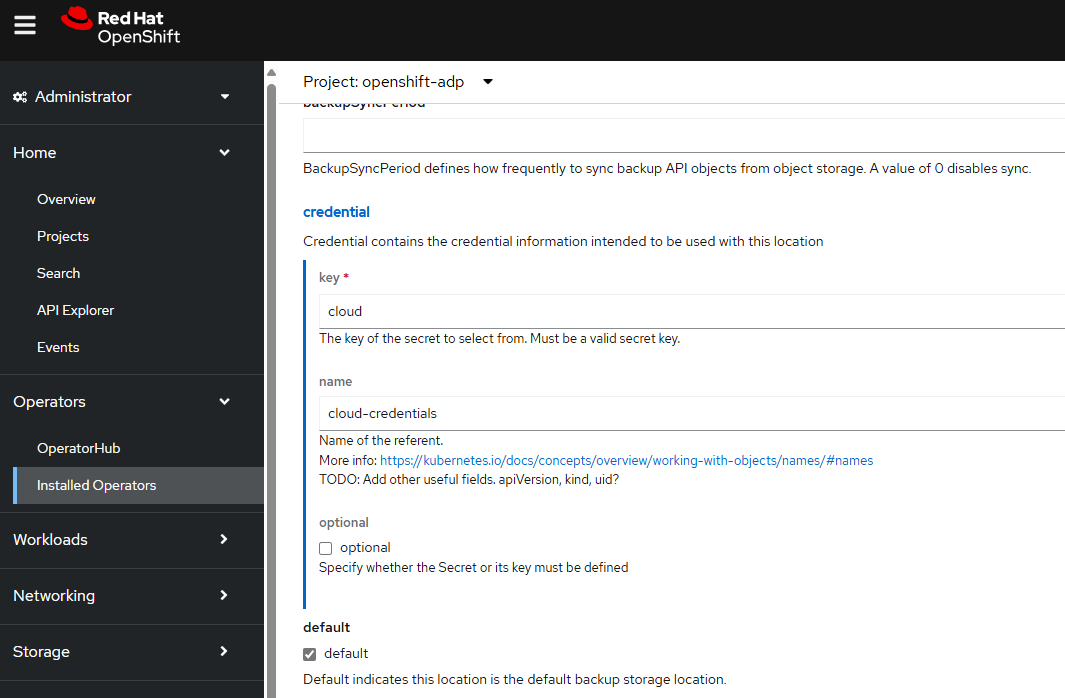
And let's provide the credentials key and value, which is the secret named cloud-credentials.
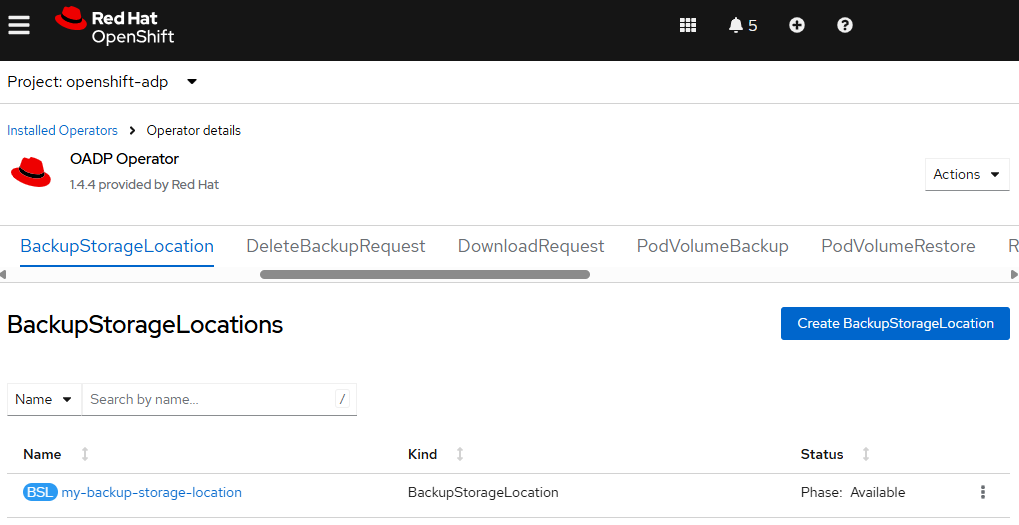
Next let's check to see if the backupStorageLocation is Available.
~]$ oc get backupStorageLocations --namespace openshift-adp
NAME                         PHASE       LAST VALIDATED   AGE   DEFAULT
my-backup-storage-location   Available   60s              64s   true
Or in the OpenShift console, at Operators > Installed Operators > OADP select BackupStorageLocations and check to see if the phase is Available.
Data Protection Application
Next let's create the Data Protection Application.
Let's create a YAML file that contains the following. In this example, since the backups are being stored in an Amazon Web Services (AWS) S3 Bucket, the aws default plugin is included. This also references the backupStorageLocation that was created in the prior step.
apiVersion: oadp.openshift.io/v1alpha1
kind: DataProtectionApplication
metadata:
  name: my-data-protection-application
  namespace: openshift-adp
spec:
  backupImages: false
  backupLocations:
    - name: my-backup-storage-location
      velero:
        default: true
        config:
          region: us-east-1
          profile: velero
        credential:
          key: cloud
          name: cloud-credentials
        objectStorage:
          bucket: my-bucket-asdfadkjsfasfljdf
        provider: aws
  configuration:
    velero:
      defaultPlugins:
        - openshift
        - aws
Be aware that by default, the velero deployment will contain three containers, each with 500m of CPU requests. If you do not have that much available CPU on your OpenShift nodes, you can bump down the CPU requests to perhaps something like 50m.
apiVersion: oadp.openshift.io/v1alpha1
kind: DataProtectionApplication
metadata:
  name: my-data-protection-application
  namespace: openshift-adp
spec:
  backupImages: false
  backupLocations:
    - name: my-backup-storage-location
      velero:
        default: true
        config:
          region: us-east-1
          profile: velero
        credential:
          key: cloud
          name: cloud-credentials
        objectStorage:
          bucket: my-bucket-asdfadkjsfasfljdf
        provider: aws
  configuration:
    velero:
      defaultPlugins:
        - openshift
        - aws
      podConfig:
        resourceAllocations:
          requests:
            cpu: 50m
Let's use the oc apply command to create my-data-protection-application.
oc apply --filename my-data-protection-application.yaml
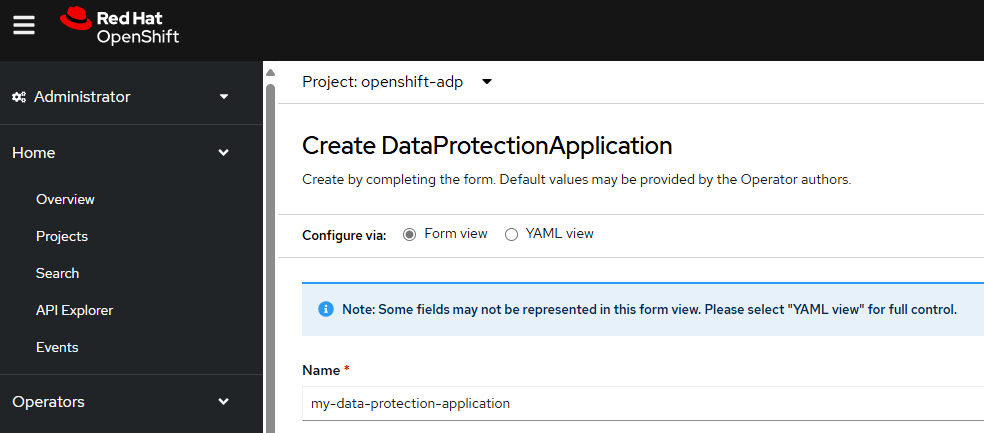
Or in the OpenShift console, at Operators > Installed Operators > OADP select DataProtectionApplication create instance.
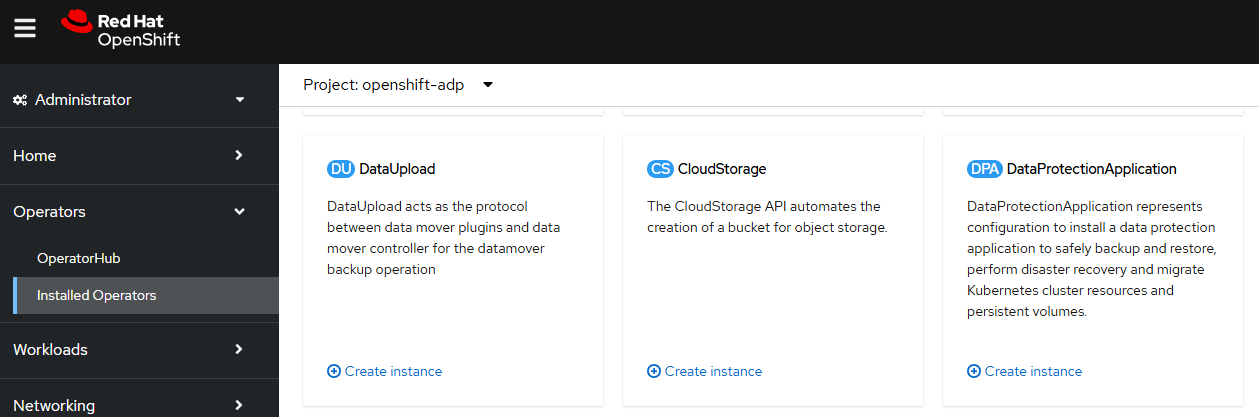
And then complete the form or use the YAML option to create the Data Protection Application.
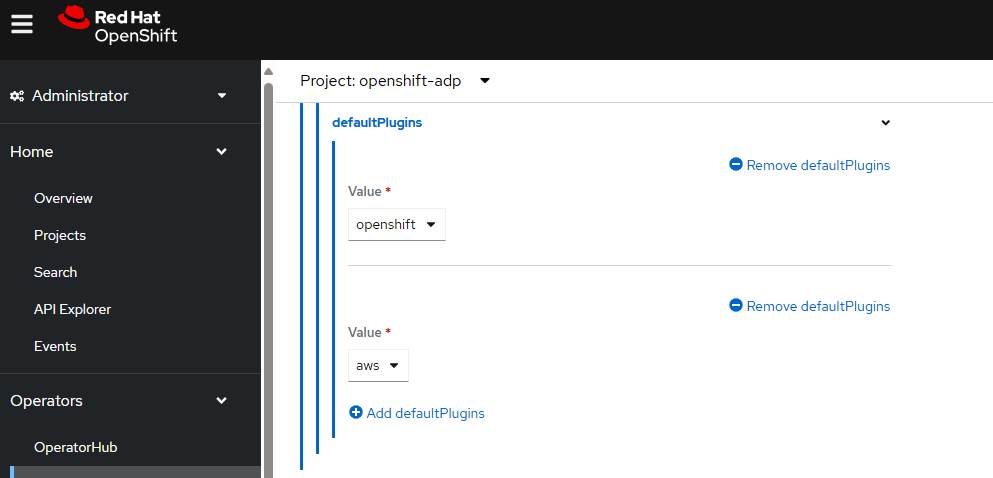
In this example, since the backups are going to be stored in an Amazon Web Services (AWS) S3 Bucket, the velero defaultPlugins will need to include aws.
This also references the backupStorageLocation that was created in the prior step.

Let's ensure the status is of the Data Protection Application is Reconciled.
~]$ oc describe DataProtectionApplication my-data-protection-application --namespace openshift-adp
. . .
Status:
  Conditions:
    Last Transition Time:  2025-04-10T01:25:11Z
    Message:               Reconcile complete
    Reason:                Complete
    Status:                True
    Type:                  Reconciled
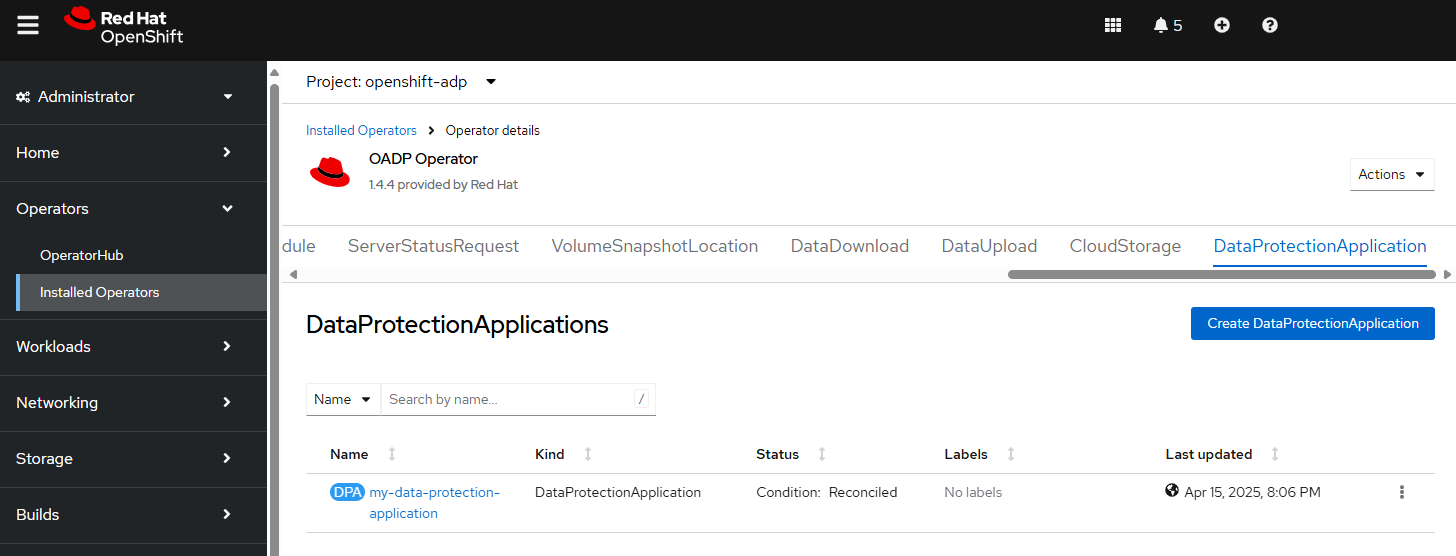
Or you can use the OpenShift console, at Operators > Installed Operators > OADP > DataProtectionApplication.
The Data Protection Application should provision additional "velero" resources in the openshift-adp namespace.
~]$ oc get all --namespace openshift-adp
NAME                                                    READY   STATUS    RESTARTS   AGE
pod/openshift-adp-controller-manager-55f68b778f-tlr8v   1/1     Running   0          8m52s
pod/velero-6777878978-nvqm4                             1/1     Running   0          3m10s
NAME                                                       TYPE        CLUSTER-IP       EXTERNAL-IP   PORT(S)    AGE
service/openshift-adp-controller-manager-metrics-service   ClusterIP   172.30.220.147   <none>        8443/TCP   9m3s
service/openshift-adp-velero-metrics-svc                   ClusterIP   172.30.87.161    <none>        8085/TCP   3m10s
NAME                                               READY   UP-TO-DATE   AVAILABLE   AGE
deployment.apps/openshift-adp-controller-manager   1/1     1            1           8m52s
deployment.apps/velero                             1/1     1            1           3m10s
NAME                                                          DESIRED   CURRENT   READY   AGE
replicaset.apps/openshift-adp-controller-manager-55f68b778f   1         1         1       8m52s
replicaset.apps/velero-6777878978                             1         1         1       3m10s
If you included podConfig with 50m of CPU, then the contains in the deployment should have 50m of CPU requests.
~]$ oc get deployments --namespace openshift-adp --output yaml | grep cpu
              cpu: 50m
              cpu: 50m
              cpu: 50m
Backup
Let's create a backup resource that will backup the resources in namespace my-project. Let's say this markup is in a file named my-backup.yml. By default, the Time To Live (TTL) will be 30 days, which means the backup will be retained for 30 days. Once the backup has exceeded 30 days, the backup will be removed from the storage location.
apiVersion: velero.io/v1
kind: Backup
metadata:
  name: my-backup
  labels:
    velero.io/storage-location: my-backup-storage-location
  namespace: openshift-adp
spec:
  includedNamespaces:
  - my-project
  storageLocation: my-backup-storage-location
Let's use the oc apply command to create the backup resource.
~]$ oc apply --filename my-backup.yml
backup.velero.io/my-project created
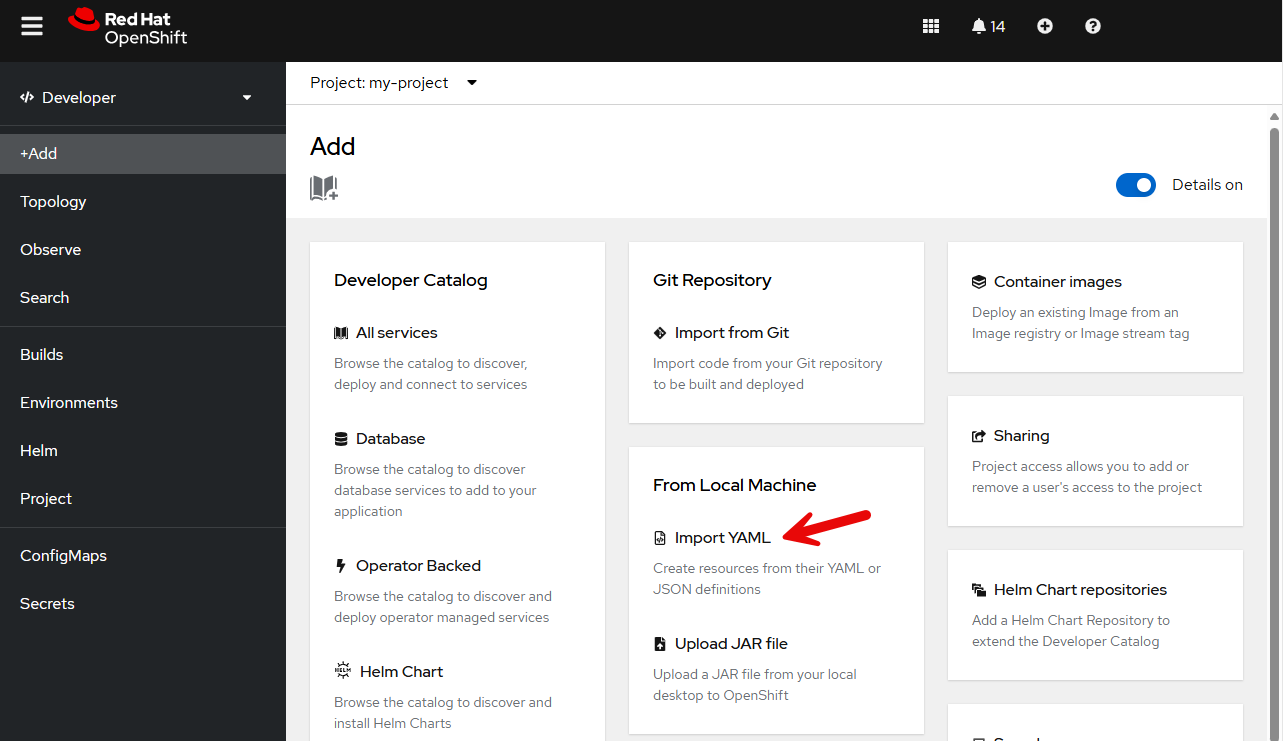
Or in the OpenShift console, in the Developer view, select the project you want to backup, and then select +Add > Import YAML.
Then create a Backup using the following YAML, replacing my-project with the namespace you want to back up. The backup must be created in the openshift-adp namespace thus if you do not have access to view backups in the openshift-adp namespace you will not be able to view the backup resource once it has been created.
apiVersion: velero.io/v1
kind: Backup
metadata:
  name: my-backup
  labels:
    velero.io/storage-location: my-backup-storage-location
  namespace: openshift-adp
spec:
  includedNamespaces:
  - my-project
  storageLocation: my-backup-storage-location
Or in the OpenShift console, in the Administrator view, at Operators > Installed Operators > OADP select Backup > create instance.
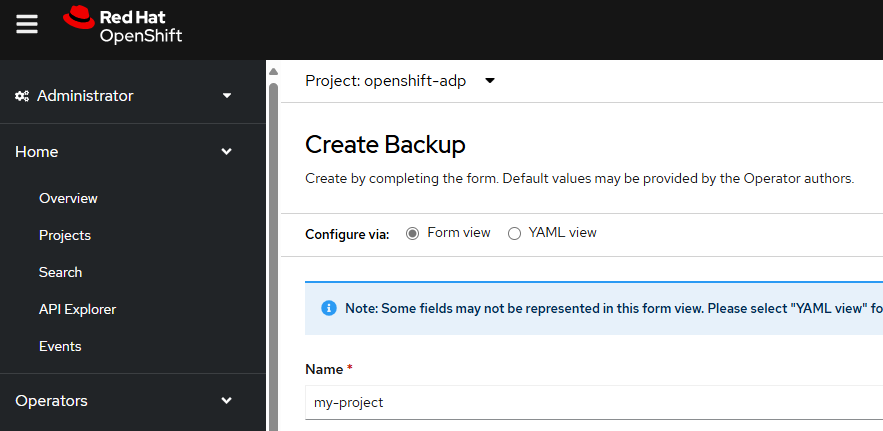
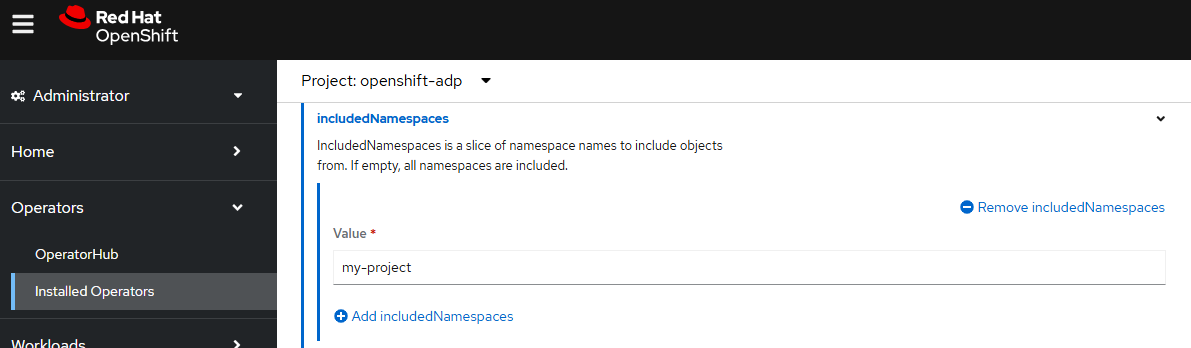
In this example, the Backup is being named my-project since the backup is going to backup the resource in namespace my-project.
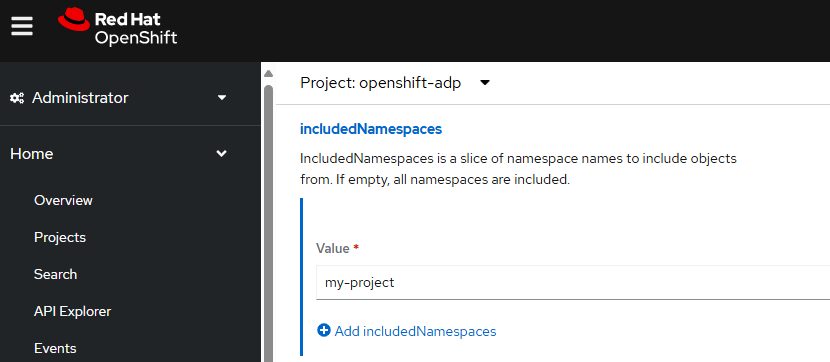
And includedNamespaces will also have my-project.
And the resources will be stored in the storage location named my-backup-storage-location.
There should now be a backup resource named my-project in the openshift-adp namespace.
~]$ oc get backups --namespace openshift-adp
NAME          AGE
my-project    102s
If you then describe the backup resource named my-project and the status should be InProgress.
~]$ oc describe backup my-project --namespace openshift-adp
Name:         my-project
Namespace:    openshift-adp
Labels:       velero.io/storage-location=my-backup-storage-location
Annotations:  velero.io/resource-timeout: 10m0s
              velero.io/source-cluster-k8s-gitversion: v1.29.10+67d3387
              velero.io/source-cluster-k8s-major-version: 1
              velero.io/source-cluster-k8s-minor-version: 29
API Version:  velero.io/v1
Kind:         Backup
Metadata:
  Creation Timestamp:  2025-04-16T01:25:13Z
  Generation:          1
  Resource Version:    497329502
  UID:                 8f72d858-77da-40bc-8fa2-b8f1ca0deb14
Spec:
  Csi Snapshot Timeout:          10m0s
  Default Volumes To Fs Backup:  false
  Included Namespaces:
    my-project
  Item Operation Timeout:  24h0m0s
  Snapshot Move Data:  false
  Storage Location:    my-backup-storage-location
  Ttl:                 30d
Status:
  Expiration:      2025-05-16T01:25:13Z
  Format Version:  1.1.0
  Hook Status:
  Phase:  InProgress
  Progress:
    Items Backed Up:  18
    Total Items:      18
  Start Timestamp:    2025-04-16T01:25:13Z
  Version:            1
Events:               <none>
And then shortly thereafter, the status should be Completed. Awesome!
Notice also that the Time To Live (TTL) is 30 days which means the backup will be retained for 30 days and Expiration is 30 days from when the backup was created. In 30 days, the items that were backed up will be removed from the storage location.
~]$ oc describe backup my-project --namespace openshift-adp
Name:         my-project
Namespace:    openshift-adp
Labels:       velero.io/storage-location=my-backup-storage-location
Annotations:  velero.io/resource-timeout: 10m0s
              velero.io/source-cluster-k8s-gitversion: v1.29.10+67d3387
              velero.io/source-cluster-k8s-major-version: 1
              velero.io/source-cluster-k8s-minor-version: 29
API Version:  velero.io/v1
Kind:         Backup
Metadata:
  Creation Timestamp:  2025-04-16T01:25:13Z
  Generation:          1
  Resource Version:    497329502
  UID:                 8f72d858-77da-40bc-8fa2-b8f1ca0deb14
Spec:
  Csi Snapshot Timeout:          10m0s
  Default Volumes To Fs Backup:  false
  Included Namespaces:
    my-project
  Item Operation Timeout:  24h0m0s
  Snapshot Move Data:  false
  Storage Location:    my-backup-storage-location
  Ttl:                 30d
Status:
  Completion Timestamp:  2025-04-16T01:25:16Z
  Expiration:            2025-04-17T01:25:13Z
  Format Version:        1.1.0
  Hook Status:
  Phase:  Completed
  Progress:
    Items Backed Up:  18
    Total Items:      18
  Start Timestamp:    2025-04-16T01:25:13Z
  Version:            1
Events:               <none>
Recall in this example that OADP was configured to store the backups in an Amazon Web Services (AWS) S3 Bucket named my-bucket-asdfadkjsfasfljdf. The aws s3api list-objects command can be used to list the objects in the S3 Bucket. Something like this should be returned, where there are my-project objects in the S3 Bucket. Awesome, it works!
~]$ aws s3api list-objects --bucket my-bucket-asdfadkjsfasfljdf --profile velero
{
    "Contents": [
        {
            "Key": "backups/my-project/my-project-csi-volumesnapshotclasses.json.gz",
            "LastModified": "2025-04-16T01:25:17+00:00",
            "ETag": "\"6848cb8d5f3669ef603f87e48ece8567\"",
            "Size": 29,
            "StorageClass": "STANDARD",
            "Owner": {
                "DisplayName": "john.doe",
                "ID": "ab0e0a41e318d5103a77c82240d5cb3fc41ff11cc325c65b5c777a5f8e743743"
            }
        },
        {
            "Key": "backups/my-project/my-project-csi-volumesnapshotcontents.json.gz",
            "LastModified": "2025-04-16T01:25:17+00:00",
            "ETag": "\"6848cb8d5f3669ef603f87e48ece8567\"",
            "Size": 29,
            "StorageClass": "STANDARD",
            "Owner": {
                "DisplayName": "john.doe",
                "ID": "ab0e0a41e318d5103a77c82240d5cb3fc41ff11cc325c65b5c777a5f8e743743"
            }
        },
        {
            "Key": "backups/my-project/my-project-csi-volumesnapshots.json.gz",
            "LastModified": "2025-04-16T01:25:17+00:00",
            "ETag": "\"6848cb8d5f3669ef603f87e48ece8567\"",
            "Size": 29,
            "StorageClass": "STANDARD",
            "Owner": {
                "DisplayName": "john.doe",
                "ID": "ab0e0a41e318d5103a77c82240d5cb3fc41ff11cc325c65b5c777a5f8e743743"
            }
        },
        {
            "Key": "backups/my-project/my-project-itemoperations.json.gz",
            "LastModified": "2025-04-16T01:25:16+00:00",
            "ETag": "\"ae811dd04e417ed7b896b4c4fa3d2ac0\"",
            "Size": 27,
            "StorageClass": "STANDARD",
            "Owner": {
                "DisplayName": "john.doe",
                "ID": "ab0e0a41e318d5103a77c82240d5cb3fc41ff11cc325c65b5c777a5f8e743743"
            }
        },
        {
            "Key": "backups/my-project/my-project-logs.gz",
            "LastModified": "2025-04-16T01:25:16+00:00",
            "ETag": "\"673aef92adf289811d5c04b270084eac\"",
            "Size": 11312,
            "StorageClass": "STANDARD",
            "Owner": {
                "DisplayName": "john.doe",
                "ID": "ab0e0a41e318d5103a77c82240d5cb3fc41ff11cc325c65b5c777a5f8e743743"
            }
        },
        {
            "Key": "backups/my-project/my-project-resource-list.json.gz",
            "LastModified": "2025-04-16T01:25:16+00:00",
            "ETag": "\"47145873ba24f87182ee601bc7dd92fc\"",
            "Size": 307,
            "StorageClass": "STANDARD",
            "Owner": {
                "DisplayName": "john.doe",
                "ID": "ab0e0a41e318d5103a77c82240d5cb3fc41ff11cc325c65b5c777a5f8e743743"
            }
        },
        {
            "Key": "backups/my-project/my-project-results.gz",
            "LastModified": "2025-04-16T01:25:16+00:00",
            "ETag": "\"4b8f571a28628df1f222ee56c3673550\"",
            "Size": 49,
            "StorageClass": "STANDARD",
            "Owner": {
                "DisplayName": "john.doe",
                "ID": "ab0e0a41e318d5103a77c82240d5cb3fc41ff11cc325c65b5c777a5f8e743743"
            }
        },
        {
            "Key": "backups/my-project/my-project-volumeinfo.json.gz",
            "LastModified": "2025-04-16T01:25:16+00:00",
            "ETag": "\"05cd97096815e99b306792f280b67b06\"",
            "Size": 292,
            "StorageClass": "STANDARD",
            "Owner": {
                "DisplayName": "john.doe",
                "ID": "ab0e0a41e318d5103a77c82240d5cb3fc41ff11cc325c65b5c777a5f8e743743"
            }
        },
        {
            "Key": "backups/my-project/my-project-volumesnapshots.json.gz",
            "LastModified": "2025-04-16T01:25:16+00:00",
            "ETag": "\"6848cb8d5f3669ef603f87e48ece8567\"",
            "Size": 29,
            "StorageClass": "STANDARD",
            "Owner": {
                "DisplayName": "john.doe",
                "ID": "ab0e0a41e318d5103a77c82240d5cb3fc41ff11cc325c65b5c777a5f8e743743"
            }
        },
        {
            "Key": "backups/my-project/my-project.tar.gz",
            "LastModified": "2025-04-16T01:25:16+00:00",
            "ETag": "\"c28c1d05c60cfb80f21799b5b11faac9\"",
            "Size": 13046,
            "StorageClass": "STANDARD",
            "Owner": {
                "DisplayName": "john.doe",
                "ID": "ab0e0a41e318d5103a77c82240d5cb3fc41ff11cc325c65b5c777a5f8e743743"
            }
        },
        {
            "Key": "backups/my-project/velero-backup.json",
            "LastModified": "2025-04-16T01:25:17+00:00",
            "ETag": "\"33c1cecb4d65267049037e13b78759d1\"",
            "Size": 3826,
            "StorageClass": "STANDARD",
            "Owner": {
                "DisplayName": "john.doe",
                "ID": "ab0e0a41e318d5103a77c82240d5cb3fc41ff11cc325c65b5c777a5f8e743743"
            }
        }
    ]
}
Let's use the aws s3api get-object command to download the resource-list.json.gz file.
aws s3api get-object --bucket my-bucket-asdfadkjsfasfljdf --profile velero --key backups/my-project-20250511010045/my-project-20250511010045-resource-list.json.gz resource-list.json.gz
And then the zcat and jq commands can be used to view the list of resources that were included in the backup.
~]$ zcat resource-list.json.gz | jq
{
  "apiextensions.k8s.io/v1/CustomResourceDefinition": [
    "clusterserviceversions.operators.coreos.com"
  ],
  "apps/v1/Deployment": [
    "my-project/my-app"
  ],
  "apps/v1/ReplicaSet": [
    "my-project/my-app-f58b7c88d"
  ],
  "authorization.openshift.io/v1/RoleBinding": [
    "my-project/admin"
  ],
  "operators.coreos.com/v1alpha1/ClusterServiceVersion": [
    "my-project/openshift-gitops-operator.v1.16.0"
  ],
  "rbac.authorization.k8s.io/v1/RoleBinding": [
    "my-project/admin"
  ],
  "v1/ConfigMap": [
    "my-project/kube-root-ca.crt",
    "my-project/my-config-map",
    "my-project/openshift-service-ca.crt"
  ],
  "v1/Event": [
    "my-project/my-app-f58b7c88d-qr7wm.183df2e37839b360",
    "my-project/my-app-f58b7c88d-qr7wm.183df344cec90b97"
  ],
  "v1/Namespace": [
    "my-project"
  ],
  "v1/Pod": [
    "my-project/my-app-f58b7c88d-qr7wm"
  ],
  "v1/Secret": [
    "my-project/default-dockercfg-mccs2"
  ],
  "v1/ServiceAccount": [
    "my-project/default"
  ]
}
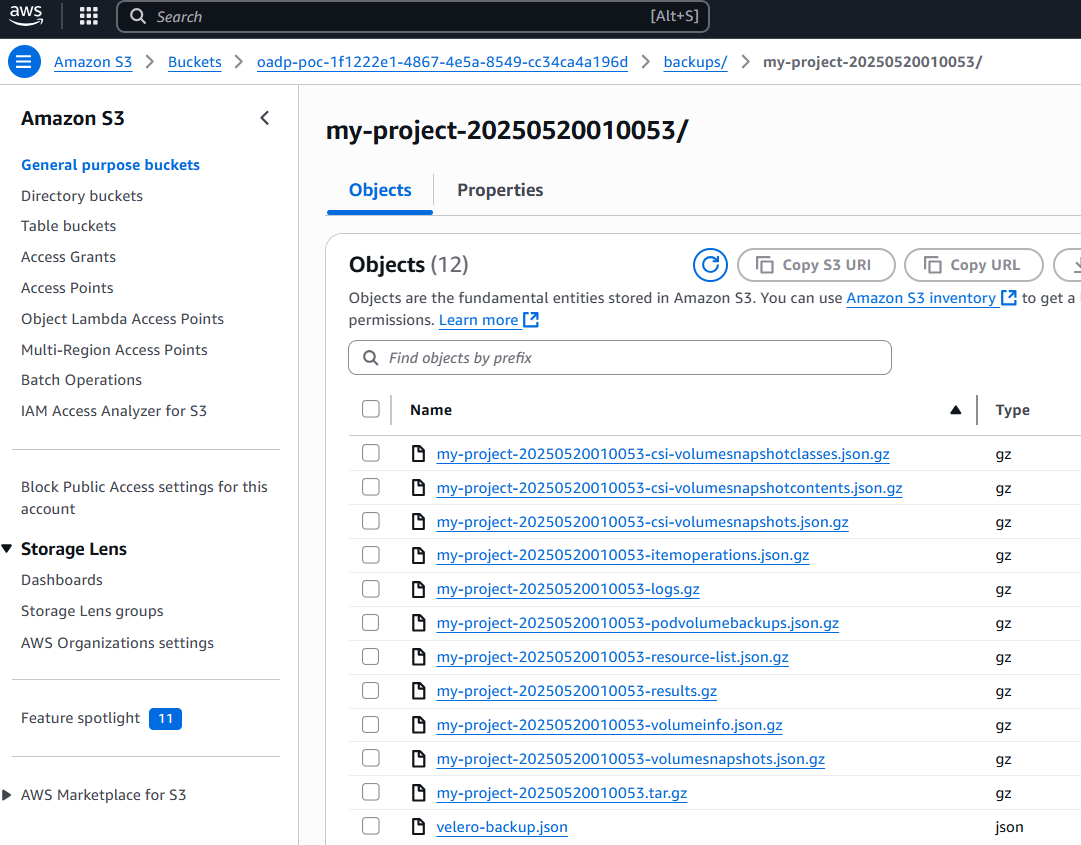
Or you can view the backups in the Amazon Web Services (AWS) S3 console.
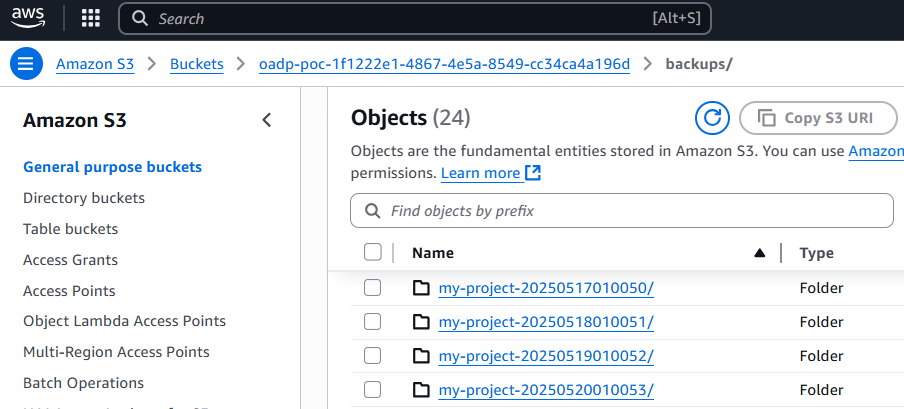
And selecting one of the backup folders should display a gzip compressed file for the various resources that were backed up.
Schedule Reoccurring Backup
Similar to the above example, we can also create a reoccurring backup. Let's say you have the following in a YAML file. This will create a backup of the resources in every namespace daily at 1:00 am UTC.
apiVersion: velero.io/v1
kind: Schedule
metadata:
  name: my-schedule
  namespace: openshift-adp
spec:
  paused: false
  schedule: 00 01 * * *
  template:
    storageLocation: my-backup-storage-location
Let's use the oc apply command to create the scheduled backup resource.
~]$ oc apply --filename my-schedule.yml
schedule.velero.io/my-schedule created
Or in the OpenShift console, at Operators > Installed Operators > OADP select Schedule > Create instance.

Let's give the schedule a meaningful name and include a cron expression. In this example, backups will be created daily at 1:00 am.
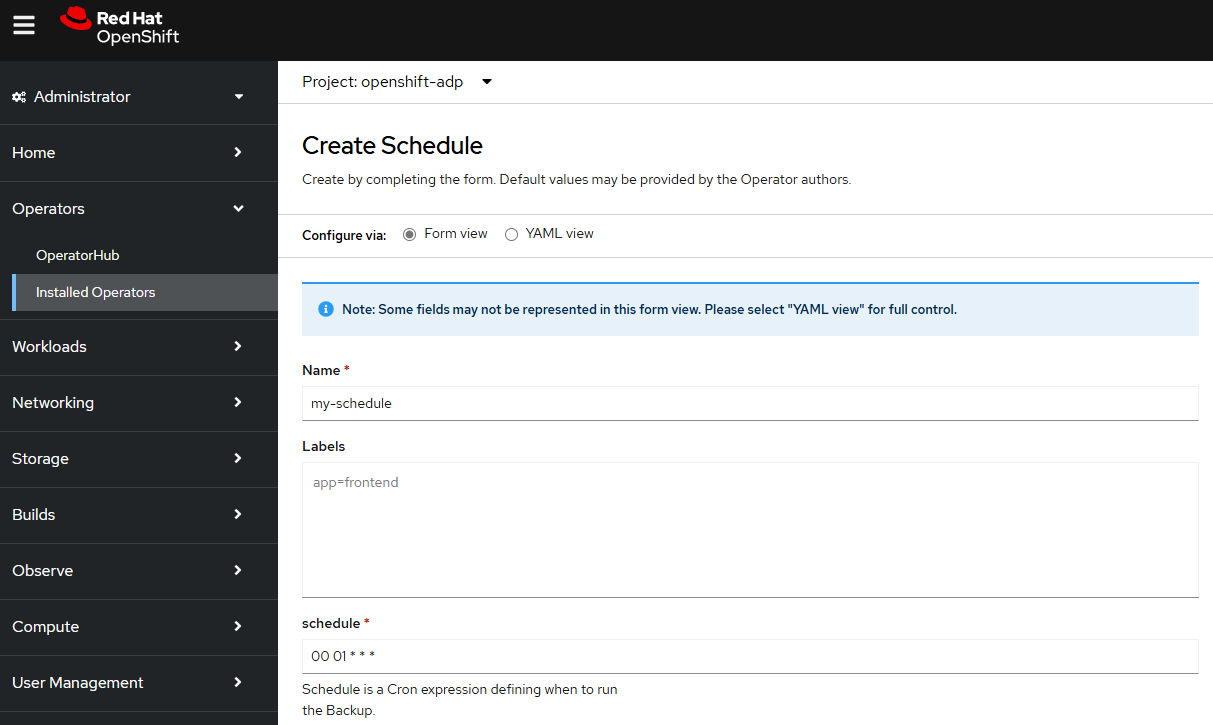
The name of the storage location will need to be the name of one of your backupStorageLocations.
And in this example, only resources in namespace my-project will be backed up.
There should now be a backup resource named my-schedule in the openshift-adp namespace. Notice that LASTBACKUP contains no value because the scheduled job has not yet run.
~]$ oc get schedules --namespace openshift-adp
NAME           STATUS    SCHEDULE      LASTBACKUP   AGE   PAUSED
my-schedule    Enabled   00 01 * * *                42s   false
Once the scheduled job has run, LASTBACKUP should then have a value.
~]$ oc get schedules --namespace openshift-adp
NAME           STATUS    SCHEDULE      LASTBACKUP   AGE   PAUSED
my-schedule    Enabled   00 01 * * *   15m          23h   false
And there should be a backup each time the schedule was run. Nice!
~]$ oc get backups --namespace openshift-adp
NAME                        AGE
my-schedule-20250507010034   24h
my-schedule-20250508010035   22m
Temporarily disable backups
There may be scenarios where you want to temporarily disable scheduled backups, for example, when upgrading your OpenShift cluster to a new version. This can be done by setting paused to True in the Schedule resource. Notice in this example that paused is false.
~]$ oc get schedule my-schedule --namespace openshift-adp
NAME            STATUS    SCHEDULE      LASTBACKUP   AGE   PAUSED
my-schedule     Enabled   00 01 * * *                55m   false
This one-liner can be used to pause the hosting-platforms Schedule so that Paused is true.
oc patch schedule my-schedule --namespace openshift-adp --type merge --patch '{"spec":{"paused": true}}'
Restore
Now let's see how to go about restoring from the backup. Let's say your pod in namespace my-project logs Hello World once every 5 seconds. Check out my article Deploy Python container on OpenShift for details on how to create a Python pod that prints Hello World once every 5 seconds.
~]$ oc logs pod/my-app-6d458c66f4-jxnjz --namespace my-project | tail
[2025-05-15 01:00:11 INFO] hello world
[2025-05-15 01:00:16 INFO] hello world
[2025-05-15 01:00:21 INFO] hello world
[2025-05-15 01:00:26 INFO] hello world
[2025-05-15 01:00:31 INFO] hello world
[2025-05-15 01:00:36 INFO] hello world
[2025-05-15 01:00:41 INFO] hello world
[2025-05-15 01:00:46 INFO] hello world
[2025-05-15 01:00:51 INFO] hello world
[2025-05-15 01:00:56 INFO] hello world
Let's delete my-deployment in namespace my-project.
oc delete deployment my-deployment --namespace my-project
And ensure there are now no deployments, no pods, no resources in my-project.
~]$ oc get backups --namespace my-project
No resources found in my-project namespace.
Let's say we want to restore using the backup named my-project-20250508010035.
~]$ oc get backups --namespace openshift-adp
NAME                         AGE
my-project-20250510010044    5d
my-project-20250511010045    4d
my-project-20250512010046    3d
my-project-20250513010047    2d
my-project-20250514010048    24h
my-project-20250515010049    2m41s
Similar to the backup resource, let's create a restore resource. For example, let's say you have the following in a YAML file to create a resource to restore my-project. In this example, backup my-project-20250515010049 is being used.
]$ cat my-project-restore-deployment.yml
apiVersion: velero.io/v1
kind: Restore
metadata:
  name: my-project-restore-deployment-20250515010049
  namespace: openshift-adp
spec:
  backupName: my-project-20250515010049
  includedNamespaces:
  - my-project
  restorePVs: false
Let's use the oc apply command to create the restore resource.
~]$ oc apply --filename my-project-restore-deployment.yml
restore.velero.io/my-project-restore-deployment-20250515010049 created
Or in the OpenShift console, in the Developer view, select the project you want to restore, and then select +Add > Import YAML.
Then create a Restore resource. The restore must be created in the openshift-adp namespace thus if you do not have access to view restores in the openshift-adp namespace you will not be able to view the Restore resource once it has been created.
apiVersion: velero.io/v1
kind: Restore
metadata:
  name: my-project-restore-deployment-20250515010049
  namespace: openshift-adp
spec:
  backupName: my-project-20250515010049
  includedNamespaces:
  - my-project
  restorePVs: false
Let's ensure the restore resource exists.
~]$ oc get restore --namespace openshift-adp
NAME                                           AGE
my-project-restore-deployment-20250515010049   18s
If there are no issues, the Phase should be Completed, meaning the resources in my-project should have been restored from the backup in the backups location named my-backup-storage-location.
]$ oc describe restore --namespace openshift-adp
Name:         my-project-restore-deployment-20250515010049
Namespace:    openshift-adp
Labels:       <none>
Annotations:  <none>
API Version:  velero.io/v1
Kind:         Restore
Metadata:
  Creation Timestamp:  2025-04-22T01:16:54Z
  Finalizers:
    restores.velero.io/external-resources-finalizer
  Generation:        6
  Resource Version:  502671529
  UID:               131cc504-801b-4ff1-a8aa-76e7619041c9
Spec:
  Backup Name:  my-project-20250515010049
  Excluded Resources:
    nodes
    events
    events.events.k8s.io
    backups.velero.io
    restores.velero.io
    resticrepositories.velero.io
    csinodes.storage.k8s.io
    volumeattachments.storage.k8s.io
    backuprepositories.velero.io
  Included Resources:
    deployments
  Item Operation Timeout:  4h0m0s
  Namespace Mapping:
    my - project:  my-project
  Restore P Vs:     false
Status:
  Completion Timestamp:  2025-04-22T01:16:56Z
  Hook Status:
  Phase:  Completed
  Progress:
    Items Restored:  28
    Total Items:     28
  Start Timestamp:   2025-04-22T01:16:54Z
Events:              <none>
And the deployment in my-project should have been restored, which should have created a replica set and the replica set should have spawned pods. Wow! It works.
]$ oc get all --namespace my-project
NAME                          READY   STATUS    RESTARTS   AGE
pod/my-app-6d458c66f4-4plf4   1/1     Running   0          111s

NAME                     READY   UP-TO-DATE   AVAILABLE   AGE
deployment.apps/my-app   1/1     1            1           112s

NAME                                DESIRED   CURRENT   READY   AGE
replicaset.apps/my-app-6d458c66f4   1         1         1       112s
And looking at the logs of the pod, there are only a few events because in this example only the deployment was restored, meaning a new pod was spawned.
]$ oc logs pod/my-app-6d458c66f4-4plf4 --namespace my-project
[2025-05-15 01:06:11 INFO] hello world
[2025-05-15 01:06:16 INFO] hello world
[2025-05-15 01:06:21 INFO] hello world
[2025-05-15 01:06:26 INFO] hello world
Did you find this article helpful?
If so, consider buying me a coffee over at 