
This assumes you have already
- Installed the OpenShift API for Data Protection (OADP) Operator
- Created OpenShift API for Data Protection (OADP) backup Storage Location
Let's say you want to use OpenShift API for Data Protection (OADP) to backup images and store the backups in an Amazon Web Services S3 Bucket.
Let's create a YAML file that contains the following, replacing my-bucket-asdfadkjsfasfljdf with the name of your S3 Bucket.
apiVersion: oadp.openshift.io/v1alpha1
kind: DataProtectionApplication
metadata:
  name: my-data-protection-application
  namespace: openshift-adp
spec:
  backupImages: true
  backupLocations:
    - name: my-backup-storage-location
      velero:
        default: true
        config:
          region: us-east-1
          profile: default
        credential:
          key: cloud
          name: cloud-credentials
        objectStorage:
          bucket: my-bucket-asdfadkjsfasfljdf
        provider: aws
  configuration:
    velero:
      defaultPlugins:
        - openshift
        - aws
      nodeSelector: worker
      resourceTimeout: 10m
Let's use the oc apply command to create my-data-protection-application.
oc apply --filename my-data-protection-application.yaml
Let's ensure the status is Reconciled.
~]$ oc describe DataProtectionApplication --namespace openshift-adp
. . .
Status:
  Conditions:
    Last Transition Time:  2025-04-10T01:25:11Z
    Message:               Reconcile complete
    Reason:                Complete
    Status:                True
    Type:                  Reconciled
The Data Protection Application should provision additional "velero" resources in the openshift-adp namespace.
~]$ oc get all --namespace openshift-adp
NAME                                                    READY   STATUS    RESTARTS   AGE
pod/openshift-adp-controller-manager-55f68b778f-tlr8v   1/1     Running   0          8m52s
pod/velero-6777878978-nvqm4                             1/1     Running   0          3m10s

NAME                                                       TYPE        CLUSTER-IP       EXTERNAL-IP   PORT(S)    AGE
service/openshift-adp-controller-manager-metrics-service   ClusterIP   172.30.220.147   <none>        8443/TCP   9m3s
service/openshift-adp-velero-metrics-svc                   ClusterIP   172.30.87.161    <none>        8085/TCP   3m10s

NAME                                               READY   UP-TO-DATE   AVAILABLE   AGE
deployment.apps/openshift-adp-controller-manager   1/1     1            1           8m52s
deployment.apps/velero                             1/1     1            1           3m10s

NAME                                                          DESIRED   CURRENT   READY   AGE
replicaset.apps/openshift-adp-controller-manager-55f68b778f   1         1         1       8m52s
replicaset.apps/velero-6777878978                             1         1         1       3m10s
Next let's check to see if the backupStorageLocation is Available.
~]$ oc get backupStorageLocations --namespace openshift-adp
NAME                         PHASE       LAST VALIDATED   AGE   DEFAULT
my-backup-storage-location   Available   60s              64s   true
Now let's say you want to backup the resources in namespace my-project. Let's create a velero backup resource that will backup the resources in namespace my-project. Let's say this markup is in a file named my-project-backup.yml. By default, the Time To Live (TTL) will be 30 days, which means the backup will be retained for 30 days. Once the backup has exceeded 30 days, the backup will be removed from the storage location.
apiVersion: velero.io/v1
kind: Backup
metadata:
  name: my-project
  labels:
    velero.io/storage-location: my-backup-storage-location
  namespace: openshift-adp
spec:
  hooks: {}
  includedNamespaces:
  - my-project
  includedResources: []
  excludedResources: []
  storageLocation: my-backup-storage-location
Let's use the oc apply command to create the velero backup resource.
~]$ oc apply --filename my-project-backup.yml
backup.velero.io/my-project created
There should now be a backup resource named my-project in the openshift-adp namespace.
~]$ oc get backups --namespace openshift-adp
NAME          AGE
my-project    102s
If you then describe the backup resource named my-project the status should be InProgress.
~]$ oc describe backup my-project --namespace openshift-adp
Name:         my-project
Namespace:    openshift-adp
Labels:       velero.io/storage-location=my-backup-storage-location
Annotations:  velero.io/resource-timeout: 10m0s
              velero.io/source-cluster-k8s-gitversion: v1.29.10+67d3387
              velero.io/source-cluster-k8s-major-version: 1
              velero.io/source-cluster-k8s-minor-version: 29
API Version:  velero.io/v1
Kind:         Backup
Metadata:
  Creation Timestamp:  2025-04-16T01:25:13Z
  Generation:          4
  Resource Version:    497329502
  UID:                 8f72d858-77da-40bc-8fa2-b8f1ca0deb14
Spec:
  Csi Snapshot Timeout:          10m0s
  Default Volumes To Fs Backup:  false
  Excluded Resources:
  Hooks:
  Included Namespaces:
    my-project
  Included Resources:
  Item Operation Timeout:  4h0m0s
  Snapshot Move Data:  false
  Storage Location:    my-backup-storage-location
  Ttl:                 30d
Status:
  Expiration:      2025-04-17T01:25:13Z
  Format Version:  1.1.0
  Hook Status:
  Phase:  InProgress
  Progress:
    Items Backed Up:  18
    Total Items:      18
  Start Timestamp:    2025-04-16T01:25:13Z
  Version:            1
Events:               <none>
And then shortly thereafter, the status should be Completed. Awesome!
Notice also that the Time To Live (TTL) is 30 days which means the backup will be retained for 30 days and Expiration is 30 days from when the backup was created. In 30 days, the items that were backed up will be removed from the storage location.
~]$ oc describe backup my-project --namespace openshift-adp
Name:         my-project
Namespace:    openshift-adp
Labels:       velero.io/storage-location=my-backup-storage-location
Annotations:  velero.io/resource-timeout: 10m0s
              velero.io/source-cluster-k8s-gitversion: v1.29.10+67d3387
              velero.io/source-cluster-k8s-major-version: 1
              velero.io/source-cluster-k8s-minor-version: 29
API Version:  velero.io/v1
Kind:         Backup
Metadata:
  Creation Timestamp:  2025-04-16T01:25:13Z
  Generation:          6
  Resource Version:    497329528
  UID:                 8f72d858-77da-40bc-8fa2-b8f1ca0deb14
Spec:
  Csi Snapshot Timeout:          10m0s
  Default Volumes To Fs Backup:  false
  Excluded Resources:
  Hooks:
  Included Namespaces:
    my-project
  Included Resources:
  Item Operation Timeout:  4h0m0s
  Label Selector:
    Match Labels:
      App:             my-project
  Snapshot Move Data:  false
  Storage Location:    my-backup-storage-location
  Ttl:                 30d
Status:
  Completion Timestamp:  2025-04-16T01:25:16Z
  Expiration:            2025-04-17T01:25:13Z
  Format Version:        1.1.0
  Hook Status:
  Phase:  Completed
  Progress:
    Items Backed Up:  18
    Total Items:      18
  Start Timestamp:    2025-04-16T01:25:13Z
  Version:            1
Events:               <none>
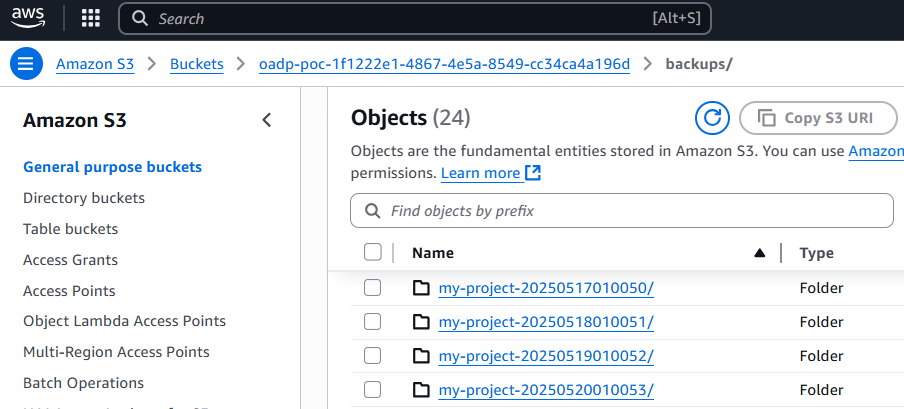
Recall in this example that OADP was configured to store the backups in an Amazon Web Services (AWS) S3 Bucket named my-bucket-asdfadkjsfasfljdf. The aws s3api list-objects command can be used to list the objects in the S3 Bucket. Something like this should be returned, where there are my-project objects in the S3 Bucket. Awesome, it works!
~]$ aws s3api list-objects --bucket my-bucket-asdfadkjsfasfljdf --profile velero
{
    "Contents": [
        {
            "Key": "backups/my-project/my-project-csi-volumesnapshotclasses.json.gz",
            "LastModified": "2025-04-16T01:25:17+00:00",
            "ETag": "\"6848cb8d5f3669ef603f87e48ece8567\"",
            "Size": 29,
            "StorageClass": "STANDARD",
            "Owner": {
                "DisplayName": "john.doe",
                "ID": "ab0e0a41e318d5103a77c82240d5cb3fc41ff11cc325c65b5c777a5f8e743743"
            }
        },
        {
            "Key": "backups/my-project/my-project-csi-volumesnapshotcontents.json.gz",
            "LastModified": "2025-04-16T01:25:17+00:00",
            "ETag": "\"6848cb8d5f3669ef603f87e48ece8567\"",
            "Size": 29,
            "StorageClass": "STANDARD",
            "Owner": {
                "DisplayName": "john.doe",
                "ID": "ab0e0a41e318d5103a77c82240d5cb3fc41ff11cc325c65b5c777a5f8e743743"
            }
        },
        {
            "Key": "backups/my-project/my-project-csi-volumesnapshots.json.gz",
            "LastModified": "2025-04-16T01:25:17+00:00",
            "ETag": "\"6848cb8d5f3669ef603f87e48ece8567\"",
            "Size": 29,
            "StorageClass": "STANDARD",
            "Owner": {
                "DisplayName": "john.doe",
                "ID": "ab0e0a41e318d5103a77c82240d5cb3fc41ff11cc325c65b5c777a5f8e743743"
            }
        },
        {
            "Key": "backups/my-project/my-project-itemoperations.json.gz",
            "LastModified": "2025-04-16T01:25:16+00:00",
            "ETag": "\"ae811dd04e417ed7b896b4c4fa3d2ac0\"",
            "Size": 27,
            "StorageClass": "STANDARD",
            "Owner": {
                "DisplayName": "john.doe",
                "ID": "ab0e0a41e318d5103a77c82240d5cb3fc41ff11cc325c65b5c777a5f8e743743"
            }
        },
        {
            "Key": "backups/my-project/my-project-logs.gz",
            "LastModified": "2025-04-16T01:25:16+00:00",
            "ETag": "\"673aef92adf289811d5c04b270084eac\"",
            "Size": 11312,
            "StorageClass": "STANDARD",
            "Owner": {
                "DisplayName": "john.doe",
                "ID": "ab0e0a41e318d5103a77c82240d5cb3fc41ff11cc325c65b5c777a5f8e743743"
            }
        },
        {
            "Key": "backups/my-project/my-project-resource-list.json.gz",
            "LastModified": "2025-04-16T01:25:16+00:00",
            "ETag": "\"47145873ba24f87182ee601bc7dd92fc\"",
            "Size": 307,
            "StorageClass": "STANDARD",
            "Owner": {
                "DisplayName": "john.doe",
                "ID": "ab0e0a41e318d5103a77c82240d5cb3fc41ff11cc325c65b5c777a5f8e743743"
            }
        },
        {
            "Key": "backups/my-project/my-project-results.gz",
            "LastModified": "2025-04-16T01:25:16+00:00",
            "ETag": "\"4b8f571a28628df1f222ee56c3673550\"",
            "Size": 49,
            "StorageClass": "STANDARD",
            "Owner": {
                "DisplayName": "john.doe",
                "ID": "ab0e0a41e318d5103a77c82240d5cb3fc41ff11cc325c65b5c777a5f8e743743"
            }
        },
        {
            "Key": "backups/my-project/my-project-volumeinfo.json.gz",
            "LastModified": "2025-04-16T01:25:16+00:00",
            "ETag": "\"05cd97096815e99b306792f280b67b06\"",
            "Size": 292,
            "StorageClass": "STANDARD",
            "Owner": {
                "DisplayName": "john.doe",
                "ID": "ab0e0a41e318d5103a77c82240d5cb3fc41ff11cc325c65b5c777a5f8e743743"
            }
        },
        {
            "Key": "backups/my-project/my-project-volumesnapshots.json.gz",
            "LastModified": "2025-04-16T01:25:16+00:00",
            "ETag": "\"6848cb8d5f3669ef603f87e48ece8567\"",
            "Size": 29,
            "StorageClass": "STANDARD",
            "Owner": {
                "DisplayName": "john.doe",
                "ID": "ab0e0a41e318d5103a77c82240d5cb3fc41ff11cc325c65b5c777a5f8e743743"
            }
        },
        {
            "Key": "backups/my-project/my-project.tar.gz",
            "LastModified": "2025-04-16T01:25:16+00:00",
            "ETag": "\"c28c1d05c60cfb80f21799b5b11faac9\"",
            "Size": 13046,
            "StorageClass": "STANDARD",
            "Owner": {
                "DisplayName": "john.doe",
                "ID": "ab0e0a41e318d5103a77c82240d5cb3fc41ff11cc325c65b5c777a5f8e743743"
            }
        },
        {
            "Key": "backups/my-project/velero-backup.json",
            "LastModified": "2025-04-16T01:25:17+00:00",
            "ETag": "\"33c1cecb4d65267049037e13b78759d1\"",
            "Size": 3826,
            "StorageClass": "STANDARD",
            "Owner": {
                "DisplayName": "john.doe",
                "ID": "ab0e0a41e318d5103a77c82240d5cb3fc41ff11cc325c65b5c777a5f8e743743"
            }
        }
    ]
}
Or you can view the backups in the Amazon Web Services (AWS) S3 console.
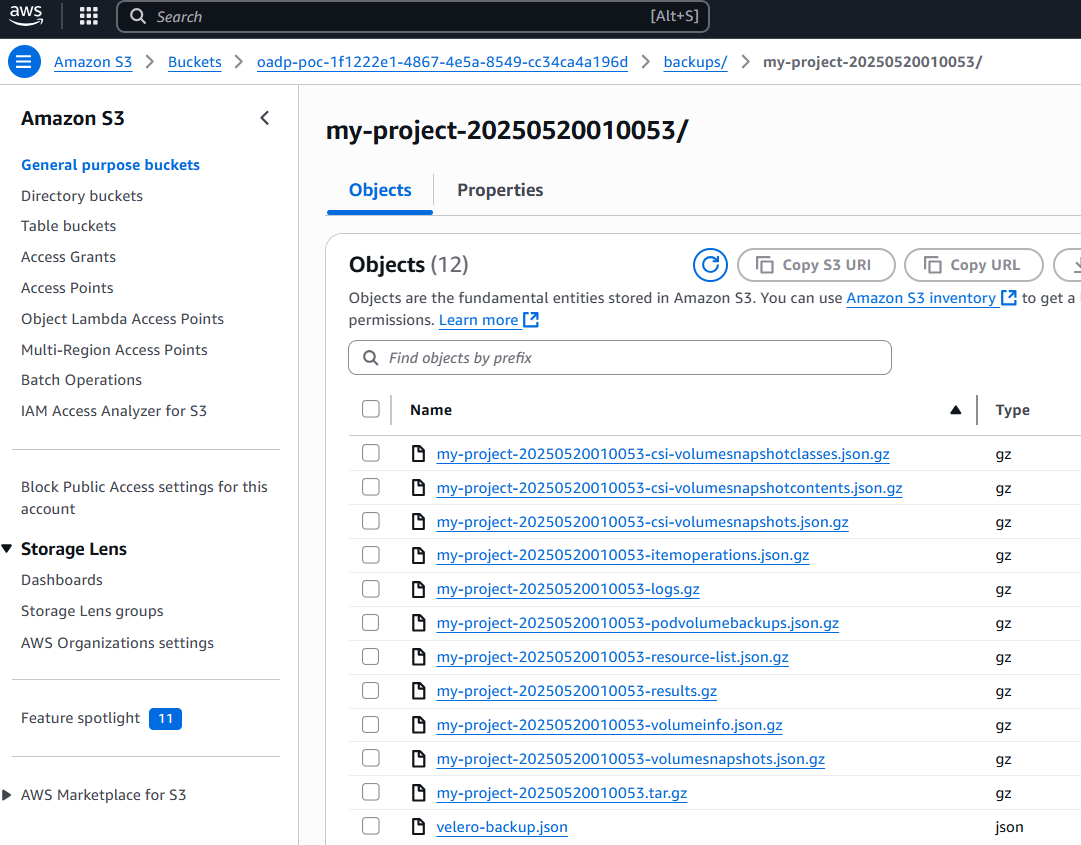
And selecting one of the backup folders should display a gzip compressed file for the various resources that were backed up.
Did you find this article helpful?
If so, consider buying me a coffee over at 