
There are multiple identity providers (IdP) that can be used with OpenShift for authentication.
- htpasswd
- kubeadmin
- LDAP sync (Active Directory)
- Red Hat build of the Keycloak Operator (this article)
- Red Hat Single Sign-On (SSO)
Both the Red Hat build of the Keycloak Operator and Red Hat Single Sign-On (SSO) (this article) use keycloak as the backend Identity Provider (IdP) system. Red Hat Single Sign-On (SSO) is much easier to install and configure but may limit you from being able to use or configure certain features. For example, Red Hat Single Sign-On (SSO) installs and configures a Postgres SQL database for you, whereas with Red Hat build of the Keycloak Operator you install and configure the Postgres SQL database.
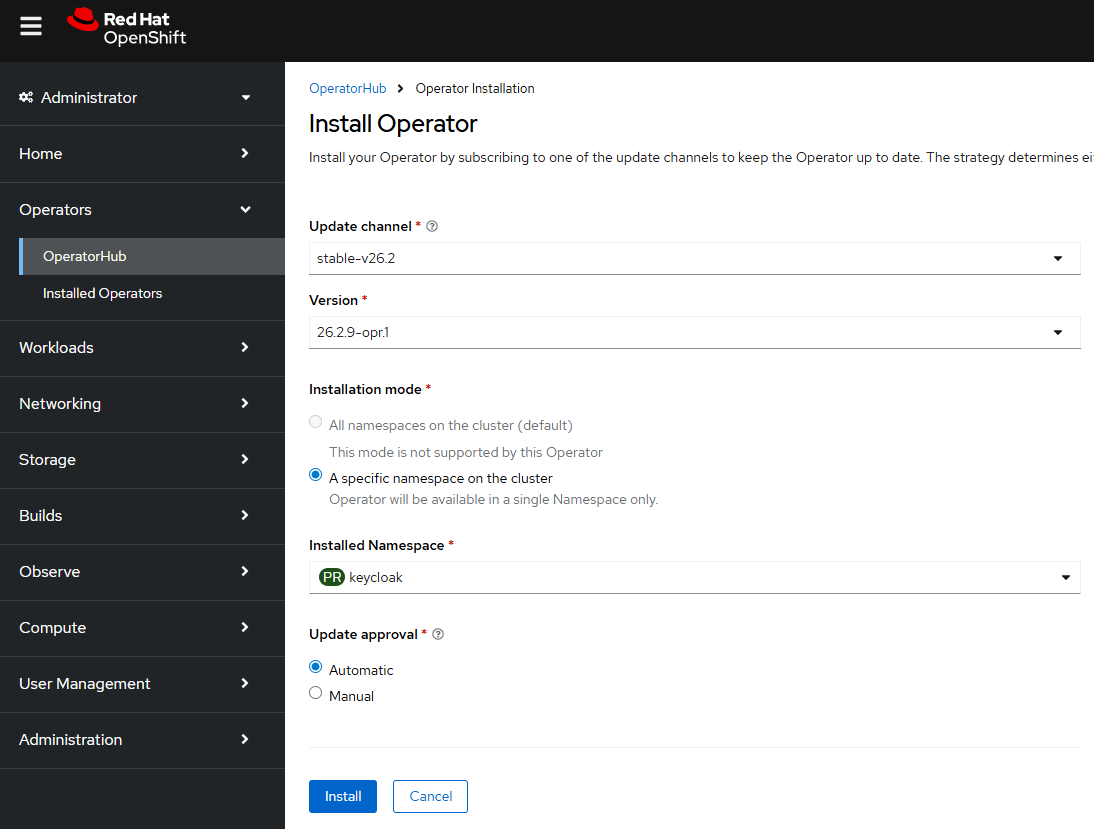
In the OpenShift console, at Operators > Operator Hub search for the Red Hat build of Keycloak Operator.
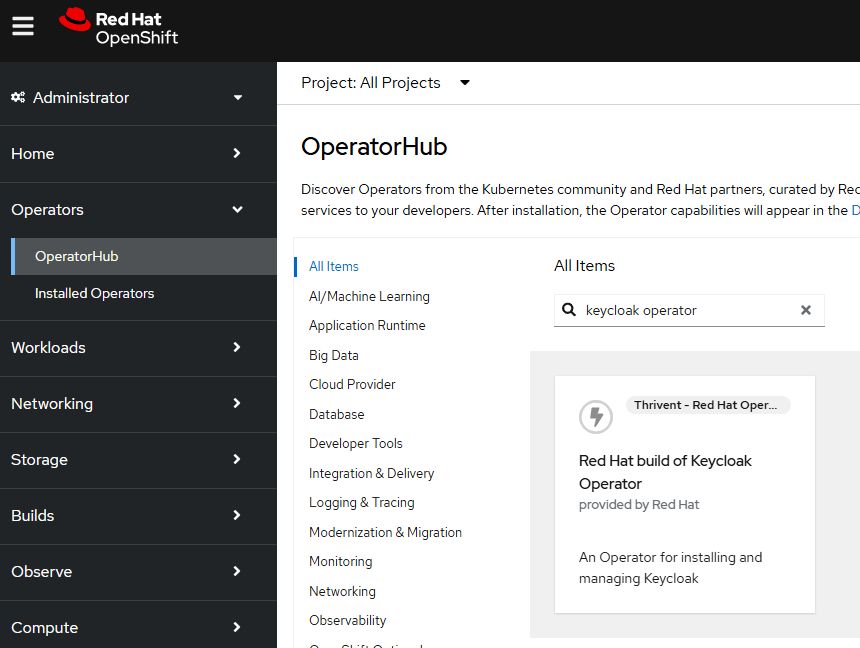
And follow the prompts to install the operator.
The Operator should create a deployment which should spawn a replica set which should spawn a pod.
~]$ oc get all --namespace keycloak
NAME                                 READY   STATUS    RESTARTS   AGE
pod/rhbk-operator-57b47d9d66-56q58   1/1     Running   0          13s

NAME                            READY   UP-TO-DATE   AVAILABLE   AGE
deployment.apps/rhbk-operator   1/1     1            1           23h

NAME                                       DESIRED   CURRENT   READY   AGE
replicaset.apps/rhbk-operator-57b47d9d66   1         1         1       13s
If the pod is in an Error state.
~]$ oc get pods --namespace keycloak
NAME                                 READY   STATUS   RESTARTS   AGE
pod/rhbk-operator-65ffd96644-f4wvx   0/1     Error    0          6s
And the pod logs has something like this.
~]$ oc logs pod/rhbk-operator-65ffd96644-f4wvx
 --namespace keycloak
2025-10-02 01:13:02,481 ERROR [io.qua.run.Application] (main) Failed to start application: java.lang.RuntimeException: Failed to start quarkus
        at io.quarkus.runner.ApplicationImpl.doStart(Unknown Source)
        at io.quarkus.runtime.Application.start(Application.java:101)
        at io.quarkus.runtime.ApplicationLifecycleManager.run(ApplicationLifecycleManager.java:121)
        at io.quarkus.runtime.Quarkus.run(Quarkus.java:77)
        at io.quarkus.runtime.Quarkus.run(Quarkus.java:48)
        at io.quarkus.runtime.Quarkus.run(Quarkus.java:137)
        at io.quarkus.runner.GeneratedMain.main(Unknown Source)
        at io.quarkus.bootstrap.runner.QuarkusEntryPoint.doRun(QuarkusEntryPoint.java:68)
        at io.quarkus.bootstrap.runner.QuarkusEntryPoint.main(QuarkusEntryPoint.java:36)
Caused by: java.lang.IllegalArgumentException: Failure in creating proxy URL. Proxy port is required!
This may occur if your OpenShift cluster has a proxy configured.
- FreeKB - OpenShift - HTTP_PROXY HTTPS_PROXY and NO_PROXY
- FreeKB - OpenShift - List proxy servers using the oc get proxy command
In this scenario, you may need to adjust the proxy configurations in the keycloak deployment. For example, I resolved the pod being in an Error state by removing the following from my keycloak deployment.
- name: HTTP_PROXY
  value: http://proxy.example.com
- name: HTTPS_PROXY
  value: https://proxy.example.com
- name: NO_PROXY
  value: .cluster.local,.access.redhat.com,cloud.openshift.com,localhost,quay.io,registry.connect.redhat.com,registry.redhat.io
A stable pod should have logs that look something like this. Notice the pod is listening for connections on http://10.11.12.13:8080.
~]$ oc logs pod/rhbk-operator-57b47d9d66-56q58 --namespace keycloak
2025-10-02 01:14:26,319 WARN  [io.qua.config] (main) Unrecognized configuration key "quarkus.operator-sdk.bundle.package-name" was provided; it will be ignored; verify that the dependency extension for this configuration is set or that you did not make a typo
2025-10-02 01:14:27,500 INFO  [io.qua.ope.run.OperatorProducer] (main) Quarkus Java Operator SDK extension 7.1.1.redhat-00002 (commit: bbd08ea) built on Mon Apr 07 13:41:33 GMT 2025
2025-10-02 01:14:27,516 INFO  [io.jav.ope.Operator] (main) Registered reconciler: 'keycloakrealmimportcontroller' for resource: 'class org.keycloak.operator.crds.v2alpha1.realmimport.KeycloakRealmImport' for namespace(s): [keycloak]
2025-10-02 01:14:27,600 INFO  [io.jav.ope.Operator] (main) Registered reconciler: 'keycloakcontroller' for resource: 'class org.keycloak.operator.crds.v2alpha1.deployment.Keycloak' for namespace(s): [keycloak]
2025-10-02 01:14:27,600 INFO  [io.qua.ope.run.AppEventListener] (main) Starting operator.
2025-10-02 01:14:27,600 INFO  [io.jav.ope.Operator] (main) Operator SDK 5.0.4.redhat-00001 (commit: 2a58f2b) built on Thu Apr 03 15:50:23 GMT 2025 starting...
2025-10-02 01:14:27,600 INFO  [io.jav.ope.Operator] (main) Client version: 7.1.0.redhat-00001
2025-10-02 01:14:27,601 INFO  [io.jav.ope.pro.Controller] (Controller Starter for: keycloakrealmimportcontroller) Starting 'keycloakrealmimportcontroller' controller for reconciler: org.keycloak.operator.controllers.KeycloakRealmImportController, resource: org.keycloak.operator.crds.v2alpha1.realmimport.KeycloakRealmImport
2025-10-02 01:14:27,601 INFO  [io.jav.ope.pro.Controller] (Controller Starter for: keycloakcontroller) Starting 'keycloakcontroller' controller for reconciler: org.keycloak.operator.controllers.KeycloakController, resource: org.keycloak.operator.crds.v2alpha1.deployment.Keycloak
2025-10-02 01:14:27,800 WARN  [io.fab.kub.cli.dsl.int.VersionUsageUtils] (InformerWrapper [keycloakrealmimports.k8s.keycloak.org/v2alpha1] 27) The client is using resource type 'keycloakrealmimports' with unstable version 'v2alpha1'
2025-10-02 01:14:27,800 WARN  [io.fab.kub.cli.dsl.int.VersionUsageUtils] (InformerWrapper [keycloaks.k8s.keycloak.org/v2alpha1] 26) The client is using resource type 'keycloaks' with unstable version 'v2alpha1'
2025-10-02 01:14:29,394 INFO  [io.jav.ope.pro.Controller] (Controller Starter for: keycloakrealmimportcontroller) 'keycloakrealmimportcontroller' controller started
2025-10-02 01:14:29,697 INFO  [io.jav.ope.pro.Controller] (Controller Starter for: keycloakcontroller) 'keycloakcontroller' controller started
2025-10-02 01:14:29,716 INFO  [io.quarkus] (main) keycloak-operator 26.2.9.redhat-00001 on JVM (powered by Quarkus 3.20.2.redhat-00004) started in 4.293s. Listening on: http://10.11.12.13:8080
2025-10-02 01:14:29,716 INFO  [io.quarkus] (main) Profile prod activated.
2025-10-02 01:14:29,716 INFO  [io.quarkus] (main) Installed features: [cdi, kubernetes, kubernetes-client, openshift-client, operator-sdk, smallrye-context-propagation, smallrye-health, vertx]
Also, the deployment should have label name: rhbk-operator.
~]$ oc get pod/rhbk-operator-57b47d9d66-56q58 --namespace keycloak --output jsonpath="{.metadata.labels}"
{"name":"rhbk-operator","pod-template-hash":"57b47d9d66"}
Postgres Secret
Keycloak requires a Postgres database that contains a database named keycloak that keycloak will use to store data.
Let's say you want your Postgres username to be admin, password to be itsasecret, and the name of the database must be keycloak. The base64 command can be used to get the base64 of these strings.
AVOID TROUBLE
printf or echo with the -n flag must be used here to ensure the base64 encoded strings do not contain a trailing new line character
~]$ printf admin | base64
YWRtaW4=

~]$ printf itsasecret | base64
aXRzYXNlY3JldA==

~]$ printf keycloak | base64
a2V5Y2xvYWs=
Let's say you have the following in a YAML file. Notice the values are the base64 encoded strings.
apiVersion: v1
kind: Secret
metadata:
  name: postgres
  labels:
    app: postgres
data:
  POSTGRESQL_DATABASE: a2V5Y2xvYWs=
  POSTGRESQL_USER: YWRtaW4=
  POSTGRESQL_PASSWORD: aXRzYXNlY3JldA==
The oc apply command with the -f or --filename option can be used to create the secret using the template YAML file. Check out my article FreeKB - OpenShift - Create Opaque Generic Secrets (key value pairs).
~]$ oc create --filename secret.yml
secret/postgres created
The oc get secrets command can be used to list the secrets that have been created.
~]# oc get secrets
NAME          TYPE        DATA      AGE
postgres      Opaque      1         30s
And you can validate that the secret contains the values.
]$ oc get secret postgres --output jsonpath="{.data}"
{"POSTGRESQL_DATABASE":"a2V5Y2xvYWs=","POSTGRESQL_PASSWORD":"aXRzYXNlY3JldA==","POSTGRESQL_USER":"YWRtaW4="}

~]$ oc get secret postgres --output jsonpath="{.data.POSTGRESQL_PASSWORD}" | base64 --decode
itsasecret

~]$ oc get secret postgres --output jsonpath="{.data.POSTGRESQL_DATABASE}" | base64 --decode
keycloak

~]$ oc get secret postgres --output jsonpath="{.data.POSTGRESQL_USER}" | base64 --decode
admin
Postgres Persistent Volume
In this example, the Postgres will be configured to store it's data in a Persistent Volume. The oc get storageclass command can be used to list the available storage classes in your OpenShift cluster.
]$ oc get storageclasses
NAME                     PROVISIONER                    RECLAIMPOLICY   VOLUMEBINDINGMODE      ALLOWVOLUMEEXPANSION   AGE
file-storage (default)   csi.trident.netapp.io          Delete          Immediate              true                   2y113d
thin                     kubernetes.io/vsphere-volume   Delete          Immediate              false                  2y116d
thin-csi                 csi.vsphere.vmware.com         Delete          WaitForFirstConsumer   true                   2y116d
Let's say you have the following in a YAML file. Notice in this example that the Persistent Volume will use one of the available storage classes (file-storage in this example). It is also important that the Persistent Volume Claim gets created in the keycloak namespace.
apiVersion: v1
kind: PersistentVolumeClaim
metadata:
  name: postgres
  namespace: keycloak
  labels:
    app: postgres
spec:
  accessModes:
  - ReadWriteMany
  resources:
    requests:
      storage: 5Gi
  storageClassName: file-storage
The oc apply command with the -f or --filename option can be used to create the persistent volume claim using the template YAML file.
~]$ oc create --filename pvc.yml
persistentvolumeclaim/postgres created
The oc get persistentvolumeclaims (or oc get pvc) command will return the list of persistent volume claims.
~]$ oc get pvc --namespace keycloak
NAME       STATUS   VOLUME                                     CAPACITY   ACCESS MODES   STORAGECLASS   VOLUMEATTRIBUTESCLASS   AGE
postgres   Bound    pvc-80bc89a3-f4d4-4786-9649-9de9536d2e2b   5Gi        RWX            file-storage   <unset>                 3m29s
And the oc get persistentvolumes (or oc get pv) command should list the persistent volume.
~]$ oc get pv
NAME                                       CAPACITY   ACCESS MODES   RECLAIM POLICY   STATUS   CLAIM               STORAGECLASS   REASON   AGE
pvc-80bc89a3-f4d4-4786-9649-9de9536d2e2b   5Gi        RWX            Delete           Bound    keycloak/postgres   file-storage            19m
Postgres Service
By default, postgres listens for connections on port 5432. Check out my article FreeKB - OpenShift - Create ClusterIP Service. Let's say you have the following in a YAML file.
apiVersion: v1
kind: Service
metadata:
  name: postgres
  namespace: keycloak
  labels:
    app: postgres
spec:
  selector:
    app: postgres
  ports:
    - protocol: TCP
      port: 5432
      targetPort: 5432
  type: ClusterIP
The oc apply command with the -f or --filename option can be used to create the service using the template YAML file.
~]$ oc create --filename service.yml
service/postgres created
The oc get services command can be used to list the services that have been created.
]$ oc get services
NAME          TYPE           CLUSTER-IP      EXTERNAL-IP   PORT(S)             AGE
postgres      ClusterIP      172.30.53.213   <none>        5432/TCP            24m
Postgres Stateful Set
Now that we have the config map, secret, service, and persistent volume / persistent volume claim, we can create the stateful set.
The oc get images command can be used to list the postgres images that have been imported into your OpenShift cluster.
]$ oc get images | grep -i postgres
sha256:0b939c13john.doe43a85b813ec8c170adcb7479507ed4e592d982296f745c62e   registry.redhat.io/rhel8/postgresql-15@sha256:0b939c13john.doe43a85b813ec8c170adcb7479507ed4e592d982296f745c62e
sha256:12b1d5a86864d21d6594384edfe5cccc94205dbf689fjohn.doe78901237060a5   registry.redhat.io/rhel8/postgresql-13@sha256:12b1d5a86864d21d6594384edfe5cccc94205dbf689fjohn.doe78901237060a5
sha256:1d1d42ba374084d59308f44aafdab883145b06ca109aa7c2f362a578a6abf318   registry.redhat.io/rhel9/postgresql-13@sha256:1d1d42ba374084d59308f44aafdab883145b06ca109aa7c2f362a578a6abf318
sha256:72a123456789012359429b9bbb172c4363efe32d9a1490d25f5e313041022c7a   registry.redhat.io/rhel8/postgresql-13@sha256:72a123456789012359429b9bbb172c4363efe32d9a1490d25f5e313041022c7a
sha256:a1c75f08c929a4992816b8b91f9372852aefe46e183d3cf0464dd5dbe3d836a1   registry.redhat.io/rhel8/postgresql-10@sha256:a1c75f08c929a4992816b8b91f9372852aefe46e183d3cf0464dd5dbe3d836a1
sha256:a21e2a6d92d4ejohn.doe19d6a382f379a12d3ee7a8abe3e74fc01ba0cf56a232   registry.redhat.io/rhscl/postgresql-10-rhel7@sha256:a21e2a6d92d4ejohn.doe19d6a382f379a12d3ee7a8abe3e74fc01ba0cf56a232
sha256:bbe3dd60fefb35dbaf2ee8f45d0b0b903fc5ceab9f58fb522ebd3d9aee4f535f   registry.redhat.io/rhel8/postgresql-12@sha256:bbe3dd60fefb35dbaf2ee8f45d0b0b903fc5ceab9f58fb522ebd3d9aee4f535f
sha256:c6fde1a8653a597c18b0326bc71ce4a614273be74b9aef3ced83a1b11472687a   registry.redhat.io/rhscl/postgresql-13-rhel7@sha256:c6fde1a8653a597c18b0326bc71ce4a614273be74b9aef3ced83a1b11472687a
sha256:d05fd5870e03045baeb1113c913b290e56616a307a559c067c6a57cfcb60e1a2   registry.redhat.io/rhel9/postgresql-15@sha256:d05fd5870e03045baeb1113c913b290e56616a307a559c067c6a57cfcb60e1a2
sha256:d99bb8c63bbdbbfb1bd1a1f4e1a5f114dc5a0d972cdd9d27ca9e69c16cb98089   registry.redhat.io/rhscl/postgresql-12-rhel7@sha256:d99bb8c63bbdbbfb1bd1a1f4e1a5f114dc5a0d972cdd9d27ca9e69c16cb98089
Let's say you have the following in a YAML file. You may need to update image to reference one of the postgres images in your cluster
apiVersion: apps/v1
kind: StatefulSet
metadata:
  name: postgres
  labels:
    app: postgres
spec:
  replicas: 1
  serviceName: postgres
  selector:
    matchLabels:
      app: postgres
  template:
    metadata:
      labels:
        app: postgres
    spec:
      containers:
        - envFrom:
          - secretRef:
              name: postgres
          env:
            - name: PGDATA
              value: /data/pgdata
          image: registry.redhat.io/rhel9/postgresql-15
          ports:
            - containerPort: 5432
          name: postgres
          volumeMounts:
            - mountPath: /data
              name: postgres-vm
      volumes:
        - name: postgres-vm
          persistentVolumeClaim:
            claimName: postgres
The oc apply command with the -f or --filename option can be used to create the stateful set using the template YAML file.
~]$ oc apply -f statefulset.yml
statefulset/postgres created
The oc get statefulsets command will return the list of stateful sets. Since the stateful set YAML had replicas: 1 this is why 1 pod was created by the stateful set. In this example, since ready is 1/1 this means there should be a running postgres pod.
]$ oc get statefulsets
NAME       READY   AGE
postgres   1/1     27m
And the oc get pods command can be used to ensure the postgres pod is running.
$ oc get pods
NAME                             READY   STATUS    RESTARTS   AGE
postgres-0                       1/1     Running   0          29m
And the pod logs should return something like this.
]$ oc logs pod/postgres-0
The files belonging to this database system will be owned by user "postgres".
This user must also own the server process.
The database cluster will be initialized with locale "en_US.utf8".
The default database encoding has accordingly been set to "UTF8".
The default text search configuration will be set to "english".
Data page checksums are disabled.
fixing permissions on existing directory /var/lib/pgsql/data/userdata ... ok
creating subdirectories ... ok
selecting dynamic shared memory implementation ... posix
selecting default max_connections ... 100
selecting default shared_buffers ... 128MB
selecting default time zone ... UTC
creating configuration files ... ok
running bootstrap script ... ok
performing post-bootstrap initialization ... ok
syncing data to disk ... ok
initdb: warning: enabling "trust" authentication for local connections
initdb: hint: You can change this by editing pg_hba.conf or using the option -A, or --auth-local and --auth-host, the next time you run initdb.
Success. You can now start the database server using:
    pg_ctl -D /var/lib/pgsql/data/userdata -l logfile start
waiting for server to start....2025-10-09 01:15:43.003 UTC [35] LOG:  redirecting log output to logging collector process
2025-10-09 01:15:43.003 UTC [35] HINT:  Future log output will appear in directory "log".
 done
server started
/var/run/postgresql:5432 - accepting connections
=> sourcing /usr/share/container-scripts/postgresql/start/set_passwords.sh ...
ALTER ROLE
waiting for server to shut down.... done
server stopped
Starting server...
2025-10-09 01:15:43.244 UTC [1] LOG:  redirecting log output to logging collector process
2025-10-09 01:15:43.244 UTC [1] HINT:  Future log output will appear in directory "log".
And using the psql CLI in the pod, you should see there is a database named keycloak that is owned by admin.
]$ oc exec pod/postgres-0 -- psql --username admin --list
                                                List of databases
   Name    |  Owner   | Encoding |  Collate   |   Ctype    | ICU Locale | Locale Provider |   Access privileges
-----------+----------+----------+------------+------------+------------+-----------------+-----------------------
 keycloak  | admin    | UTF8     | en_US.utf8 | en_US.utf8 |            | libc            |
 postgres  | postgres | UTF8     | en_US.utf8 | en_US.utf8 |            | libc            |
 template0 | postgres | UTF8     | en_US.utf8 | en_US.utf8 |            | libc            | =c/postgres          +
           |          |          |            |            |            |                 | postgres=CTc/postgres
 template1 | postgres | UTF8     | en_US.utf8 | en_US.utf8 |            | libc            | =c/postgres          +
           |          |          |            |            |            |                 | postgres=CTc/postgres
(4 rows)
SSL Certificate
Next let's create an SSL certificate for keycloak. This example uses cert-manager. Check out my article FreeKB - OpenShift - Create SSL certificate using cert-manager.
Before creating a new SSL certificate using cert-manager, you are going to want to list the available issuers. The oc get issuers command can be used to list the issues that can be used by cert-manager. It's fairly common for the oc get issuers command to return "No resources found" since issues are typically a cluster wide resource and not limited to a particular namespace.
~]$ oc get issuers --all-namespaces
No resources found
The oc get clusterissuers command can be used to list the issuers that cert-manager can used in any namespace in the OpenShift cluster.
~]$ oc get clusterissuers
NAME                         READY   AGE
public-clusterissuer         True    649d
internal-clusterissuer       True    471d
Let's say you have the following in a YAML file. Notice the YAML includes one of the issuers, internal-clusterissuer in this example. Notice also that the common name and dnsNames for the certificate is keycloak.apps.openshift.example.com in this example.
apiVersion: cert-manager.io/v1
kind: Certificate
metadata:
  name: my-certificate
  namespace: keycloak
spec:
  commonName: keycloak.apps.openshift.example.com
  dnsNames:
    - "keycloak.apps.openshift.example.com"
  duration: 8760h0m0s
  isCA: false
  issuerRef:
    kind: ClusterIssuer
    name: internal-clusterissuer
  privateKey:
    algorithm: RSA
    encoding: PKCS1
    rotationPolicy: Always
    size: 2048
  renewBefore: 360h0m0s
  secretName: my-secret
  subject:
    countries:
    - US
    localities:
    - Los Angeles
    organizationalUnits:
    - Information Technology
    organizations:
    - Acme
    provinces:
    - CA
  usages:
  - server auth
The oc apply command can be used to create the Certificate resource.
oc apply --filename my-certificate.yml
Then the oc get certificates command can be used to list the cert-manager certificates in the namespace the certificate was created in. You want to ensure the certificate READY is True.
]$ oc get certificates --namespace my-project
NAME             READY   SECRET      AGE
my-certificate   True    my-secret   2m37s
KeyCloak Instance
Last but not least, let's create the keycloak instance.
- spec.db.usernameSecret.name must be the name of secret you created
- spec.db.usernameSecret.key must be the name of the key in the secret that contains your postgres username
- spec.db.passwordSecret.name must be the name of secret you created
- spec.db.passwordSecret.key must be the name of the key in the secret that contains your postgres password
- spec.http.tlsSecret must be the name of the secret for your SSL certificate
- spec.hostname must be the common name and dnsNames for your SSL certificate
apiVersion: k8s.keycloak.org/v2alpha1
kind: Keycloak
metadata:
  name: keycoak
  labels:
    app: keycloak
spec:
  db:
    vendor: postgres
    host: postgres
    usernameSecret:
      name: postgres
      key: username
    passwordSecret:
      name: postgres
      key: password
  http:
    httpEnabled: true # optional
    httpPort: 8080 # optional, http will NOT be enabled if this is not included
    httpsPort: 8443 # optional, will default to 8443 if not specified
    tlsSecret: keycloak-certificate
  hostname:
    hostname: https://keycloak.apps.openshift.example.com
    admin: https://keycloak.apps.openshift.example.com/admin # optional
  instances: 1
  networkPolicy:
    enabled: false # this is optional - if excluded, this will default to true and create a Network Policy
The oc apply command can be used to create the keycloak resource.
oc apply --filename keycloak.yml
And then the oc get keycloak command can be used to see that the keycloak resource has been created.
]$ oc get keycloak --namespace keycloak
NAME         AGE
keycloak     35m
The keycloak resource should create a stateful set.
]$ oc get statefulsets --namespace keycloak
NAME         READY   AGE
keycloak     1/1     36m
And the stateful set should spawn a pod.
]$ oc get pods --namespace keycloak
NAME                             READY   STATUS    RESTARTS   AGE
keycloak-0                       1/1     Running   0          36m
postgres-0                       1/1     Running   0          39m
rhbk-operator-78d6459ddd-s77rl   1/1     Running   0          24h
The keycloak pod logs should return something like this.
]$ oc logs pod/keycloak-0 --namespace keycloak
Changes detected in configuration. Updating the server image.
Updating the configuration and installing your custom providers, if any. Please wait.
2025-10-31 01:06:20,477 INFO  [io.quarkus.deployment.QuarkusAugmentor] (main) Quarkus augmentation completed in 3269ms
Server configuration updated and persisted. Run the following command to review the configuration:

        kc.sh show-config

Next time you run the server, just run:

        kc.sh --verbose start --optimized

WARNING: The following used run time options are UNAVAILABLE and will be ignored during build time:
        - tracing-service-name: Available only when Tracing is enabled.
        - tracing-resource-attributes: Available only when Tracing is enabled.
2025-10-31 01:06:23,482 INFO  [org.keycloak.quarkus.runtime.storage.database.liquibase.QuarkusJpaUpdaterProvider] (main) Initializing database schema. Using changelog META-INF/jpa-changelog-master.xml
2025-10-31 01:06:27,795 INFO  [org.keycloak.quarkus.runtime.storage.infinispan.CacheManagerFactory] (main) Starting Infinispan embedded cache manager
2025-10-31 01:06:28,090 INFO  [org.keycloak.quarkus.runtime.storage.infinispan.CacheManagerFactory] (main) JGroups Encryption enabled (mTLS).
2025-10-31 01:06:28,150 INFO  [org.infinispan.CONTAINER] (main) Virtual threads support enabled
2025-10-31 01:06:28,192 INFO  [org.keycloak.infinispan.module.certificates.CertificateReloadManager] (main) Starting JGroups certificate reload manager
2025-10-31 01:06:28,299 INFO  [org.infinispan.CONTAINER] (main) ISPN000556: Starting user marshaller 'org.infinispan.commons.marshall.ImmutableProtoStreamMarshaller'
2025-10-31 01:06:28,424 INFO  [org.infinispan.CLUSTER] (main) ISPN000078: Starting JGroups channel `ISPN` with stack `kubernetes`
2025-10-31 01:06:28,425 INFO  [org.jgroups.JChannel] (main) local_addr: b9cc5b49-663f-4661-9615-1fbdcc41f95e, name: example-kc-0-53579
2025-10-31 01:06:28,432 INFO  [org.jgroups.protocols.FD_SOCK2] (main) server listening on *:57800
2025-10-31 01:06:30,434 INFO  [org.jgroups.protocols.pbcast.GMS] (main) example-kc-0-53579: no members discovered after 2001 ms: creating cluster as coordinator
2025-10-31 01:06:30,446 INFO  [org.infinispan.CLUSTER] (main) ISPN000094: Received new cluster view for channel ISPN: [example-kc-0-53579|0] (1) [example-kc-0-53579]
2025-10-31 01:06:30,447 INFO  [org.keycloak.infinispan.module.certificates.CertificateReloadManager] (main) Reloading JGroups Certificate
2025-10-31 01:06:30,469 INFO  [org.infinispan.CLUSTER] (main) ISPN000079: Channel `ISPN` local address is `example-kc-0-53579`, physical addresses are `[10.131.19.254:7800]`
2025-10-31 01:06:30,711 INFO  [org.keycloak.connections.infinispan.DefaultInfinispanConnectionProviderFactory] (main) Node name: example-kc-0-53579, Site name: null
2025-10-31 01:06:30,795 INFO  [org.keycloak.services] (main) KC-SERVICES0050: Initializing master realm
2025-10-31 01:06:31,564 INFO  [org.keycloak.services] (main) KC-SERVICES0077: Created temporary admin user with username temp-admin
2025-10-31 01:06:31,680 INFO  [io.quarkus] (main) Keycloak 26.2.12.redhat-00001 on JVM (powered by Quarkus 3.20.4.redhat-00001) started in 5.623s. Listening on: http://0.0.0.0:8080 and https://0.0.0.0:8443. Management interface listening on https://0.0.0.0:9000.
2025-10-31 01:06:31,680 INFO  [io.quarkus] (main) Profile prod activated.
2025-10-31 01:06:31,680 INFO  [io.quarkus] (main) Installed features: [agroal, cdi, hibernate-orm, jdbc-postgresql, keycloak, narayana-jta, opentelemetry, reactive-routes, rest, rest-jackson, smallrye-context-propagation, smallrye-health, vertx]
The kcadm.sh CLI should return stdout.
~]$ oc exec pod/keycloak-0 --namespace keycloak -- /opt/keycloak/bin/kcadm.sh --help
Keycloak Admin CLI

Use 'kcadm.sh config credentials' command with username and password to start a session against a specific
server and realm.

For example:

  $ kcadm.sh config credentials --server http://localhost:8080 --realm master --user admin
  Enter password:
  Logging into http://localhost:8080 as user admin of realm master

Any configured username can be used for login, but to perform admin operations the user
needs proper roles, otherwise operations will fail.

Usage: kcadm.sh COMMAND [ARGUMENTS]

Global options:
  -x            Print full stack trace when exiting with error
  --help        Print help for specific command
  --config      Path to the config file (~/.keycloak/kcadm.config by default)

Commands:
  config        Set up credentials, and other configuration settings using the config file
  create        Create new resource
  get           Get a resource
  update        Update a resource
  delete        Delete a resource
  get-roles     List roles for a user or a group
  add-roles     Add role to a user or a group
  remove-roles  Remove role from a user or a group
  set-password  Re-set password for a user
  help          This help

Use 'kcadm.sh help <command>' for more information about a given command.
The kc.sh CLI should also return stdout.
~]$ oc exec pod/keycloak-0 --namespace keycloak -- /opt/keycloak/bin/kc.sh show-config
Current Mode: production
Current Configuration:
        kc.health-enabled =  true (ENV)
        kc.bootstrap-admin-password =  ******* (ENV)
        kc.cache-stack =  kubernetes (ENV)
        kc.hostname-admin =  https://keycloak.apps.openshift.example.com/admin (ENV)
        kc.db-username =  admin (ENV)
        kc.log-level-org.infinispan.transaction.lookup.JBossStandaloneJTAManagerLookup =  WARN (classpath application.properties)
        kc.log-level-io.quarkus.config =  off (classpath application.properties)
        kc.hostname =  https://keycloak.apps.openshift.example.com (ENV)
        kc.log-console-output =  default (classpath application.properties)
        kc.https-certificate-file =  /mnt/certificates/tls.crt (ENV)
        kc.https-port =  8443 (ENV)
        kc.bootstrap-admin-username =  temp-admin (ENV)
        kc.db =  postgres (ENV)
        kc.db-password =  ******* (ENV)
        kc.log-level-io.quarkus.hibernate.orm.deployment.HibernateOrmProcessor =  warn (classpath application.properties)
        kc.version =  26.2.12.redhat-00001 (SysPropConfigSource)
        kc.https-certificate-key-file =  /mnt/certificates/tls.key (ENV)
        kc.http-enabled =  true (ENV)
        kc.truststore-paths =  /var/run/secrets/kubernetes.io/serviceaccount/ca.crt,/var/run/secrets/kubernetes.io/serviceaccount/service-ca.crt (ENV)
        kc.log-level-org.jboss.resteasy.resteasy_jaxrs.i18n =  WARN (classpath application.properties)
        kc.log-level-io.quarkus.arc.processor.BeanArchives =  off (classpath application.properties)
        kc.cache =  ispn (ENV)
        kc.db-url-host =  postgres (ENV)
        kc.log-level-io.quarkus.deployment.steps.ReflectiveHierarchyStep =  error (classpath application.properties)
        kc.http-port =  8080 (ENV)
        kc.log-level-io.quarkus.arc.processor.IndexClassLookupUtils =  off (classpath application.properties)
        kc.log-level-org.hibernate.engine.jdbc.spi.SqlExceptionHelper =  off (classpath application.properties)
        kc.run-in-container =  true (ENV)
The keycloak resource will also create two services, keycloak-discovery and keycloak-service.
~]$ oc get services --namespace keycloak
NAME                 TYPE        CLUSTER-IP      EXTERNAL-IP   PORT(S)             AGE
keycloak-discovery   ClusterIP   None            <none>        7800/TCP            5d
keycloak-service     ClusterIP   172.30.99.133   <none>        8443/TCP,9000/TCP   5d
postgres             ClusterIP   172.30.53.213   <none>        5432/TCP            27d
The keycloak resource will also create an ingress route that will route requests onto the keycloak-service, and the keycloak-service will route requests onto the keycloak pod.
~]$ oc get ingress --namespace keycloak
NAME               CLASS    HOSTS                                 ADDRESS   PORTS   AGE
keycloak-ingress   <none>   keycloak.apps.openshift.example.com             80      5d

~]$ oc get routes
NAME                     HOST/PORT                                         PATH   SERVICES           PORT    TERMINATION            WILDCARD
keycloak-ingress-x5bjm   keycloak.apps.openshift.example.com               keycloak-service   https   passthrough/Redirect   None
If you have more than one type of ingress routers, such as "default" and "internal" and "external" in this example . . .
~]$ oc get pods --namespace openshift-ingress
NAME                                      READY   STATUS    RESTARTS   AGE
router-default-6f84fdff65-4zdmp           1/1     Running   0          557d
router-default-6f84fdff65-t7h22           1/1     Running   0          557d
router-default-6f84fdff65-z579b           1/1     Running   0          557d
router-internal-247fda1127-jmhv5          1/1     Running   0          342d
router-internal-247fda1127-sqqhc          1/1     Running   0          342d
router-internal-247fda1127-knlt2          1/1     Running   0          342d
router-external-f58b6de991-qng54          1/1     Running   0          340d
router-external-6f84fdff65-vcrn2          1/1     Running   0          340d
router-external-6f84fdff65-px6s8          1/1     Running   0          340d
The oc get ingresscontroller command can be used to list the Ingress Controllers which are in the openshift-ingress-operator namespace.
~]$ oc get ingresscontroller --namespace openshift-ingress-operator
NAME              AGE
default           360d
external-router   356d
internal-router   356d
If you have more than one ingress controller, you may need to label the route to get the route exposed on one of the ingress routers, such as the "default" or "internal" or "external" routers.
oc label route my-route route-type=default
The keycloak resource will also create a network policy that allows ingress requests.
~]$ oc get networkpolicy keycloak-network-policy --namespace keycloak --output yaml
apiVersion: networking.k8s.io/v1
kind: NetworkPolicy
metadata:
  annotations:
    javaoperatorsdk.io/previous: 7f3b785a-6a86-4dbf-8a02-11b86f15af48
  creationTimestamp: "2025-10-31T01:45:29Z"
  generation: 1
  labels:
    app: keycloak
    app.kubernetes.io/instance: keycloak
    app.kubernetes.io/managed-by: keycloak-operator
  name: keycloak-network-policy
  namespace: keycloak
  ownerReferences:
  - apiVersion: k8s.keycloak.org/v2alpha1
    kind: Keycloak
    name: keycloak
    uid: e46c1c2a-77bb-4f18-9770-c34777cb8a75
  resourceVersion: "655702846"
  uid: 283d2fb7-fbd6-4bd1-b624-c7482a08b3a3
spec:
  ingress:
  - ports:
    - port: 8443
      protocol: TCP
  - from:
    - podSelector:
        matchLabels:
          app: keycloak
          app.kubernetes.io/instance: keycloak
          app.kubernetes.io/managed-by: keycloak-operator
    ports:
    - port: 7800
      protocol: TCP
    - port: 57800
      protocol: TCP
  - ports:
    - port: 9000
      protocol: TCP
  podSelector:
    matchLabels:
      app: keycloak
      app.kubernetes.io/instance: keycloak
      app.kubernetes.io/managed-by: keycloak-operator
  policyTypes:
  - Ingress
Does it actually work?
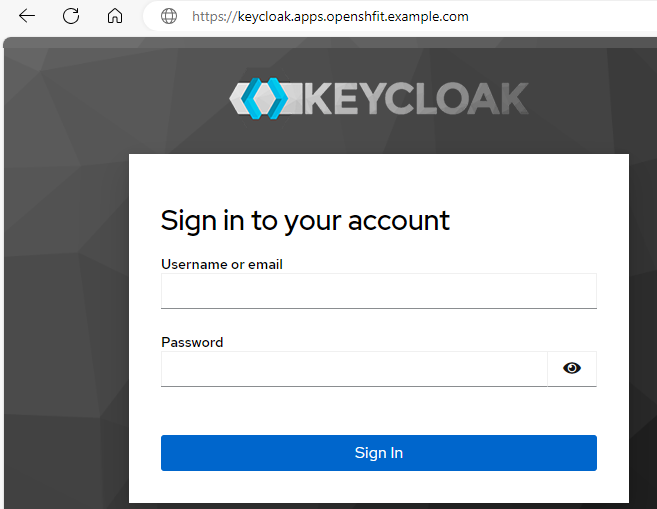
Now you can go to the URL of your route and if all goes according to plan, you should be presented with the admin console sign in page. Awesome!
You should be able to sign into the console using the KC_BOOTSTRAP_ADMIN_USERNAME and KC_BOOTSTRAP_ADMIN_PASSWORD, which is temp-admin and abcdefg123456789abcdefg123456789 in this example.
~]$ oc exec pod/keycloak-0 --namespace keycloak -- printenv
KC_BOOTSTRAP_ADMIN_USERNAME=temp-admin
KC_BOOTSTRAP_ADMIN_PASSWORD=abcdefg123456789abcdefg123456789
Likewise there should be a secret named keycloak-initial-admin that contains the temp-admin username and password.
~]$ oc get secret keycloak-initial-admin --namespace keycloak --output jsonpath="{.data}"
{"password":"YWJjZGVmZzEyMzQ1Njc4OWFiY2RlZmcxMjM0NTY3ODk=","username":"dGVtcC1hZG1pbg=="}

~]$ oc get secret keycloak-initial-admin --namespace keycloak --output jsonpath="{.data.username}" | base64 --decode
temp-admin

~]$ oc get secret keycloak-initial-admin --namespace keycloak --output jsonpath="{.data.password}" | base64 --decode
abcdefg123456789abcdefg123456789
And the psql CLI should show that the temp-admin user exists in the user_entity table in the master relam.
~]$ oc exec pod/postgres-0 -- psql --username admin --dbname keycloak --expanded --command "select * from user_entity where realm_id = (select id from realm where name = 'master')"
-[ RECORD 1 ]---------------+-------------------------------------
id                          | dedc1aaf-6094-4f9a-baf1-4e545f49e76d
email                       |
email_constraint            | 87ed719c-f845-40d1-baf4-d14774677aa0
email_verified              | f
enabled                     | t
federation_link             |
first_name                  |
last_name                   |
realm_id                    | f06c8b60-126e-4e18-8f9e-5069309073bc
username                    | temp-admin
created_timestamp           | 1764935003350
service_account_client_link |
not_before                  | 0
Create permanent admin user account
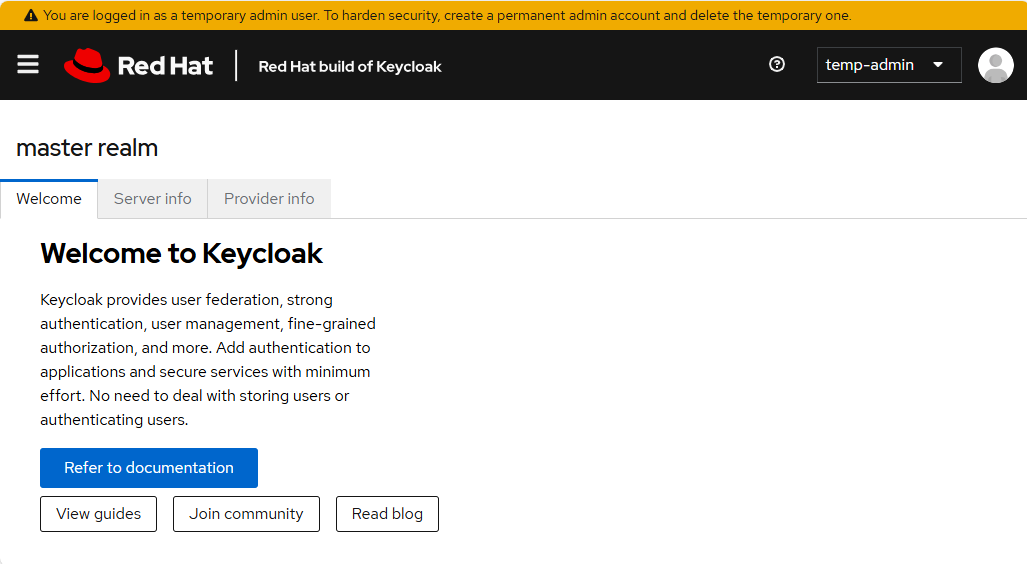
Once signed into the console, you should see something like this. Notice the orange banner that suggests creating a permanent admin account because as the name suggests, temp-admin is a temporary admin account.
In the left panel of the console, select Groups and let's create a group named admins.
In the left panel of the console, select Users and let's create a user named admin and add the user as a member of the /admins group.
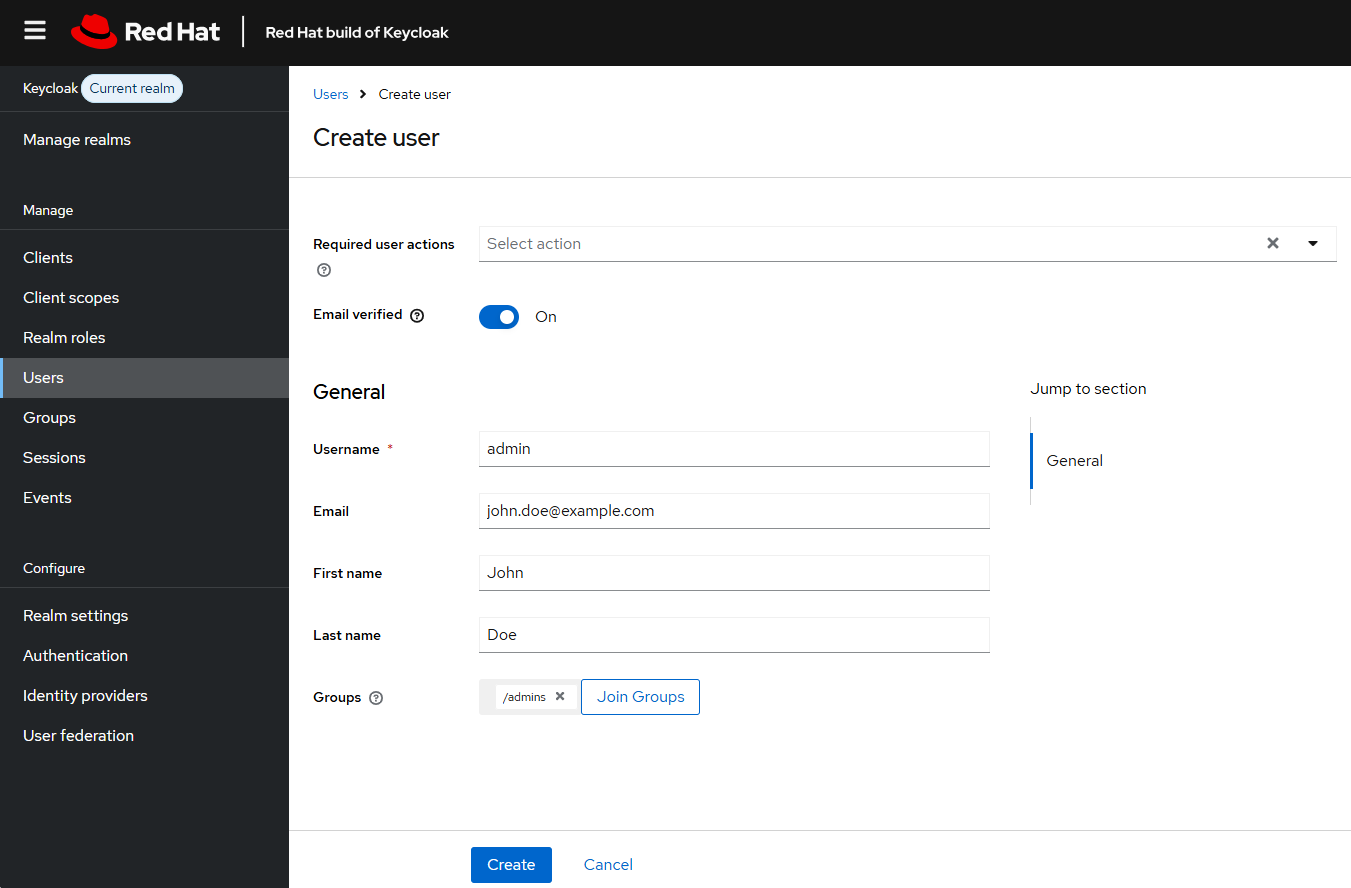
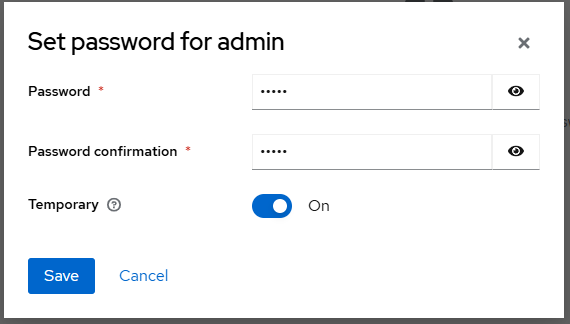
Select the Set Password tab and give the admin user a password.
Select the Assign Roles tab, select the Filter by realm role drop down, and select the admin role.

There should now be a record in the user_entity table in the Postgres database with the new user that was created.
~]$ oc exec pod/postgres-0 -- psql --username admin --dbname keycloak --expanded --command "select * from user_entity where realm_id = (select id from realm where name = 'master')"
-[ RECORD 1 ]---------------+-------------------------------------
id                          | dedc1aaf-6094-4f9a-baf1-4e545f49e76d
email                       |
email_constraint            | 87ed719c-f845-40d1-baf4-d14774677aa0
email_verified              | f
enabled                     | t
federation_link             |
first_name                  |
last_name                   |
realm_id                    | f06c8b60-126e-4e18-8f9e-5069309073bc
username                    | temp-admin
created_timestamp           | 1764935003350
service_account_client_link |
not_before                  | 0
-[ RECORD 2 ]---------------+-------------------------------------
id                          | 0b084180-1482-4465-a9c8-0c6dc35cdd8c
email                       | john.doe@example.com
email_constraint            | john.doe@example.com
email_verified              | t
enabled                     | t
federation_link             |
first_name                  | John
last_name                   | Doe
realm_id                    | f06c8b60-126e-4e18-8f9e-5069309073bc
username                    | john.doe
created_timestamp           | 1764935561093
service_account_client_link |
not_before                  | 0
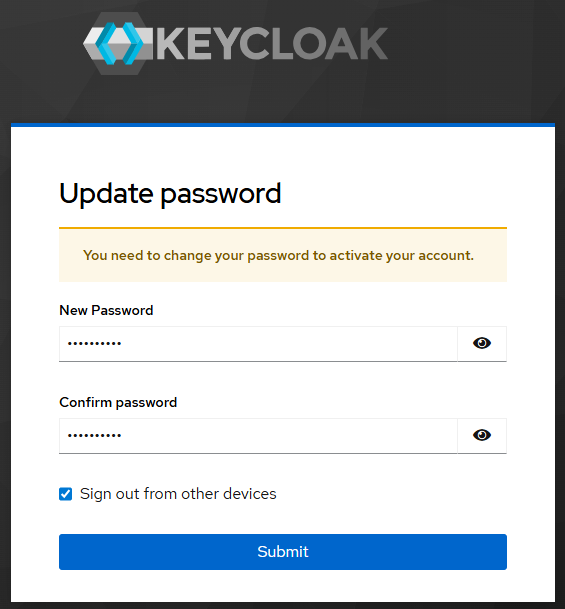
Sign out as temp-admin, sign in as admin, and create a new password for admin.
If you are able to sign in with the permanent admin account, you can then go ahead and delete the keycloak-initial-admin secret that contains the temp-admin username and password.
oc delete secret keycloak-initial-admin --namespace keycloak
Configure keycloak for OpenShift authentication
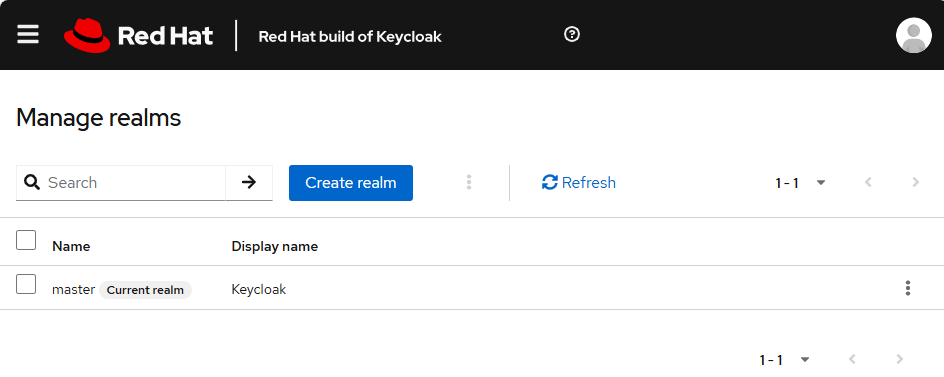
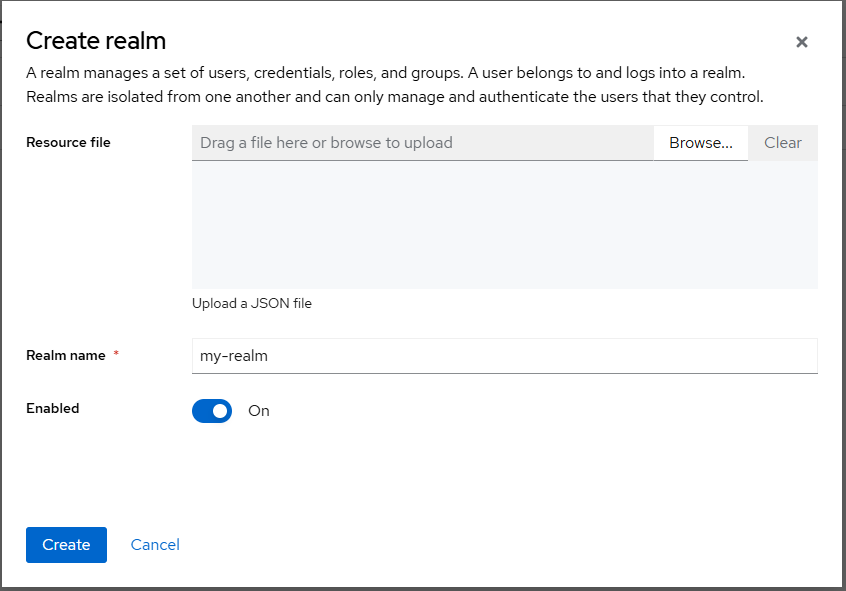
And finally, we can configure OpenShift to use keycloak for authentication. In the keycloak console, select Manage Realms > Create realm.
Give the realm a name, ensure it is enabled (of course), and select Create.
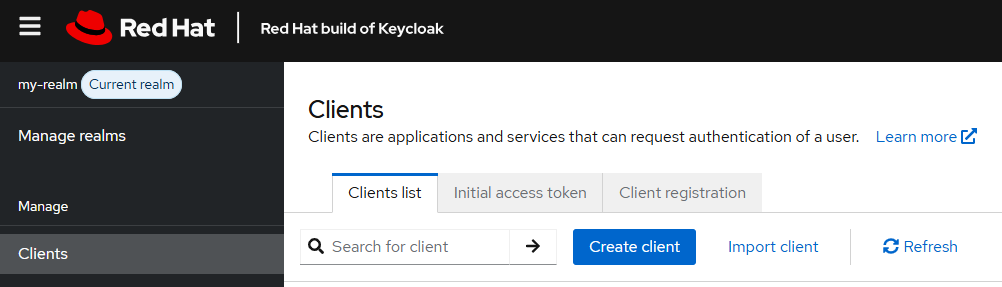
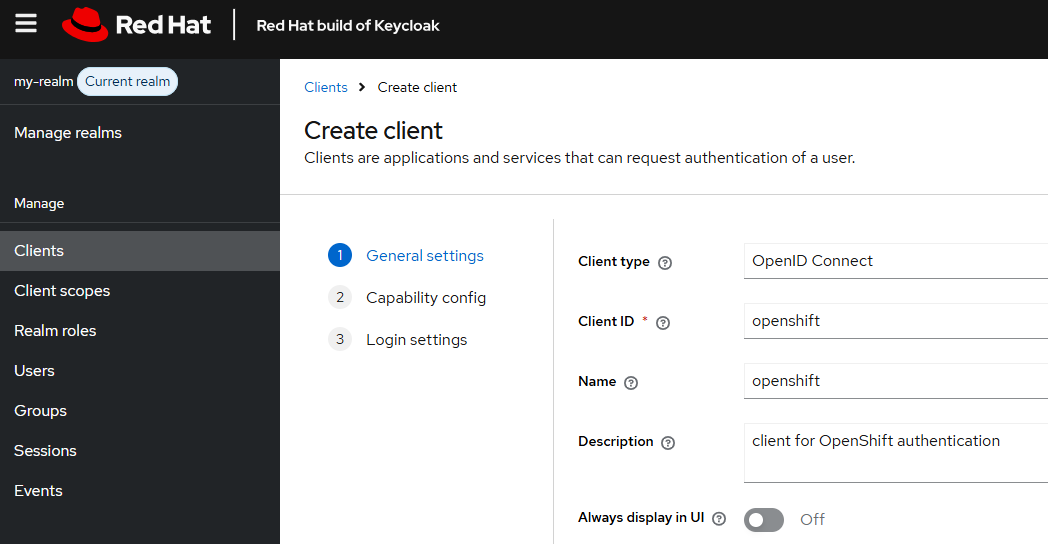
In the realm you created, select Clients > Create client.
In General settings, ensure the client type is OpenID Connect, and enter whatever you would like for the client ID, name and description.
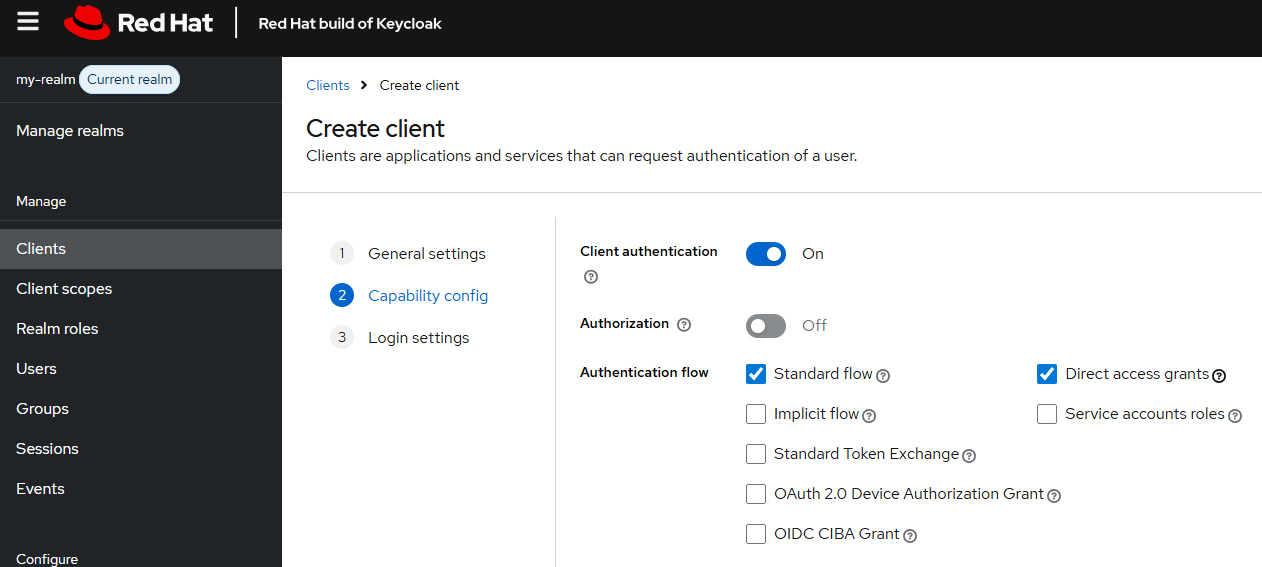
At Capability config, toggle on Client authentication, ensure both Standard flow and Direct access grants are checked.
Get the oAuth URL of your OpenShift cluster. Check out my article FreeKB - OpenShift - Return oAuth URLs.
~]$ curl --request GET --url https://api.openshift.example.com:6443/.well-known/oauth-authorization-server
{
  "issuer": "https://oauth-openshift.apps.openshift.example.com",
  "authorization_endpoint": "https://oauth-openshift.apps.openshift.example.com/oauth/authorize",
  "token_endpoint": "https://oauth-openshift.apps.openshift.example.com/oauth/token",
  "scopes_supported": [
    "user:check-access",
    "user:full",
    "user:info",
    "user:list-projects",
    "user:list-scoped-projects"
  ],
  "response_types_supported": [
    "code",
    "token"
  ],
  "grant_types_supported": [
    "authorization_code",
    "implicit"
  ],
  "code_challenge_methods_supported": [
    "plain",
    "S256"
  ]
}
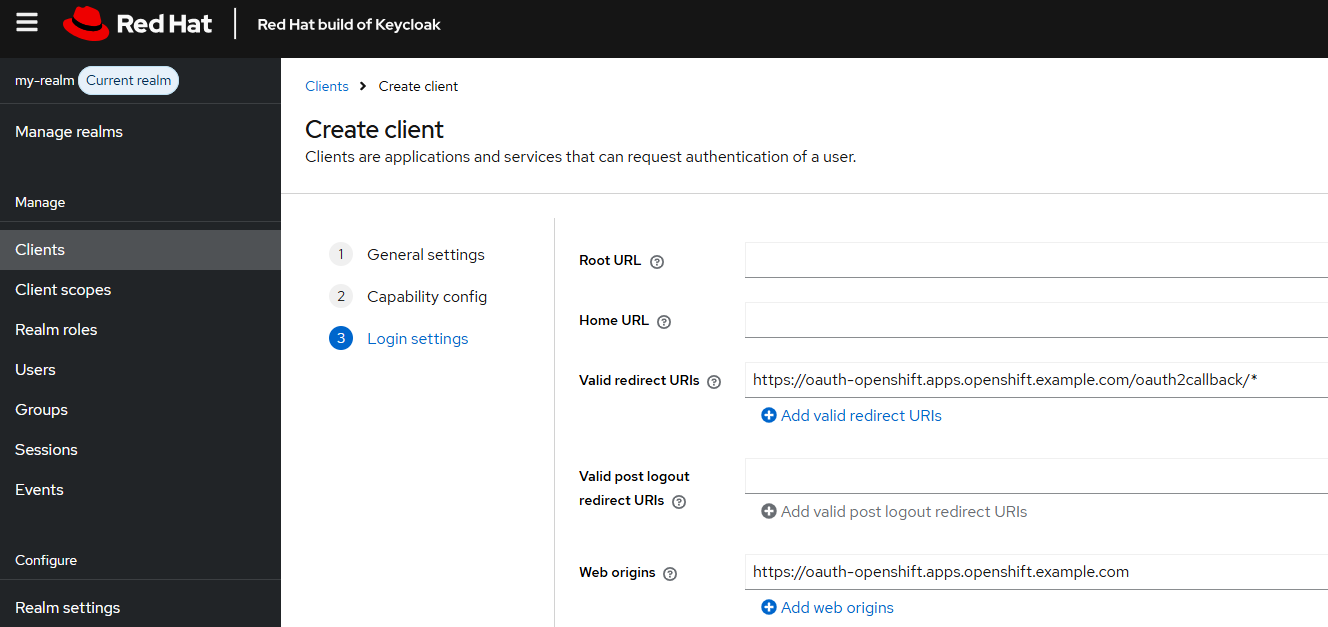
At Login settings, for Valid redirect URLs, enter your OpenShift clusters base oAuth URL followed by /oauth2callback/* and for Web origins enter your OpenShift clusters base oAuth URL.
Select the client you created, select the Credentials tab, and reveal the Client Secret and get the base64 encoded value of the Client Secret.
]$ printf MdfkjM234MDSFK234sdfkljMKADSFasdfsf | base64
TWRma2pNMjM0TURTRksyMzRzZGZrbGpNS0FEU0Zhc2Rmc2Y=
Create a secret in the openshift-config namespace that contains clientSecret and the base64 encoded value of the Client Secret.
apiVersion: v1
kind: Secret
metadata:
  name: keycloak
  namespace: openshift-config
data:
  clientSecret: TWRma2pNMjM0TURTRksyMzRzZGZrbGpNS0FEU0Zhc2Rmc2Y=
type: Opaque
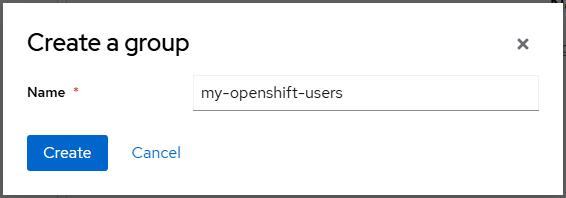
At Groups, select Create group.
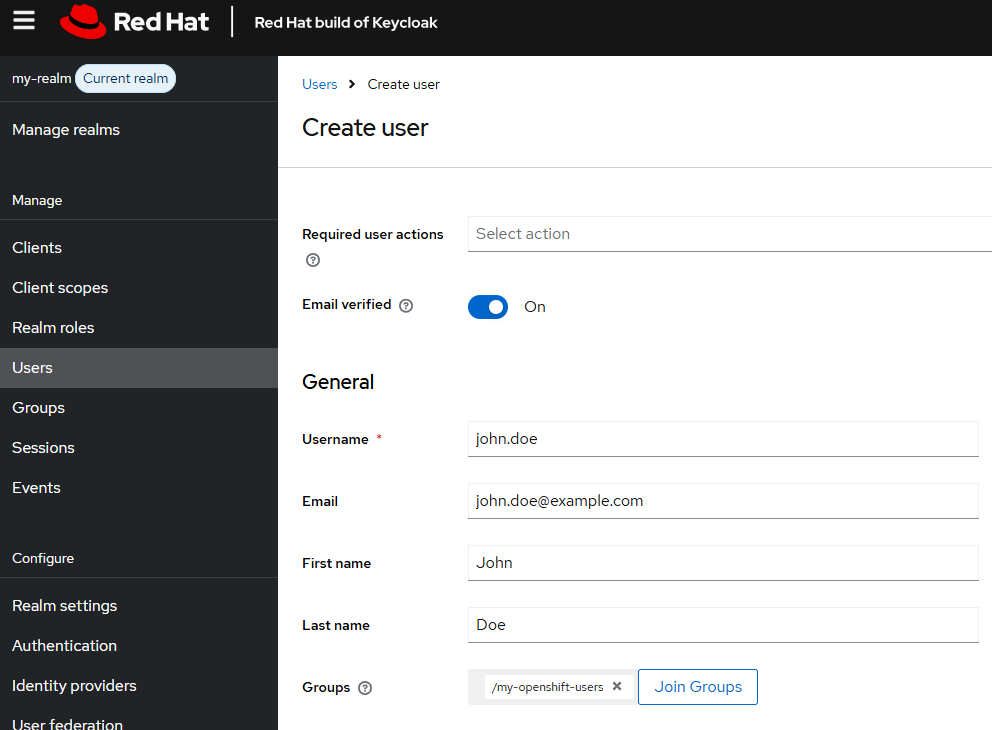
Create a user account and ensure the user account is a member of the group you created.
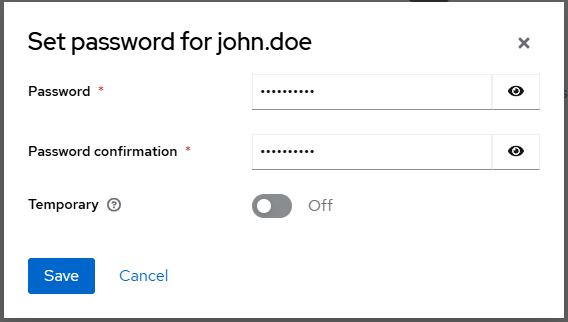
Give the user a password.
There should now be a record in the user_entity table in the Postgres database with the new user that was created in the new realm.
~]$ oc exec pod/postgres-0 -- psql --username admin --dbname keycloak --expanded --command "select * from user_entity where realm_id = (select id from realm where name = 'my-realm')"
-[ RECORD 1 ]---------------+-------------------------------------
id                          | d3efec9d-3e03-460f-92e8-c3a5a913c196
email                       | john.doe@example.com
email_constraint            | john.doe@example.com
email_verified              | t
enabled                     | t
federation_link             |
first_name                  | John
last_name                   | Doe
realm_id                    | 2396a520-9238-45c7-b4e2-f515a9179369
username                    | john.doe
created_timestamp           | 1765193863242
service_account_client_link |
not_before                  | 0
Last but not least, let's add the keycloak Identity Provider (IdP) to the oauth cluster resource.
- spec.identityProviders[].openID.clientSecret.name must be the name of the secret you created in the openshift-config namespace that contains the keycloak clientSecret
- spec.identityProviders[].openID.issuer must be the realm you created in keycloak that contains your OpenID client
- spec.identityProviders[].type must be OpenID since an OpenID client was created in keycloak
apiVersion: config.openshift.io/v1
kind: OAuth
metadata:
  name: cluster
spec:
  identityProviders:
  - mappingMethod: add
    name: keycloak
    openID:
      claims:
        email:
        - email
        groups:
        - groups
        name:
        - name
        preferredUsername:
        - preferred_username
      clientID: openshift
      clientSecret:
        name: keycloak
      extraScopes: []
      issuer: https://keycloak.apps.openshift.example.com/realms/my-realm
    type: OpenID
This should cause the authentication Cluster Operator to terminate the pods in the openshift-authentication namespace, one at a time, and spawn new pods.
~]$ oc get clusteroperators
NAME                                       VERSION   AVAILABLE   PROGRESSING   DEGRADED   SINCE    MESSAGE
authentication                             4.18.22   True        True          False      122d     OAuthServerDeploymentProgressing: deployment/oauth-openshift.openshift-authentication: 2/3 pods have been updated to the latest generation and 2/3 pods are available
And you should see the pods in the openshift-authentication namespace Terminating and new pods being spawned.
~]$ oc get pods --namespace openshift-authentication
NAME                               READY   STATUS        RESTARTS   AGE
oauth-openshift-79776b975b-rnf6n   1/1     Terminating   0          117s
oauth-openshift-7b895986c9-f4zcw   1/1     Running       0          46s
oauth-openshift-7b895986c9-pxmcv   0/1     Pending       0          19s
oauth-openshift-7b895986c9-z5z54   1/1     Running       0          60s
Now when you go to the oauth URL to sign into your OpenShift cluster, there should be a keycloak option. Awesome!
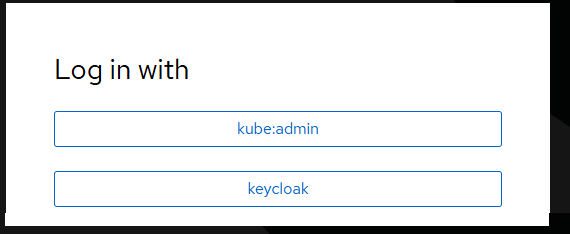
And you should be able to sign into the OpenShift cluster using one of your user accounts in keycloak.

Did you find this article helpful?
If so, consider buying me a coffee over at 