
If you are not familiar with SSO and LTPA, check out our getting started article.
If you have two or more WebSphere servers, and you want to be able to get an LTPA token for one of WebSphere servers and then use the LTPA token to be automatically authenticated to the other WebSphere servers, each WebSphere server will need the same LTPA key.
Prerequisites
- Synchronize time - Since LTPA tokens expire (120 minutes is the default), it is important to ensure that each WebSphere server is configured with the correct date and time, which is usually done via network time protocol (NTP). Configuring a servers time is beyond the scope of this article.
- User account repository - Ensure each WebSphere server is configured to use the same user account repository.
- Administrative security - Ensure administrative security is enable on each WebSphere server.
- DNS - Ensure each server is in the same DNS domain.
- Realm name - Ensure each server is configured with the same realm name.
Create and Export LTPA key
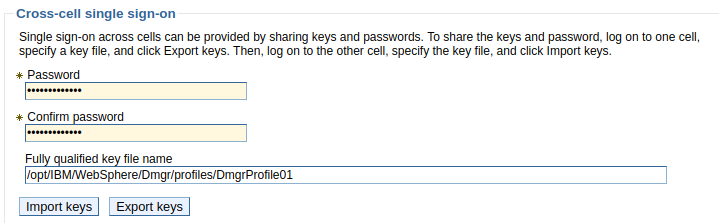
In one of your WebSphere servers, navigate to Security > Global Security > LTPA. Provide a password for the LTPA key and the location and name of the file that will contain the LTPA key and select Export. In this example, "ltpa.key" is the name of the file that contains the LTPA key.
If the export is successful, the following should be displayed, and the key file should now reside on your server.

The exported file is nothing more than a text file that contains the following lines.
#IBM WebSphere Application Server key file
#Tue Sep 03 06:21:30 CDT 2019
com.ibm.websphere.CreationDate=Tue Sep 03 06\:21\:30 CDT 2019
com.ibm.websphere.ltpa.version=1.0
com.ibm.websphere.ltpa.3DESKey=mbcy.....ES2AeaUE\=
com.ibm.websphere.CreationHost=dmgr.example.com
com.ibm.websphere.ltpa.PrivateKey=DXbx8Ho.....JEgN1Y\=
com.ibm.websphere.ltpa.Realm=defaultRealm
com.ibm.websphere.ltpa.PublicKey=AMxdld/P.....OjO2/AQAF
Import LTPA key
Now, on your other WebSphere servers, transfer the file that was exported from server "a" to some directory on server "b". Then, at Security > Global Security > LTPA, enter the LTPA key password, enter the path to the file, and select Import key. If the import is successful, the following should be displayed. Select Save.

And that's it. You should now be able to authenticate into server "a" and then automatically be authenticated into the other WebSphere servers for the duration of the LTPA token.
Other considerations
You typically want each WebSphere server to be configured to use the same type of users registry (federated repository, LDAP, local operating system, custom).
Did you find this article helpful?
If so, consider buying me a coffee over at 