
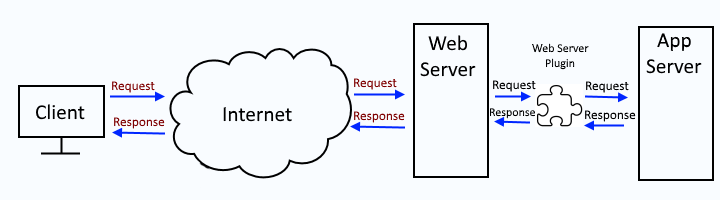
The web server plugin is used to create a communication channel between IBMs IHS web server and a WebSphere application server.
This assumes you have already generated the plugin. There are various ways to go about generating the global or dedicated plugin-cfg.xml files.
- global or dedicated - Generate web server plugin (plugin-cfg.xml) using GenPluginCfg (this article)
- dedicated - Generate web server plugin (plugin-cfg.xml) using wsadmin
- dedicated - Generate web server plugin (plugin-cfg.xml) using wsadmin and httpPluginManagement.py
- global or dedicated - Generate web server plugin (plugin-cfg.xml) using the dmgr
- dedicated - Generate web server plugin (plugin-cfg.xml) using the PCT command
Likewise, after the web server plugin has been generated, there are various ways to propagate the plugin-cfg.xml file.
- Propagate web server plugin (plugin-cfg.xml) using the dmgr
- Propagate web server plugin (plugin-cfg.xml) using GenPluginCfg
- Propagate web server plugin (plugin-cfg.xml) using wsadmin
- Propagate web server plugin (plugin-cfg.xml) using wsadmin and httpPluginManagement.py
- Propagate web server plugin (plugin-cfg.xml) using configurewebservername.sh
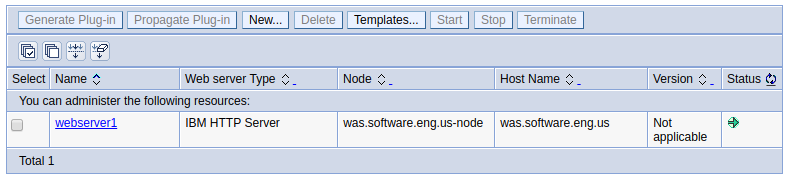
After you have generated the web server plugin using the PCT command, the configurewebservername.sh (Linux) or configurewebservername.bat (Windows) file will be created in the plugin_home/bin/ directory on your IHS web server. If you are setting up a remote web server, copy the configurewebservername.sh (Linux) or configurewebservername.bat (Windows) file from the web server to the dmgr_home/bin/ directory on the application server. This can be done on the dmgr using the SCP (secure copy protocal) command. This example is on Linux.
scp username@your_ihs_web_server_hostname:/path/to/configurewebservername.sh /opt/IBM/WebSphere/Dmgr/bin/
Run the script on the dmgr. The configurewebservername script contains a wsadmin command that will add the web server to the dmgr, update the plugin, and then propagate the plugin to your IHS web server.
./wsadmin.sh
profile_name
userid
password
-f was_home/bin/configureWebserverDefinition.jacl
webserver1
IHS
'/opt/IBM/HTTPServer'
'/opt/IBM/HTTPServer/conf/httpd.conf'
80
MAP_ALL
'/opt/IBM/WebSphere/Plugins'
unmanaged
example.com-node
example.com
linux
After the configirewebserverdefinition scipt is run, the web server should be added to the WebSphere admin console, and you should be able to start the web server. If the web server fails to start, ensure ports 80 and 443 are open on the web server.
The script will also make changes to the plugin-cfg.xml file on the web server. In this example, the web server is able to route request to two application servers (server1 server2) in a cluster (cluster1), and the /beta app can be produced.
<VirtualHostGroup Name="default_host">
  <VirtualHost Name="*:80"/>
  <VirtualHost Name="*:443"/>
  <VirtualHost Name="*:9080"/>
  <VirtualHost Name="*:9081"/>
  <VirtualHost Name="*:9443"/>
  <VirtualHost Name="*:9444"/>
</VirtualHostGroup>


<ServerCluster Name="cluster1">
  <Server Name="server1">
    <Transport Port="9080" Protocol="http"/>
    <Transport Port="9443" Protocol="https"/>
    </Transport>
  </Server>
  <Server Name="server2">
    <Transport Port="9081" Protocol="http"/>
    <Transport Port="9444" Protocol="https"/>
    </Transport>
  </Server>
</ServerCluster>


<UriGroup Name="server1_Cluster_URIs">
  <Uri Name="/beta/*"/>
</UriGroup>
You should now be able to produce apps running on your app server from the web server.

Did you find this article helpful?
If so, consider buying me a coffee over at 