
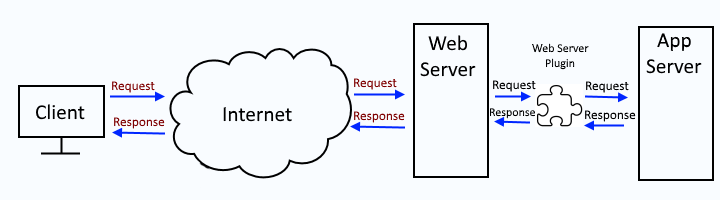
The web server plugin is used to create a communication channel between IBMs IHS web server and a WebSphere application server.
This assumes you have already generated the plugin. There are various ways to go about generating the global or dedicated plugin-cfg.xml files.
- global or dedicated - Generate web server plugin (plugin-cfg.xml) using GenPluginCfg (this article)
- dedicated - Generate web server plugin (plugin-cfg.xml) using wsadmin
- dedicated - Generate web server plugin (plugin-cfg.xml) using wsadmin and httpPluginManagement.py
- global or dedicated - Generate web server plugin (plugin-cfg.xml) using the dmgr
- dedicated - Generate web server plugin (plugin-cfg.xml) using the PCT command
Likewise, after the web server plugin has been generated, there are various ways to propagate the plugin-cfg.xml file.
- Propagate web server plugin (plugin-cfg.xml) using the dmgr
- Propagate web server plugin (plugin-cfg.xml) using GenPluginCfg (this article)
- Propagate web server plugin (plugin-cfg.xml) using wsadmin
- Propagate web server plugin (plugin-cfg.xml) using wsadmin and httpPluginManagement.py
- Propagate web server plugin (plugin-cfg.xml) using configurewebservername.sh
Propagating the web server plugin means that you are sending the plugin-cfg.xml file from your WebSphere application server or dmgr to your IHS web server.
Before propagating the plugin, you will need to create the directory on the IHS web server for the plugin-cfg.xml file. For example, if the plugin-cfg.xml file will be propagated to the /opt/IBM/WebSphere/Plugins/config/was.software.eng.us directory, you will need to make the was.software.eng.us directory.
mkdir /opt/IBM/WebSphere/Plugins/config/was.software.eng.us
You will also need to ensure your IHS admin server user has write permission to the newly created directory.
- In the dmgr, select Servers > Server types > Web servers.
- Select your web server.
- Select Remote web server management.
In this example, john.doe is the IHS admin server user.
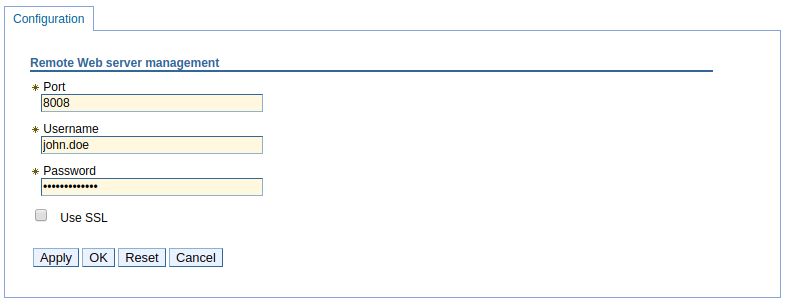
Ensure the user (john.doe in this example) has write permission to the directory. Setting the user as the owner of the directory with rwx (read write execute) permissions will ensure the user has permission to write to the directory.
chown john.doe /opt/IBM/WebSphere/Plugins/config/was.software.eng.us
chmod u+rwx /opt/IBM/WebSphere/Plugins/config/was.software.eng.us
Generating the web server plugin creates/updates the plugin XML file (plugin-cfg.xml).
It is important to recognize that you may have two (or more) plugin-cfg.xml files.
- global plugin-cfg.xml file that would be used by all of the IHS HTTP servers that have been added in your WebSphere admin console
- dedicated plugin-cfg xml file(s), one for each IHS HTTP server that has been added in your WebSphere admin console
The global plugin-cfg.xml file should be located at
${WAS_INSTALL_ROOT}/profiles/your_profile/config/cells/plugin-cfg.xml
dedicated plugin-cfg.xml file(s) should be located at
${WAS_INSTALL_ROOT}/profiles/your_profile/config/cells/your_cell/nodes/your_web_node/servers/your_web_server/plugin-cfg.xml
There are various ways to go about generating the global or dedicated plugin-cfg.xml files.
- global or dedicated - Generate web server plugin (plugin-cfg.xml) using GenPluginCfg (this article)
- dedicated - Generate web server plugin (plugin-cfg.xml) using wsadmin
- dedicated - Generate web server plugin (plugin-cfg.xml) using wsadmin and httpPluginManagement.py
- global or dedicated - Generate web server plugin (plugin-cfg.xml) using the dmgr
- dedicated - Generate web server plugin (plugin-cfg.xml) using the PCT command
Running the GenPluginCfg.sh (Linux) or GenPluginCfg.bat (Windows) script in ${WAS_INSTALL_ROOT}/bin (e.g. /opt/WebSphere/bin/GenPluginCfg.sh) or in ${WAS_INSTALL_ROOT}/profiles/your_profile/bin (e.g. /opt/WebSphere/profile/Profile01/bin/GenPluginCfg.sh) without the -webserver.name option will generate the global web server plugin.
IMPORTANT!
You must first delete the global plugin-cfg.xml file before issuing the GenPluginCfg.sh script. If you do not delete the global plugin-cfg.xml file, only new key:values will be added to the global plugin-cfg.xml file. Existing key:values will not be updated. By first deleting the global plugin-cfg.xml file, both new and existing key:values will get updated.
For example.
${WAS_INSTALL_ROOT}/bin/GenPluginCfg.sh
Or like this.
${WAS_INSTALL_ROOT}/bin/GenPluginCfg.sh -cell.name Cell01
Or like this.
${WAS_INSTALL_ROOT}/bin/GenPluginCfg.sh -cell.name Cell01 -node.name. Node01
The following output should be displayed.
*** Initiating original genplugincfg call using arg of:

IBM WebSphere Application Server, Release <version>
WebSphere Plugin Configuration Generator
Copyright IBM Corp., 1997-2012
PLGC0012I: The plug-in is generating a server plug-in configuration file using the cluster definition. your_cell.
PLGC0005I: Plug-in configuration file = ${WAS_INSTALL_ROOT}/profiles/your_profile/config/cells/plugin-cfg.xml
Running the GenPluginCfg.sh (Linux) or GenPluginCfg.bat (Windows) script in ${WAS_INSTALL_ROOT}/bin (e.g. /opt/WebSphere/bin/GenPluginCfg.sh) or in ${WAS_INSTALL_ROOT}/profiles/your_profile/bin (e.g. /opt/WebSphere/profile/Profile01/bin/GenPluginCfg.sh) with the -webserver.name option will generate the dedicated web server plugin.
For example.
${WAS_INSTALL_ROOT}/bin/GenPluginCfg.sh -cell.name Cell01 -node.name Node01 -webserver.name WebServer01
Something like this should be displayed.
*** Initiating original genplugincfg call using args of:   -cell.name Cell01 -node.name Node01 -webserver.name WebServer01

IBM WebSphere Application Server, Release 8.5
WebSphere Plugin Configuration Generator
Copyright IBM Corp., 1997-2012
PLGC0005I: Plug-in configuration file = /opt/WebSphere/AppServer/profiles/Profile01/config/cells/Cell01/nodes/Node01/servers/WebServer01/plugin-cfg.xml
PLGC0052I: Plug-in configuration file generation is complete for the Web server. Cell01.Node01.WebServer01.
Optionally, the -propagate yes option can be included to propagate the dedicated plugin-cfg.xml file from the dmgr to your IHS web server.
${WAS_INSTALL_ROOT}/bin/GenPluginCfg.sh -cell.name Cell01 -node.name Node01 -webserver.name WebServer01 -propagate yes
It's probably a good idea to also include -propagateKeyring yes to also propagate the plugin-cfg.kdb and plugin-cfg.sth files.
${WAS_INSTALL_ROOT}/bin/GenPluginCfg.sh -cell.name Cell01 -node.name Node01 -webserver.name WebServer01 -propagate yes -propagateKeyring yes
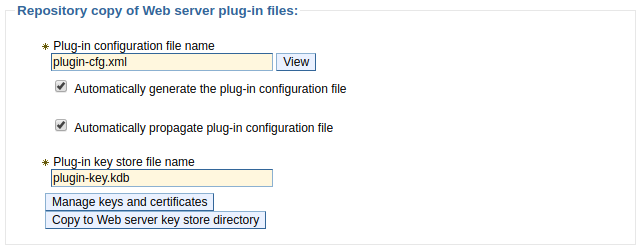
The GenPluginCfg.sh|bat is almost never used to generate / re-generate and propagate the dedicated plugin-cfg.xml file, as the dedicated plugin-cfg.xml can be automatically re-generated and propagated when a change is made to the master configuration file. This is configured in the dmgr at Servers > Server types > Web servers > your web server > Plug-in properties. If Automatically generate the plug-in configuration file and Automatically propagate the plug-in configuration file are checked, then the dedicated plugin-cfg.xml file will be automatically re-generated and propagated when a change is made to the master configuration file.
Additionally, the -debug yes option can be used to append events to plugin-cfg.log.
${WAS_INSTALL_ROOT}/bin/GenPluginCfg.sh -debug yes
Which should be located at.
/opt/WebSphere/AppServer/profiles/your_profile/logs/your_web_server/plugin-cfg.log
Did you find this article helpful?
If so, consider buying me a coffee over at 