
This article describes the design where Flask contains all of the code to process a transaction using the PayPal Python orders client. This is ideal for a single Flask application that wants to use the PayPal Python orders client, meaning the PayPal Python orders client would not be used by other Flask applications.
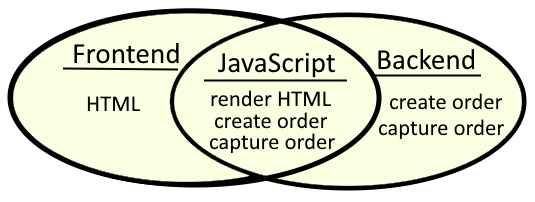
At a high level, there is a front end that contains an HTML page and JavaScript and there is a back end that uses the same JavaScript as the front end and also used the PayPal Python orders client. In this way, the JavaScript is basically the glue between the frontend HTML and backend PayPal Python orders client.
The HTML and JavaScript work together to present the form that prompts the users to provide their credit or debit card information. Upon entering the credit or debit card information, there is back and forth between JavaScript and PayPal Python orders client to process the transaction, and the user is then returned to an HTML page letting the user know if their transaction was successful.
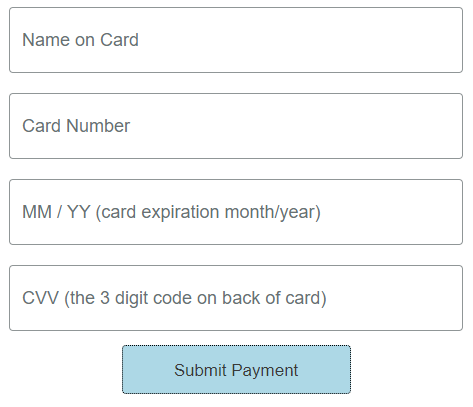
For example, the HTML and JavaScript could work together to present something like this, where the credit card data gathered and then JavaScript and the PayPal Python orders client process the transaction. Check out my article FreeKB - PayPal - JavaScript frontend for more details on how to create and customize the HTML form.
Let's first set this up in the PayPal Sandbox environment.
- Go to https://developer.paypal.com/dashboard/applications/sandbox
- Select Create App and follow the prompts to create an app. You should get a Client ID and Secret.
Let's say your Flask app has the following structure.
├── main.py
├── my-project (directory)
│   ├── __init__.py
│   ├── checkout.py
│   ├── paypal_backend.py
│   ├── javascript (directory)
│   │   ├── paypal_frontend.js
│   ├── templates (directory)
│   │   ├── checkout.html
In this example, checkout.py could contain a route for your checkout.html page.
from flask import Blueprint, render_template

blueprint = Blueprint('my_route', __name__)

@blueprint.route('/checkout')
def checkout():
    paypal_client_id="your PayPal Client ID"
    return render_template('checkout.html', paypal_client_id=paypal_client_id)
And your checkout.html page could have the following, which uses paypal_frontend.js to render your PayPal checkout form.
<!DOCTYPE html>
<html>
<head></head>
<body>
<div id="paypal-button-container" class="paypal-button-container"></div>
<p id="result-message"></p>
<script src="https://www.paypal.com/sdk/js?client-id={{paypal_client_id}}¤cy=USD&components=buttons"></script>
<script src="{{ url_for('static', filename='javascript/paypal_frontend.js') }}"></script>
</body>
</html>
And your paypal_frontend.js could have something like this. Notice the createOrderCallback function submits a POST request to /paypal/orders/create and onApproveCallback function submits a POST request to /paypal/orders/capture. The onApproveCallback function is what instructs PayPal to actually charges the customers credit card.
By default, JavaScript console.log will NOT append events to the Flask logger. Instead, the JavaScript console.log will just be available in the browsers console, in the F12 developer tools. This is problematic, because they you do not have any of the JavaScript logs that you can used for analysis and debuggging. Check out my article FreeKB - PayPal - Appending JavaScript console.log to Flask logger for details of how to append the JavaScript logs to the Flask logger.
Here is the PayPal documentation on the JavaScript SDK.
https://developer.paypal.com/sdk/js/reference
async function createOrderCallback() {
    console.log(`[${new Date().toJSON()}] This is the beginning of the createOrderCallback function`);
    console.log(`[${new Date().toJSON()}] Submitting a POST request to /paypal/order/create in paypal_backend.py`);
    try {
        var response = await fetch(`/paypal/order/create`, {
            method: "POST",
            headers: {
                "Content-Type": "application/json"
            })
    } catch (error) {
        return resultMessage({ result: "failed", message: `${error}` })
    }

    if ( response.json().result != "success" ) {
        return resultMessage({ result: "failed", message: `${JSON.stringify(response.json())}` })
    } else {
        return response_json.order_id
    }
}

async function onApproveCallback(order_id) {
    console.log(`[${new Date().toJSON()}] This is the beginning of the onApproveCallback function`);
    console.log(`[${new Date().toJSON()}] Submitting a POST request to /paypal/order/capture in routes_paypal_backend.py with the following body: ${JSON.stringify(order_id)}`);
    try {
        var response = await fetch(`/paypal/order/capture`, {
            method: "POST",
            headers: {
                "Content-Type": "application/json"
            },
            body: JSON.stringify(order_id)
        })
    } catch (error) {
        return resultMessage({ result: "failed", message: `${error}` })
    }

    try {
        var response_json = await response.json()
    } catch (error) {
        console.log(`[${new Date().toJSON()}] result: failed`)
        console.log(`[${new Date().toJSON()}] message: ${error}`)
        return resultMessage({ result: "failed", message: `${error}` })
    }

    if ( response.json().status != "COMPLETED" ) {
        return resultMessage({ result: "failed", message: `${JSON.stringify(response.json())}` })
    } else {

        if (!("purchase_units" in response_json )) {
            let message = "the response JSON returned by PayPal does not include purchase_units (this is unexpected). "
            message += `response_json => ${JSON.stringify(response_json)}`
            return resultMessage({ result: "failed", message: `${message}` })
        } else {

            response_json.purchase_units.forEach(purchase_unit => {
                console.log(`[${new Date().toJSON()}] purchase_unit => ${JSON.stringify(purchase_unit)}`)

                try {
                    purchase_unit.payments
                } catch (error) {
                    let message = "the following error was captured when trying purchase_unit.payments. "
                    message += `error => ${error}. `
                    message += `response_json => ${JSON.stringify(response_json)}`
                    return resultMessage({ result: "failed", message: `${message}` })
                }

                console.log(`[${new Date().toJSON()}] purchase_unit.payments => ${JSON.stringify(purchase_unit.payments)}`)

                try {
                    purchase_unit.payments.captures
                } catch (error) {
                    let message = "the following error was captured when trying purchase_unit.payments.captures. "
                    message += `error => ${error}. `
                    message += `response_json => ${JSON.stringify(response_json)}`
                    return resultMessage({ result: "failed", message: `${message}` })
                }

                purchase_unit.payments.captures.forEach(capture => {
                    console.log(`[${new Date().toJSON()}] capture => ${JSON.stringify(capture)}`)

                    try {
                        capture.status
                    } catch (error) {
                        let message = "the following error was captured when trying capture.status. "
                        message += `error => ${error}. `
                        message += `response_json => ${JSON.stringify(response_json)}`
                        return resultMessage({ result: "failed", message: `${message}` })
                    }

                    if (capture.status != "COMPLETED") {
                        let message = "purchase_units.payments.captures.status is the PayPal response is NOT COMPLETED. "
                        message += `response_json => ${JSON.stringify(response_json)}`
                        return resultMessage({ result: "failed", message: `${message}` })
                    } else {
                        return resultMessage({ result: "success", response_json: `${JSON.stringify(response_json)}` })
                    }
                })
            })
        }
    }
}

function resultMessage(res) {
    document.location.replace(`/order?result=${res.result}`);
}

window.paypal.Buttons({
    createOrder: createOrderCallback,
    onApprove: onApproveCallback
})

const cardField = window.paypal.CardFields({
    createOrder: createOrderCallback,
    onApprove: onApproveCallback
})

if (cardField.isEligible()) {
    const nameField = cardField.NameField({ placeholder:"Name on Card" }).render("#card-name-field-container")
    const numberField = cardField.NumberField({ placeholder:"Card Number" }).render("#card-number-field-container")
    const expiryField = cardField.ExpiryField({ placeholder:"MM / YY (card expiration month/year)" }).render("#card-expiry-field-container")
    const cvvField = cardField.CVVField({ placeholder:"CVV (the 3 digit code on back of card)" }).render("#card-cvv-field-container")

    document
        .getElementById("multi-card-field-button")
        .addEventListener("click", () => {
            cardField.getState()
                .then((state) => {
                    console.log(`[${new Date().toJSON()}] cardField.getState() state => ${JSON.stringify(state)}`)
                    if (state.fields.cardNameField.isEmpty == true) {
                        let message = "It appears that the name on the credit card was not entered"
                        resultMessage({ result: "no_cvv", message: `${message}` })
                    } else if (state.fields.cardNameField.isValid == false) {
                        let message = "It appears that the name on the credit card is not valid"
                        resultMessage({ result: "invalid_cvv", message: `${message}` })
                    } else if (state.fields.cardNumberField.isEmpty == true) {
                        let message = "It appears that the credit card number was not entered"
                        resultMessage({ result: "no_number", message: `${message}` })
                    // this does a partial check to determine if the credit card is valid
                    // the first 4 integers of the credit card are used to determine the credit card issuer
                    // If PayPal determines that the credit card entered is not for a valid credit card providered, then isValid will be false
                    } else if (state.fields.cardNumberField.isValid == false) {
                        let message = "It appears that the credit card number is not valid"
                        resultMessage({ result: "invalid_number", message: `${message}` })
                    } else if (state.fields.cardExpiryField.isEmpty == true) {
                        let message = "It appears that the credit card expiration month/year was not entered"
                        resultMessage({ result: "no_expiration", message: `${message}` })
                    // this doesn't actually determine if the expiration month/year is valid
                    // it just checks if [0-9][0-9]/[0-9][0-9] was entered
                    } else if (state.fields.cardExpiryField.isValid == false) {
                        let message = "It appears that the credit card expiration month/year is not valid"
                        resultMessage({ result: "invalid_expiration", message: `${message}` })
                    } else if (state.fields.cardCvvField.isEmpty == true) {
                        let message = "It appears that the credit card CVV (3 digit number) was not entered"
                        resultMessage({ result: "no_cvv", message: `${message}` })
                    // this doesn't actually determine if the CVV is valid
                    // it just checks if a 3 digit integer was entered
                    } else if (state.fields.cardCvvField.isValid == false) {
                        let message = "It appears that the credit card CVV (3 digit number) is not valid"
                        resultMessage({ result: "invalid_cvv", message: `${message}` })
                    } else if (state.errors != 0) {
                        resultMessage({ result: "failed", message: `${error}` })
                    } else {
                        // if no errors detected then submit the transaction
                        // this is what calls createOrder and onApprove
                        cardField.submit()
                            .then(() => {})
                            .catch((submit_error) => {
                                console.log(`[${new Date().toJSON()}] submit_error => ${JSON.stringify(submit_error)}`)

                                try {
                                    submit_error.data.body.details.forEach(detail => {
                                        try {
                                            let description = detail.description
                                            console.log(`[${new Date().toJSON()}] description => ${JSON.stringify(description)}`)
                                            if (description == "Invalid card number") {
                                                resultMessage({ result: "invalid_number", message: `${description}` })
                                            } else {
                                                resultMessage({ result: "failed", message: `${description}` })
                                            }
                                        } catch (error) {
                                            let message = "got an unexpected error"
                                            resultMessage({ result: "failed", message: `${message}` })
                                        }
                                    })
                                } catch (error) {
                                    let message = "got an unexpected error"
                                    resultMessage({ result: "failed", message: `${message}` })
                                }
                            })
                    }
                })
                .catch((error) => {
                    console.log(`[${new Date().toJSON()}] cardField.getState() cardField.submit() error => ${error}`)
                    resultMessage({ result: "failed", message: `${error}` })
                })
        })
}
And paypal_backend.py could contain something like this.
- The createOrderCallback function in paypal_frontend.js submits a POST request to the /paypal/order/create route in paypal_backend.py and awaits for the response JSON.
- If the response JSON contains an order ID (it should) then the onApproveCallback function in paypal_frontend.js submits a POST request to the /paypal/order/capture route in paypal_backend.py and waits for the response JSON. This is what instructs PayPal to actually charge the customers debit or credit card.
Underneath the hood, the /paypal/order/create and /paypal/order/capture routes are using the PayPal Python orders client to submit a POST request to the PayPal orders REST APIs. Here is the GitHub repo for the PayPal Payclient orders client.
Here are the PayPal orders_create and orders_capture REST APIs.
- https://developer.paypal.com/docs/api/orders/v2/#orders_create
- https://developer.paypal.com/docs/api/orders/v2/#orders_capture
Of course, instead of using the PayPal Python client, you could instead just use the Python requests module to submit a POST request to the PayPal orders_create and orders_capture REST APIs.
This is also just the minimal boilerplate code without any error handling. In reality, this should have try / except error handling blocks.
import json
from flask import Blueprint, request
from paypalserversdk.http.auth.o_auth_2 import ClientCredentialsAuthCredentials
from paypalserversdk.logging.configuration.api_logging_configuration import LoggingConfiguration, RequestLoggingConfiguration, ResponseLoggingConfiguration
from paypalserversdk.paypal_serversdk_client import PaypalServersdkClient
from paypalserversdk.controllers.orders_controller import OrdersController
from paypalserversdk.models.amount_with_breakdown import AmountWithBreakdown
from paypalserversdk.models.checkout_payment_intent import CheckoutPaymentIntent
from paypalserversdk.models.order_request import OrderRequest
from paypalserversdk.models.purchase_unit_request import PurchaseUnitRequest
from paypalserversdk.api_helper import ApiHelper
from paypalserversdk.configuration import Environment

blueprint = Blueprint('routes_paypal_backend', __name__)

client_id = <your paypal client ID>
client_secret = <your paypal client secret>

def return_paypal_client(client_id, client_secret):

    paypal_client: PaypalServersdkClient = PaypalServersdkClient(
        client_credentials_auth_credentials=ClientCredentialsAuthCredentials(
            o_auth_client_id=client_id,
            o_auth_client_secret=client_secret
        ),
        environment=Environment.SANDBOX,
        logging_configuration=LoggingConfiguration(
            log_level=logging.DEBUG,
            mask_sensitive_headers=False,
            request_logging_config=RequestLoggingConfiguration(
                log_headers=True,
                log_body=True
            ),
            response_logging_config=ResponseLoggingConfiguration(
                log_headers=True,
                log_body=True
            )
        )
    )

    return paypal_client

@blueprint.route('/paypal/order/create', methods=['POST'])
def create_order():

    paypal_client = return_paypal_client(client_id, client_secret)
    orders_controller: OrdersController = paypal_client.orders

    order = orders_controller.create_order({
        "body": OrderRequest(
            intent=CheckoutPaymentIntent.CAPTURE,
            purchase_units=[
            PurchaseUnitRequest(
                AmountWithBreakdown(
                    currency_code='USD',
                    value='1.00'
                )
            )
            ]
        ),
        "prefer": 'return=representation'
    })

	order_body = ApiHelper.json_serialize(order.body)
	json.loads(order_body)
	# this is returned to the createOrderCallback function in javascript/paypal_frontend.js
	return json.loads(order_body)['id']

@blueprint.route('/paypal/order/capture', methods=['POST'])
def capture_order():
	paypal_client = return_paypal_client(client_id, client_secret)
	request_body = request.get_json()
    order_id = request.get_json()['orderID']
	orders_controller: OrdersController = paypal_client.orders
    order = orders_controller.capture_order({
        'id': order_id,
        'prefer': 'return=representation'
    })
	# this is returned to the onApproveCallback function in javascript/paypal_frontend.js
	return ApiHelper.json_serialize(order.body)
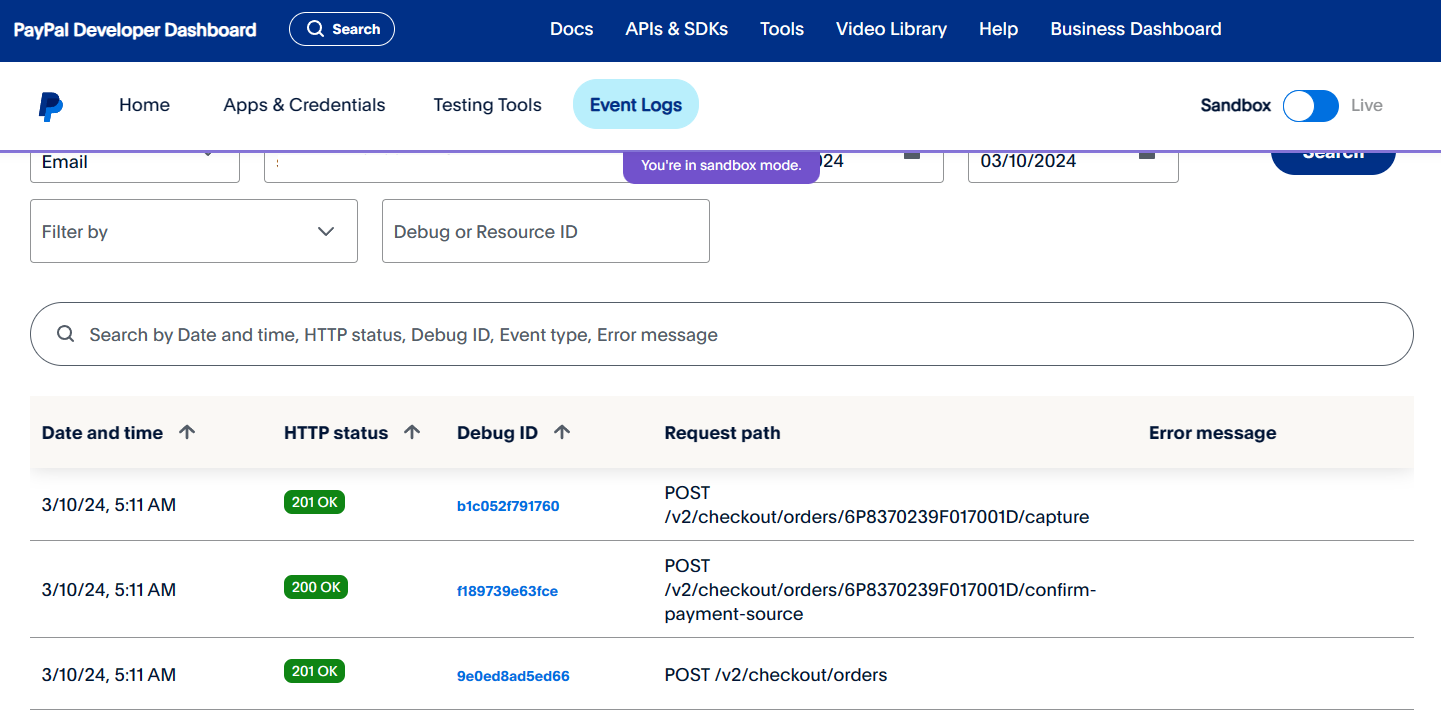
In https://developer.paypal.com/dashboard/applications/sandbox, on the Event Logs tab, there should be events for each transaction.
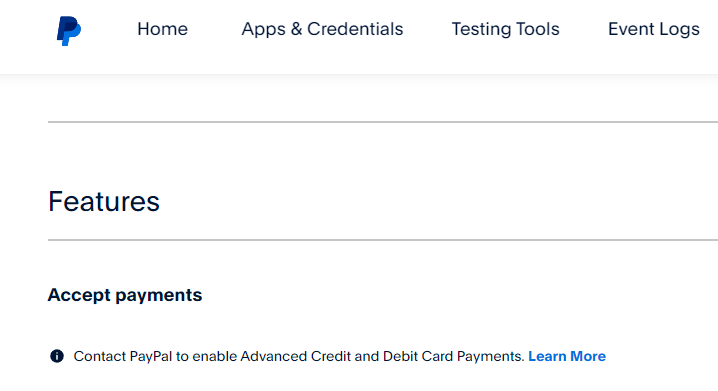
By default, your sandbox app should be setup with support for the advanced integration.
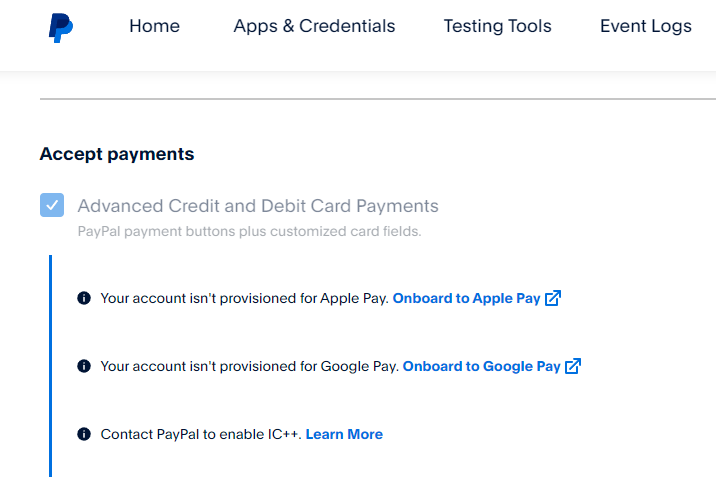
However, your live app may not be setup with support for the advanced integration. I just had to click on the Learn More link and follow the prompts to setup my live app with support for the advanced integration.
Did you find this article helpful?
If so, consider buying me a coffee over at 